This an AMT/ERTL kit #31223. It is a 1925 Model T Ford. I saw this kit on the internet first and fell in love with the roadster pictured. Two days later I was in my local hobby shop getting some paint for the F-51D Mustang I was working on and I saw that they had the kit. Since I was looking for a street rod or a muscle car to do next I snatched it up quick. This is one of AMT/Ertl's 'Builder's Choice' series, meaning the builder has a choice of how they want to build it,
NOTES: It has too many options to call out each one, but you can build it as a stock truck, stock roadster, custom truck, a custom roadster, or mount a keg shaped gas tank on the back. You also have a choice of engines to put in. Included are decals to put flames on the car (see building tips). This is a skill level 2 kit. It requires some painting to make it look like the box photo. This kit will give experienced modelers an opportunity to show off detailing skills, especially if they choose the custom options.
BUILDING TIPS: I don't know if this kit is based off of old moldings or not. I certainly hope it is, because the pieces are just awful. I absolutely hated it, and did not do as complete of a detailing job on it as I had planned because I got to the point where I wanted to get it off my workbench and work on something better. Many pieces have an outrageous amount of flash on them. Almost all of them were imperfectly aligned, meaning one half the piece is offset a little from the other half along the mold line. Keep putty, sandpaper and a good sharp hobby knife beside you at all times, you will need it. Inspect every piece carefully before you start to paint or glue and you should be able to catch any flaws before it's too late. Also the pieces seem to be molded very close to the tree. I had a hard time getting my snips in to cut the pieces off. (In all fairness, my snips are a little larger than most hobby quality because they do double duty as Radio Control snips and R/C materials are a bit more heavy duty because they have to be) Several pieces did not come off the tree cleanly and had small but noticeable gouges in them where I cut them. I feel that the plastic was too brittle and didn't cut cleanly. I was able to fix most of the parts that this happened on. If I couldn't fix it, I tried to position the parts so that the damage wasn't noticeable. If you opt to put on the flame decals you will want to cut small slits in the decal to allow the driver side hinges to poke through the decal (why are the hinges only on one side?) or sand them off completely, other wise the decal will wrinkle. (I learned the hard way) These decals don't conform to details as well as others I have used.
PAINTS REQUIRED (stock): Gloss Black, Dark Brown, Tan, Flat Black, Silver
PAINTS REQUIRED (custom): Glass Black, Flat Black, Silver, Red, Yellow (for optional engine part), body color
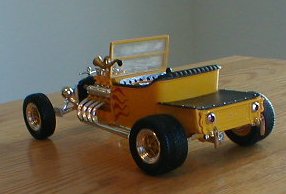
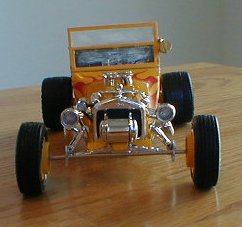
I chose to build it as the custom truck and used Testors rattle can Model Master Bright Yellow for the body, Flat Black for the interior, and Semi-Gloss Black for the truck bed cover. Gold details are Tamiya's Gold Plate. The bolts on the bed cover and wheels are Testors Model Master Chrome Trim Silver (one of all time favorite silvers, it's nice an shiny). The front window frame I used is the one intended for use on the stock version.
PICTURES: I had a several parts break during the assembly of this one. As a result I had to make some parts from scratch for the first time ever. This is not nearly as nicely built as I had originally imagined and I don't know what that hazy stuff on the windscreen is. I am going to try to get it off, soon.