What else you need:
1 plaited Polypropylene clothesline (this stuff is easy to tie and untie but does not slip, can usually be found at supermarkets - in quite nice colors!),
2 broom sticks (for epi 8 and under get 2 wooden curtain rods,) cut to 80 cm (31 1/2") length.
I piece of wood, 7 cm (2 3/4")wide, 2 cm (3/4") thick and 80 cm (31 1/2") long,
parcel string for temporary ties.
Let's start!
Double the length of your frame can be the max length of your warp. If you want to set up for a smaller single tapestry, add 2/3 of the length of your frame plus 20 cm (4") for tie up to the height of the proposed tapestry.
Use a warping board to measure out your warp, depending on the epi you want to use. There is no need to make a cross. See pic.
|

|
|
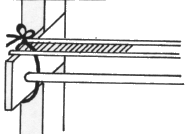
Place the reed on top of the ply wood holders and tie with a piece of string on both sides.
|
|
|
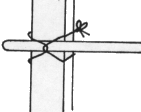
Tie one broomstick (curtain rod) to both sides of the frame approx 10 cm (8") above the reed with a piece of string.
|
|
|
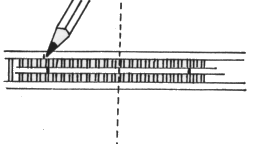
Place a ruler on top of the reed and mark the middle. Measure half the width of the tapestry you want to make to one side and mark the start with a pencil.(max warp width should not be more than the inside measurement of your frame, in this case start at the beginning of the reed.) It is always a good idea to place the weaving as centered as possible on to the frame.
|
|
|
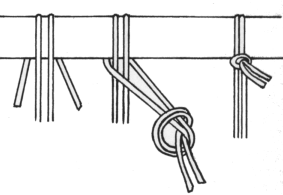
Sley the reed using a thin sleying hook, a crochet hook, a wool needle (or whatever works for you). If you sley single warps, sley 2, If you sley 2 warps, - pull the two warp ends up over the broom stick (curtain rod) come forward with a warp on each side and tie a knot tightly. Then pull both warps till they sit tightly around the stick. Continue until all warps are tied up.
|
|