|
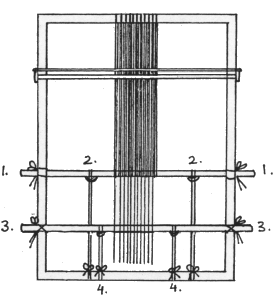
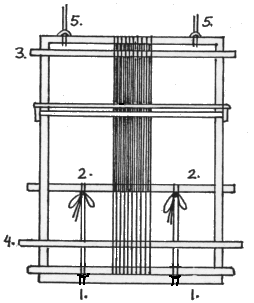
Now untie the broomstick - I'll call it "top stick" from now on, - and gently pull upwards. When warp tangles underneath the reed, pull with one hand downwards along the warp downwards along the warp and repeat along the width of the warp. Repeat pulling the top stick up, pull it over the top of the frame and down at the back of the frame until the loose warp end are just above the bottom end inside of the frame. See pic. I am used to do this on my own, but to start off, it is a lot easier when you have a friend or partner to do the pulling down, while you straighten the warp ends with both hands. Tie the "top stick" with string to both sides of the frame as before ( 1 ). Cut the clothes line into 4 pieces. Use two pieces, one on each side, to tie the top stick to the bottom of the frame ( 2 ). Tie the other broom stick (bottom stick) about 5 - 10 cm (4/8") above the loose warp ends to the sides of the frame with string ( 3 ) and tie to the bottom end of the frame with the other two pieces of clothes line as before( 4 ).
|

|
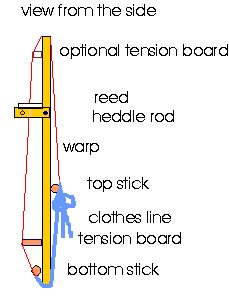
Untie both sticks, leave the clothes lines on the bottom stick. Take the clothes lines off the top stick. Push the bottom stick down until in line with the inside edge of the frame. Take one clothes line underneath and around the back of the frame, guide over the top stick, make a single not and bow to hold it there. Do the same with the second clothes line. Now adjust side by side. Undo the bow and pull down, retie and a bow, then pull the other side, retie and bow. Do this until the warp is really tight. The last time make a knot with the bow to make sure it doesn't accidentally get undone. Insert the piece of wood just above the bottom stick, the flat side parallel to the warp. Now turn the wood over towards you so that it sits at right angles to the frame. Push down as far as possible.
This is the tension board. You need to turn it back to flat position when you are not weaving. (when taking the frame in the car or on bus, always take the tension board out and carry separately, to avoid it slipping out and crashing on the ground). If you are not happy with the tension, you can insert another piece of wood, half the width, below the top of the frame, above the reed. push up as far as possible. Usually that is not necessary, but it depends on the type of warp.
The colored drawing shows the frame from the side, the front of the frame facing left.
When you are weaving and getting higher up, you then just loosen the clothesline, push the bottom stick down and around the frame and re tie the clothes lines. If I use the full width of the frame, I use another clothes line in the middle (so that there are 3 ties). Make sure not to tie the sticks too close towards the ends of the sticks.
Use the other 2 pieces of clothes line to tie the frame so that it can hang on hooks or wherever you want to hang the frame from. If you are using an easel, use G-clamps (C-clamps) to fasten the frame to the easel. In that case you don't need the 2 pieces of clothes line.
You are now ready to put the heddles in.
|
View from the front


|