General
Directions Cutting
Layout Outershell
Innershell
Assembly
Assembling
Bag
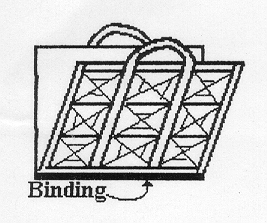
Each side of
the tote bag is finished independently. The inner panel and the outer shell are stitched
together and bound with a 1/2" binding. A laminated foam board is inserted between
the 2 layers for support and rigidity. The 2 sides are then stitched together at the
bottom edge and a binding is applied to finish the tote.
Assembling
"Side A" and "Panel A"
- Prepare a flap to be placed on the
inside of side "A". It will cover and hide the laminated foam board.
- Using #1 plain colour (navy), cut a
piece of fabric the same
- size as "side A". With raw
edges even and wrong sides
- together, baste the top and sides
together, (but not the bottom)
- keeping the handles out of the way.
- With wrong sides facing, place
"panel A" on "side A"; have the
- raw edges even at the bottom.
- Make sure that the pockets open toward
the top. The panel A will overlap the flap (applied above) creating the "slit"
or hidden "pocket" that will store an l8"x24" cutting mat (and any
other large flat object). Baste the layers together along both sides, but not along the
bottom. (See "Hanging It Up on Your Wall!")
- Using #6 print, cut 4 strips 3"
wide x 42" for the binding. Prepare binding as in "Pocket construction #5."
This binding is wider; use a 1/2" seam instead of the 1/4" seam, and stitch to
within 1/2" of the comer. Apply the binding to both sides and across the top of
"side A" (fold handle out of the way). Turn binding to the back and slipstitch
to finish. Using the unstitched opening at the bottom of "side A", slip the
laminated foam board between the 2 layers. Trim the board as required. To facilitate
sewing sides "A" and "B" together in the next step, cut the board 1
"shorter than the side.
- Finish "side B" in the same
manner (omit flap instructions).
 Putting it all Together
Place the 2 completed sides together with the inside panels facing each
other.
Baste together at the bottom edge. Apply the binding to the lower edge,
this will hold the 2 sides together. Slipstitch binding
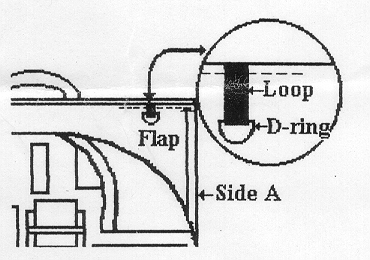
Hanging
the Tote on your Wall
Use the tote
to store equipment in the sewing room. Hang it open on the back of a door or on the wall.
It will keep valuable equipment safe and handy (see enlargement, diagram above).
- Using solid colour #1, cut 1 rectangle
2"x 10". Fold in half lengthwise, stitch the long edge. Turn. Press. Cut in half
so that there are 2 lengths called "loops".
- Thread the loops through 2
"D" rings. Before applying the binding, baste the raw ends of the loops to the
top edge of side A, 5" in from each ends. The loops are secured by the binding.
- Hang the tote to hooks (on wall) using
the D-rings. Prevent undue pressure to the tote (& the foam board) by making sure that
the hooks and the D-rings are equidistant.
Sign your tote and enjoy! Happy Quilting!