 |
|
 |
| This tutorial is designed to explain how to create a photo frame, for use in PSP7, like the one at right. This one is created with a white background, but you can match your frame to any page background you like. |
 |
| I have compressed and reduced the images on this page, so the clarity is alot less than what you can expect from your finished product. |
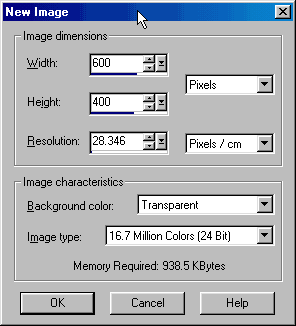
| Lets Begin I am going to assume that you know how to master the basics such as opening new files. When I use the phrase go to, move your cursor to the menu item named next. ie go to - layers, move your cursor to the layers button on the top menu and click. You'll get the hang of it. Step 1. Open 2 new files. Use the settings illustrated at right for first file. figa. Call this file A. The second file can be 150 width, 150 height on a white background. Call this file B. |
 |
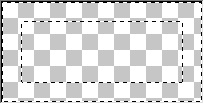
| Step 2. Using file A. go to - selections - select all. the marching ants will appear (the broken line). go to - selections - modify - contract. Set pixel number at 20 then go to - selections - invert. fig b. |
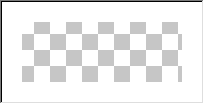
| Step 3. Flood fill the border you have created using the same colour/background as the page your finished frame will appear on. I am using white. go to - selections - select none fig c. |
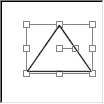
| Step 4. Switch to file B and use preset shapes from the toolbar to draw a triangle. fig d. |
| fig a. |
 |
| fig b. |
 |
| fig c. |
 |
| fig d. |
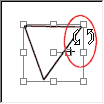
| Step 5. Position your cursor over the right centre node & the arrows illustrated should appear. Click and drag the triangle until the top edge is horizontal. fig e. |
 |
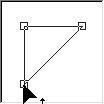
| Step 6. Select the object selector from the tool palette, then select node edit from tool options (you can toggle your options window on & off using the letter O on your keyboard). Click and drage the right and lower corners of the triangle until all three lines are perfectly straight giving you a right angled triangle. fig f. |
 |
| fig e. |
| fig f. |
| Step 7. Use the magic wand to select the triangle. go to - layers - merge - merge all. fig g. |
 |
| Step 9. Flood fill the triangle using the cement pattern. Click here if you need more information on selecting patterns. fig h. go to - effects - 3D effects - buttonise Select settings as follows: height - 20, width - 20, opacity - 75. Step 10. go to - edit -copy. |
 |
| fig g. |
| fig h. |
| Step 8. Change the background colour to #DED6C4. Click here for hints on how to change colour. |
| Click here to continue. |