Index | Ex 2-1 | Ex 2-2 | Ex 2-3
Ex 2-2 Lake Cabin Doors
Exercise 2-2: Doors
In this exercise you will add doors to your cabin floor plan.
- Open Lake Cabin.rvt created in exercise 2-1.
Placing doors:

- Click on the Door tool under
the Basics tab in the Design
Bar. (Figure 2-8)
Notice that the Options Bar has
changed to show options related to
Doors. Next we will modify those
settings.
The Type Selector indicates the door
style, width & height. Clicking the
down arrow to the right lists all the
doors loaded into the current project.
The default template project that we
started from has several sizes for a single flush door. Notice that the
there are two standard heights in the list. The 80” (6’-8”) doors are
the standard residential height and the 84” (7’-0”) doors are the
standard commercial door height.
- Change the type selector to Sgl Flush: 36” x 80”.
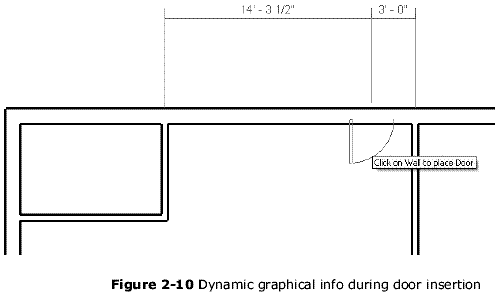
- Move your cursor over a wall and position the door as shown in
Figure 2-10. Notice that the swing of the door changes depending on
what side of the wall your cursor is. (Figure 2-10)
- Click to place the door. Revit
automatically trims the wall.
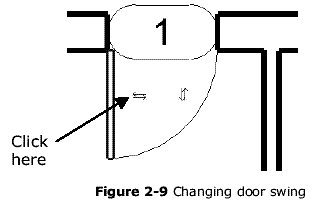
- While the door is still selected, click on the change
swing (control arrows) symbol to make the door swing against the wall.
Revit allows you to continue inserting doors until you select a different
tool from the toolbar or design bar.
- Insert the doors into the bedrooms as shown in Figure 2-1.
The exact position is not important in this exercise.
- Change the Type Selector to Sgl Flush: 30” x 80”.
- Insert a door into the bathroom.
Deleting doors:
Next you will learn how to delete a door when needed. This process
will work for most objects (i.e., walls, windows, text, etc.) in Revit.
- Insert a door between the two bedrooms.
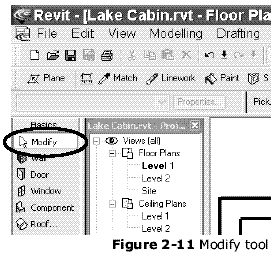
- Click on the Modify tool on the Design Bar. (Figure 2-11)
Tip: Any time you press the Esc key Revit reverts to Modify.
- Click on the door you just inserted and press the Delete key on your keyboard.
- Save your project.
Index | Ex 2-1 | Ex 2-2 | Ex 2-3