
Index | Ex 2-3 | Ex 2-4 | Ex 2-5
Exercise 2-4: Roof
In this exercise you will add a simple roof to your cabin.
Sketching a roof:
The fly-out prompts you for the method you want to use to create the roof.
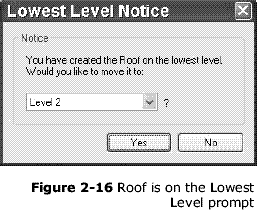
Roof is on the Lowest Level warning Revit notices that you are on Level 1 and asks you if you want to switch to another level. In our case we want toswitch to Level 2. (Figure 2-16)
You are now on level 2 and ready to sketch the roof footprint. Notice the Level 1 walls are light grey because they are on the level below the current level.
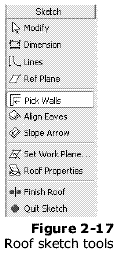
Also notice the Design Bar has temporarily been replaced with Sketch options relative to the roof (Figure 2-17), as with the Options Bar (2-18).

You should be back on Level 1. You can see this in the project browser
(i.e., Level 1 is bold).
