|
|
'87
Cherokee XJ
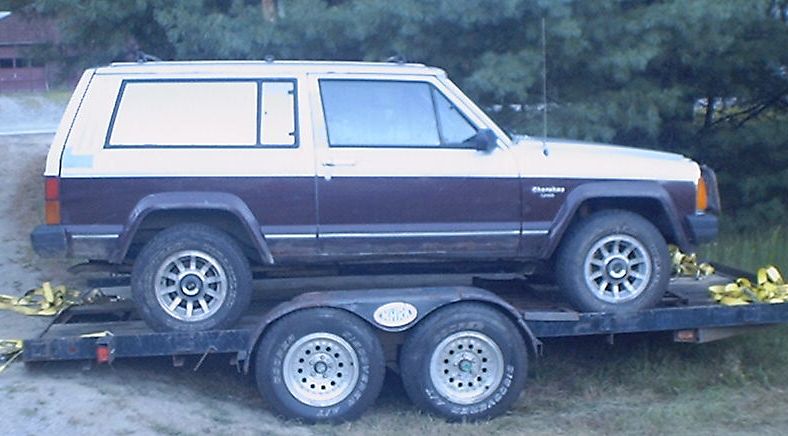
This is my '87 Jeep Cherokee with Off Road package.
It was purchased for $250 with 322,000 miles on the odometer.
Believe it or not it ran fine and I was able to drive it onto the trailer
when I purchased it, and I drove it around the yard when I got home.
It needs some work, but its a solid XJ that will hopefully see a lot more
use before it comes to the end of its life. The following pictures
were taken the day I purchased it.
As it was coming off the trailer. Not pretty, but not too bad
either. |

Dana 44 rear! Great score for a $250 XJ! |

I finally own a manual XJ. The AW-4 in my '88 held up well, but I
prefer a 5 speed. |

332,000 miles and 50 lbs. of oil pressure. I think the engine has
been changed. |

Full skid plates underneath, including gas tank, t-case, and
under the engine. |

Jeep actually did something to the vehicle besides putting a
sticker on. |

This is pretty clean for any older XJ around here, and its down
right beautiful for one with 332,000 miles. |
|
|
|
I decided to use this vehicle as an
example of just what you can do with very little money and some time spend on a
nice custom project. No corners will be cut on the building of this Jeep,
but every dollar spent will be carefully thought out. The goal is to get
the most reliability and best off road performance without investing thousands
on custom parts. Every dollar spent will be added up throughout the
building of this Jeep. Some parts will have the actual cost listed, some
will be listed as free if they came from a part's vehicle, unless the part's
vehicle was purchased only for parts for this project. Some people have
part's vehicles, and others have parts left over from previous modifications, so
its difficult to judge how much you would spend to duplicate this project.
You will find daily subtotals listed throughout the page, and a running total at
the bottom.
Update: 9/1/02
I removed the windshield from the Cherokee
to see how bad the rust problem was, and got a pleasant surprise. The
windshield frame wasn't really very bad, just some minor scaling rust and
pitting around it. The leaks were from an improperly installed windshield
seal! I cleaned up the frame with a sanding disk on an angle grinder, and
decided to use a sandblaster to properly remove the remaining rust before
painting and installing a new windshield.
| $1.00 |
Wire to remove old windshield with |
| $2.00 |
Sanding disk to clean up windshield
frame |
Update: 9/2/02
Well as usual I strayed from my plans. My original plans
called for 5-6" of lift for this Jeep, but I flew by that. Since I
can't ever do anything the "normal" way, I came up with my own
suspension. I started in the rear and decided to use a set of stock front
coil springs, placed between the axle and frame. Instead of a quick and
dirty home-built mounting system, I took the time to carefully cut the control
arm mounts and lower coil spring buckets from my 2 wheel drive '94 XJ front
axle. I also removed the upper coil mounts from the inner fenders of the
'94. Its nice to have part's rigs so handy.
For testing purposes I didn't want to have to remove the whole
rear suspension from the '87 to test fit the springs. I was lucky enough
to have my deceased '88 sitting in my driveway, up on jackstands. I jacked
up the rear and tack welded the spring mounts to the axle and frame, and
carefully blocked the tires of the rear axle. I had to do this since I
don't have control arms built yet. Remember, this was just a test fitting,
to see how the springs would make the Jeep sit. I put the springs in the
rear and let the weight of the Jeep sit down on them, then measured the height
of the Jeep. Measuring from the fender flare lip to the center of the
axle, I compared the height to the '87 and found I'll be gaining 8-9" of
lift. Since I like the rear a bit higher than the front to allow room for
additional weight, and also factoring in the fact that more weight will actually
be on the rear coils when a front axle is in place instead of having jackstands
placed near the lower control arm mounts on the front of the frame, I should be
able to run 8" front coils. If there is any adjusting that needs to
be done I can use coil spacers to fine tune ride height.
Since I will be designing my own links for the suspension, I'll
factor in the possibility of going slightly higher without having to redesign
the whole suspension. I could simply add coil spacers front and rear to
gain 2-3" at each end if I find I need more height in the future. I
don't like a vehicle to sit too high though, since I do a lot of sidehilling and
off camber driving. Things can get very tippy at times like those.
Below you will find pictures of the height testing. They aren't much to
look at, but they do give an idea of the ride height that will be
achieved. The wood block under the rear of the Jeep isn't supporting any
weight, its just there for safety reasons. And no, that shock isn't hooked
up to the axle.
Update: 9/3/02
I sandblasted the windshield frame and cleaned up
around it. I found a couple tiny pinholes in the metal, but the POR-15
paint should take care of those nicely. I blasted the entire windshield
recess and also all metal which is hidden below the plastic trim that covers the
defroster opening. There was some minor surface rust starting there, so I
took care of it before it could spread.
| $8.00 |
Sandblast sand |
| $5.00 |
leftover POR-15 from another project |
Update: 9/4/02
Although I had a perfectly good (almost) windshield
sitting in my '88 XJ, I broke down and invested the big bucks for a brand
spankin' new windshield. I did the Cheap Bastard thing though and bought
it cash-and-carry. The "insurance cost" of the windshield was
over $300, and the installed price was $168. I bought it for $125.
Its the biggest expense other than the purchase of the XJ, but at least I didn't
have to deal with getting the '88 windshield out, and that windshield wasn't
exactly perfect. There were several small stone chips, and the entire
windshield looked like it had been sandblasted. It had tiny spots all over
it. It turns out it was the original windshield, so almost 15 years and
150,000 miles can take its toll.
One thing I did fail at was the acquisition of the
proper urethane windshield adhesive. The windshield shop gave me a line
about how their company can't sell it to me because it requires special
equipment to preheat the sealer before installation. A friend used to work
at another branch of the same company, and every time their heater broke down
they would just set the tube of sealer in a pail of hot water. I think I
can handle that with my automotive experience. I'm going to try another
place tomorrow with hopes of finding the proper sealer.
I did manage to get a little more accomplished
today. I removed the rusty factory brush guard and front bumper, and found
that the bumper brackets were welded to the factory tow hook brackets. I
had to torch off the bumper brackets to remove the bumper. I'll be
removing the tow hook brackets so I can grind off the weld, clean up the
brackets, and sell them on EBay. I'll do the same with the factory
transfer case skid plate since I'll be making my own transmission crossmember
and skid plates to go with the custom suspension. Maybe I'll be able to
get back some of my money to fund other parts of the project.
After removing the bumper and brush guard I removed
both front fender flares and the plastic inner fender liners. I used a
sawz-all to trim the front part of the fender even with the bottom of the
grill/parking light assembly. I also cut off the entire fender lip,
removing all of the contoured material. That gained me close to 1
1/2" of fender opening. That left me with a new low point, the inner
fender pinch weld. I carefully hammered that over out of the way, trying
to make it look as decent as possible. I was surprised that it actually
came out looking fine. I trimmed a little extra material from the lower
rear part of the fender to allow for tire clearance while turning.
 |
 |
Tomorrows plan is to trim the other fender, then
possibly work on a little of the remaining rust. Hopefully I will be able
to Herculine the Jeep soon. If I get time I'll also start removing the
carpet. The floor is still soaked from that leaking windshield, and I'm
not looking forward to what the floor looks like under it. I hope I can
get away with just sanding out any rust, but I may have to sandblast it if its
too bad. Once the floor is cleaned up I'll Herculine that in black, since
black is the cheapest color.
Update: 9/5/02
Something I had not mentioned is that I changed the
passenger side tail light out of the XJ because the one that came with it was in
perfect condition. I had one from my '88 that had a minor crack at the
very bottom, so I swapped them so that I wouldn't destroy a perfectly good tail
light while off road. I listed the removed tail light on EBay, and it sold
for $14.50, and I'll subtract that money from what I have invested in the
Jeep. I also sold the digital clock for $24.50. I hardly think a
clock is going to aid in the trail worthiness of the Jeep.
I removed the rear bumper today and found that the
sheetmetal behind it is actually in pretty good shape. There was some
minor damage to it, but no real rust. I straightened out the minor dents
and am ready to start building a rear bumper. I trimmed the other front
fender and one rear fender today. I didn't go crazy on the rear fender
because unlike the front, the rear is double layers. I am going to have to
weld the layers back together now that I cut out the pinch weld/fender
lip. If I wanted to get into more major body work I could trim a lot more
than I did, but for now this will have to do, because I don't want to get into
the hassles of major reconstruction.
As I was sitting around tonight thinking about the XJ
mods, I started thinking about tires. Are the 34's too small? Are
they too narrow? Will they work well enough in all kinds of terrain?
Now I'm considering a possible alternative, the Goodyear MT-R. They seem
to be a good all around trail tire. Now I just have to decide.
Update: 9/6/02
Not much progress today. I had to seal a
driveway, take the dog to the vet, and Fed-Ex the deposit for my shop, so
the day was pretty full. Even so, when I got home with the dog, before
going to do the driveway, I was able to install the windshield. When I got
home I put on the trim clips and tried to remove the one remaining fender
flare. I suspect someone has had that one off before, since the nuts don't
match the other three. They are 11mm or 7/16", so I quit and came in
the house. Better luck tomorrow.
Update: 9/7/02
I got a bit more accomplished today. I did some
minor "Cheap Bastard" mods to the front axle to increase articulation
and axle droop. This involved eliminating the existing lower shock mounts
and trimming the spring mounts so the lower control arms don't hit them during
droop. After that I removed the stock springs and started working on the
lift. I'll be buying a set of 8" coils to go with the rear coil
setup, which I should be installing early next month. Until then I'll be
running a home brewed combination lift: Rough Country 3" coils in the
front, combined with 2" Budget Boosts, and Dodge truck rear springs and
3" blocks in the rear. I personally hate blocks, but this is a
temporary lift which will be used for one off road trip only, then the 8"
lift will be installed and completed properly.
Today I got the front coils installed. Man do I
get serious droop with the trimming I did! I still need to fabricate some
temporary lower shock mounts and install longer brake lines. If I have
time I'll take a few pictures of the front lift tomorrow, then start working on
the rear lift. I hope I don't run into any driveshaft problems when I do
the rear. Since the lift is temporary, I don't want to invest any money in
a custom driveshaft or SYE just for one event. If I have to I'll rotate
the pinion up at a big angle to relieve the U-joint angles. I won't be
worried about vibrations or wear of the joints since I won't be driving the XJ
on the street like this.
Update: 9/13/02
Over the past couple of days I didn't get a whole lot
done, but I did get in the parts for my crossover steering conversion, and today
I managed to get the rear springs completed. The Jeep now sits level and
the rear articulates a fair amount. Its nothing impressive, but this IS
only a temporary setup. I'll be deducting the costs of these temporary
parts once I get to work on the real lift, the rear coil conversion and front
8" coils.
I decided to post a section down here at the bottom of the page to let you
know what the future plans are for the XJ. I'll list what I plan to do for
modifications, and you can see how the plans differ as I actually follow through
on them. My plans are always changing, usually quite drastically, so this
could be interesting for you.
Engine:
The engine will remain stock with the exception of adding a snorkel. I
know that really isn't an engine modification, but since it is part of the
intake system, this seems like the most logical place to list it. At this
time the plan is to use my old reliable snorkel design, and hook up the Cherokee
intake hose to a Samurai airbox, which I'll attach a Shop-Vac hose to and run it
up the driver's A-pillar. The Samurai airbox seals better than any other I
know about, and the hose fits it perfectly.
Body:
Herculine the exterior red after repairing the rust and finishing the fender
trimming. I'll Herculine the interior floors black after removing the
carpet and cleaning up the floor. The actual Herculining will also have to
wait until after the suspension mounts are welded in place, otherwise I might
melt or burn the Herculiner.
I'll be building custom front and rear bumpers, possibly with a swing-out
tire carrier for the rear. I hate the idea of having my rear vision
blocked though, so I might put the spare in the rear of the XJ and build a shelf
over it. I'll be building something to use as rocker protection. I
don't know yet whether I'll build actual rock rails or just weld in rocker
guards. Since I'll have so much height I may just go with the rock rails.
I will be making up some custom doors for the XJ. I talked to Neal
Hoover about this on a LONG road trip. I want 3-piece doors. The
main body will be a fabricated cage lower half, with hinges and a latch like the
factory doors. I can use just that as doors on a warm day if I want the
open air feeling. If I will be driving through a lot of mud or just want
to enclose the lower part of the doors, I'll have acrylic outer skins that can
go over the framework. For either when the day turns very cold or warm,
I'll have upper portions that can be attached, like Jeep half doors have.
Then I'll be able to run the heater or A/C without fear.
At a future time I may start building an external skeleton. My friend
has an actual tubing bender that he builds race car roll cages with, and it
would be perfect to bend up tubing for an external skeleton. I don't
really care for the idea of the extra weight up that high though, so its just a
thought at this time.
Suspension:
Relocated upper and lower control arm mounts, and longer control arms.
I have the actual arms ordered, they are a cheap and dirty solution: I ordered
3-point hitch bars from a tractor supply store. They aren't machined as
precisely as automotive quality parts, and the heim joints wouldn't last as
long, but they are cheap to buy, cheap to replace the joints, and they should
work fine for a vehicle which will spend most of its remaining life on the trail
or on a trailer. The rear suspension will be a similar design, but the
frame side mounting positions will be changed a little from the front.
Where the front links have to be located so that the axle will move up and down
without rotating to keep the caster angle the same, I actually want the rear to
rotate. This is because I'll be using a CV rear driveshaft, and I'd like
the rear pinion to stay in line with the driveshaft to minimize
vibrations. Of course the rear suspension will be converted to coil
springs. Long travel shocks mounted at an angle to maximize the travel
will be used front and rear.
| Jeep Purchase Price |
$250.00 |
| Windshield removal wire |
$1.00 |
| Sanding disk |
$2.00 |
| Sandblast Sand |
$8.00 |
| POR-15 |
$5.00 |
| Windshield |
$125 |
| Sold tail light |
(Happy Neal?)-$14.50 |
| Sold Clock |
-$24.50 |
| Budget Boost |
$25 |
|
U-bolts |
$32 |
| Total: |
$404.00 |


Update 4/01/03
All work on the XJ was put on hold while I was looking for a place to live
over the winter. I was stuck on a couch for the winter, while the poor XJ was
abandoned in the woods at my friend Don's house. Spring is coming, and its
getting to be time to get back to work on the XJ. I have made some progress
since my last posting.
The first order of business is to report how the temporary lift and
suspension mods worked on the trail during a trip to Livingston, Kentucky.
The articulation was simply awesome. In fact, the front axle twisted so
far the front coils had a habit of falling out! I had to rig up some
limiting straps to get through the weekend. The next thing I found was
that the track bar I made up just won't cut it off road. Its more than
beefy for circle track racing, but thats where it should stay. I ordered
some 1" ID, 1.5" OD steel tubing from Avalanche Engineering to use for
the tie rod, drag link, and track bar. I also ordered 3/4" rod ends
from them.
Before making up the steering parts I need a strong axle suitable to mount
rugged steering parts to. I have a Grand Wagoneer Dana 44 which is just
about the perfect width, but has the wrong wheel bolt pattern. Well I'm
going to fix that by using the knuckles and outer axle parts from a late 70's
Dodge pickup with full time 4x4. The Dodges will full time 4x4 didn't use
locking hubs, so Dodge decided to make the wheel pattern smaller...and it just
happens to match an XJ. It would have been nice to have manual hubs, but I
guess I can live without them. First off, this IS a trail-only vehicle
which will see very limited street use. Wear is not a concern...strength
is. Next, many XJs didn't even use an axle disconnect, so all of the front
drivetrain parts spin while the vehicle is moving, even in 4x2. I will
have essentially the same setup, so I shouldn't have any problems. I
already have all of the parts I need for the hybrid axle, so I just need the
time to do the work.