
The Details: An excellent crag which nowadays seems out of vogue for two reasons: (1) the proliferation elsewhere of sport crags bristling with bolts; and (2) the closure of the descent ladders. Let me assure you neither should keep you away from this place, because the access here is brilliant, the routes are great, long and on fantastic rock, and you're practically guaranteed to have the place to yourself. And the ladders were rusty and scary as hell anyway, so who cares!!?!? :-)
Access: 90min drive from Sydney CBD, 5min drive from Katoomba. 5min walk to rap points. While you can cycle from Katoomba station, it makes for a bloody long day - so bring the car. Once you find Glenraphael Drive (off Cliff Drive), there are two descent options. It's only 5mins from the carparks to the rap points. Dixon's Ladders are basically in the middle of the crag, so choose your descent based on where your climb is relative to the ladders. The descent details are as follows:
1) 100 Foot Slab Rap: Drive down Glenraphael Drive (windy dirt) until views to the W (R) appear, at which point a parking space appears on the right, with a locked gate 15m down to the right. Park here. From the locked gate, walk 250m down the road to the switchback, then walk 20m W through the crash barrier to a small rock platform and nice views to the R of Rhum Du and the Boars Head. From the rock platform, head L (S) 50m down a well-used track to a cave (popular for sleep-outs), then around R to a ledge running N along under the upper cliff. For about 100m, the ledge gradually narrows and the upper cliff becomes a lovely orange 25m wall, unfortunately undercut by blank overhangs. (Some new routes have been bolted at the far left end of this wall). A striking arete also becomes visible on the lower cliffline - this is Day of Reckoning (classic 21). At the end of the orange overhangs, walk 30m down the gully/track towards the top of DoR, then head L onto a narrow ledge above the lower cliff proper. The rap chain is at head height above the start of the ledge. The 28m rap sends you straight down 100’ Slab pitch 2 to the 100FS halfway ledge. To get to the bottom, head 50m R (S) along the 100FS halfway ledge to where the ledge narrows, here there is another chain around a small tree for a 15m rap. Climb X starts about 20m R if you're keen.
2) Herbaceous Gully Rap: Continue along Glenraphael Drive past the locked gate for 500m to a small heath-enclosed carpark on the R. Walk 80m further along the road to the "obvious gumtree" described in the SRC Guide. The track here is now overgrown, so head about 120m further along the road, which curves R uphill then starts to curve back left - here there is a small dirt cutting on the right (1m high), with a small cairn marking a much better track than the previous one. Follow it easily 100m towards clifftop, trending R & down for 50m at the end, then back L along under upper cliffs for 80m. Herbaceous Gully is then obvious, a major cleft in the lower cliffs. As you approach, the rap rings are on the closer side, about 30m from the deepest point of the cleft. A worn track heads steeply down through bushes to a big-arse rap ring. Take care as you approach it. It's a 30m rap (can be done as a 20m rap with extra downclimbing), then wander down gully to a 25m rap off a tree to the bottom.
NB, About 15m before the "obvious gum tree" in the SRC guide, there is another good track, but this leads to the top of Cave Climb, necessitating a bushy traverse 120m further round to HG.
A view from Cahill's Lookout of the southern section of the crag. The age of this photo is given away by the path of Glenraphael Drive, which even splits in one section! It's not anything like that these days! The Boar's Head is clearly visible in the foreground, which is ascended by the historic route Tooth and Nail (70m 17) one of Australia's earliest 17s, first climbed in 1961 (yes that's right, before Lieben! (Warrumbungles)), and protected with only one sling runner! Also marked is the Ruined Castle, a smallish jumble of pinnacles on the hillock about 8km away in the Jamison Valley SE of Narrowneck (with the Western ridge of Mt Solitary visible just L of the Ruined Castle).
Fuddy Duddy (** 90m 15) climbs the front of the massive detached 30m-high flake, and then up the magnificent major shadowed corner to the chimney high on the cliff. On Both Sides of the Glass (*** 65m 18), probably one of the finest middle-grade aretes in the country, goes straight up the arete, with an exhilarating hand traverse out the roof at half height! You can finish on the grassy ledge (walk off right), or add a pitch up the easy slabs above. Finally, Cave Climb (** 65m 13) follows a right facing corner, and is a must do for those at the grade.
Described L to R, facing the cliff.
* LSD 12m 20 (OS)
Probably best to stick clip. Good moves to lip, then to top (or downclimb).
Day of Reckoning viewed from above Climb X, with Rhum Dhu in the background.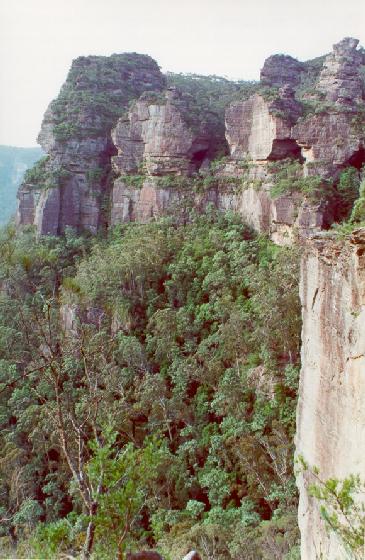
|
Day of Reckoning - looks much more impressive from below!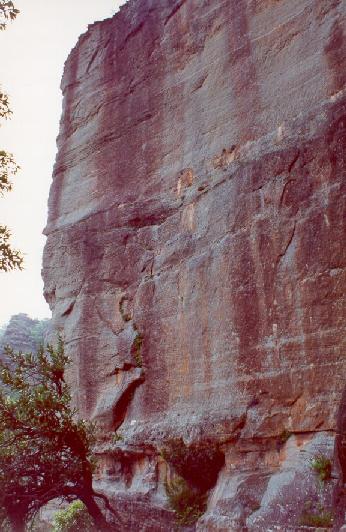 |
|
* 100’ Slab 25m 10 (OS) Best to do only P2, which is great. Great passive gear, mostly small but take a #9 hex and a #3.5 Fr. Deduct a grade or two if you stray right onto the face at half height.
* Climb X 55m 16 (OS)
|
|
** Fuddy Duddy 95m 15 (OS)
The second two pitches are both outstanding - would easily be a 3 star route if not for the crappy first pitch. Fuddy Cracks might be a better approach. Can be done with a single #5 camalot, and nothing else above #3 camalot. 1) (35m 13) Up outside face of enormous flake. No good pro til a #0.5 friend break at 12m below small rooflet (others report a reasonable #1 Friend placement in a pocket at 5m height), and the odd cam after that. Belay on top of block (2 chopped bolts), with good medium hexes (plus a hidden bolt?) in the main corner. 2) (*** 30m 15) A magnificent pitch of corner crack climbing. Up past a great #8 hex to the infamous offwidth section. Clip a good BB, then crux thrutching gains a stance to place a #5 camalot. Easier offwidth moves gain the hand/finger crack above, and awesome corner work with great pro continues for another 15m to some steep moves to gain the ledge. DBB belay back left. An excellent pitch. 3) (** 30m 14) Another good pitch. Some hard moves over bulge past the pin lead R to the corner/chimney. A crack in the left wall provides some pro, then squirm up for about 8m (not your usual type of climbing - fatties won’t make it!). Easier to a pretty poor belay on top. If you don't like this climb f*** off to Centennial Glen or Nowra and don't come back!
* Knight's Moves 15 121m (OS)
A reasonable ramble. Start 2m L of scrubby corner with a small tree on a ledge about 15m up. 1) (33m 11) Up the wall about 8m, then head about 12m L along ledge, and up below small bush for about 8m. Head all the way back along ledge to above start, and belay here or just up a bit next to tree (depending on rope drag). You could probably avoid these traverses by going direct up crack/corner, but it'd be harder. 2) (* 33m 14) Quite run out. Traverse R along ledge 15m to BB, then up about 10m to good cam slot, veer R to ledge, with a good thread (you might have to dig dirt out of it), but not much else pro here. 3) (* 30m 15) Traverse R along the lower of the 2 ledges, towards 2 mediocre BB and big exposure. Step up onto higher ledge just below them, and continue up 8m (nice, crux) with no good pro (maybe a cam in shallow pockets) to spacious ledge (lunchtime!). 4) (10m 13) At R end of ledge, pull up onto block, and continue up through trees to slab. 5) (15m 10) Up slab to top. Walk back to dirt road. We only found 13 pro placements on the entire climb, so be prepared for a bit of run out.
*** On Both Sides of the Glass 65m 18
An absolute classic, made more remarkable by being one of the few classic square Blueys aretes at a medium grade. The variety of each pitch makes this one of the best routes in the Blueys. Rebolted Feb 2001. 1) (*** 25m 18) Start up easy unprotected slab on L of arete, to stance on arete and #0.5 cam slot at 8m. Nice climbing up arete past another cam leads to bolt. Tricky moves past the bolt can be done on either side of the arete, more steeply on the L, or more balancy on the R. From stance, jugs out steep bulge reveal cam placements on lip. Some strenno moves from the jugs gains tenuous moves up thin crack (wire) and a balancy step R to jugs. A bolt protects the intimidating final bulge, which goes easily on big jugs to DBB. 2) (** 10m 18) Jump to jug, then a big crank gains an awkward stance at the break to clip BB. Swing R with poor feet to clip fixed ‘biner, then magnificent heelhook moves lead out over the void to the arete. A calf-hook gives your photographer time for some happy snaps, then swing onto ledge with good jugs to BB and #4, #5 cam belay. 3) (*** 30m 13) Another magnificent pitch. Head up and left off the belay (beware some fragile holds). Pikers then go up a little first, but its better to go directly L to the arete, to include a wonderful exposed thin move over a little overlap. A bolt then protects a magnificent 15m section up the airy exposed arete on continuously small holds - magnificent climbing. Carry on to the top and DBB. Exit R.
** Cave Climb 65m 13 (OS)
Another ripper of a route. 1) 35m 13 Big jugs over undercut start gain BB. The fierce reputation of the start is somewhat exaggerrated - if you can find the good holds around the arete just above the first bolt. From the second bolt the climbing eases a little, though don’t underestimate the smooth groove (with good pocket for pro). Veer up and R past 3rd BB, then steeply on big holds (beware loose block) to tree. Great laybacking and stemming leads up corner to cave and DBB. 2) 30m 10 Good exposed moves lead R out of cave, then lovely easy laybacking leads to the top (beware the odd fragile hold up high).
* Tal 45m 13 (OS)
Alright. 1) As for Toll, then head out left onto face to FH. Tricky moves left and up to jugs and small cams, then to BB on ledge - back it up with a #8 hex round L and a #1.5 friend up high. 2) Easy slab to dirtledge, then tricky corner to top. Good #3 camalot and #10 hex 5m back.
*** Toll 55m 16 (OS)
Fan-bloody-tastic! Pity about the bolts, but I guess you’ve gotta allow for the fact that the first ascent was not only pre-friends, but pre-hexes! They don’t detract from the climbing though, which is fabulous, up an awesome corner. Double (or triple) up on #2 camalots, take cams to #4, and have yourself a ball!
© 2002 Will
![]()