Monkey's Bum
Climbing style
Guidebook
How to get there
Associated links and references
Number of routes
About 10.
Overhanging orange sandstone. Only a handful of routes, but worth at least one visit to get those muscles working. Grades from 17-23.
• Craglets (4th edition) paper guide
Located on the eastern shore of Hobart, this area is close to both Gunners Quoin and Mad Monkey's. This info from Craglets which also has a good map. Access is via the East Derwent Highway. About 5km north from the Bowen Bridge the road crosses a creek just before it sweeps around to the L. Park on the R in the area provided. Go up the valley for about half a kilometre. After a sub-valley is passed on the R, the valley opens up to a large, grassy basin. The cliffs are visible from here. Apparently it's only about a 10 min walk.
• Craglets (4th edition) paper guide
|
Number of routes About 70 routes over a handful of areas.
Climbing style
Guidebook
How to get there
Associated links and references |
 Above: Climbers at the Paradiso. Photo: Unknown. Jonothan Nermut Collection. |
Mount Wellington (The Organ Pipes)
 Above: Sam Edwards on his route Slap Dancer (26), Alberts Tomb, Organ Pipes. Photo: Roger Parkyn |
Number of routes More than 300 routes over numerous buttresses.
Climbing style
Guidebook
How to get there [click for map]
Associated links and references |
North Esk
Climbing style
Guidebook
How to get there
For Riverbend, drive to Coralin bridge and park 100m further on at the first gate on the L (don’t block it!). Head across the field , striking the first saddle at a clearing, about the fifth major tree from the R. A faint 4WD track descends into the next paddock and past the dry creek. Keep on that bearing, to the only gate at the top right end of the field, about 5 minutes walk from the car. Turn L by 60ş and follow a track up to the next crest and a big dead tree on the ground. Keep on that bearing for a further 5 minutes, past the L-hand of two (obvious) head-high dead stumps until on top of a lookout over the cliff. Do not descend till you find this lookout, as there’s a cairned descent route just a few metres along from this, which leads down to the main area, Bullfrog Buttress.
For Grap Furear, take the road to Ben Lomond until 7 km past the Coralin bridge where theres a sign for the water treatment plant. Park 400m past this at the gate on the L. Follow the track for about 10 minutes until you come to a large concrete water pipe. Turn L for another 100m to a cairn, then drop down to the gully and follow that down on the R-hand (upstream) side to the bottom of the downstream cliff - about 20 minutes walk all up and easy to find.
For Hidden Crag, drive and park as for Grap Fureau, and follow the trail as for that crag. At the T-junction, follow the pipeline downstream for 20 minutes, to a creek. Follow the creek down for a further 100m, then head L and down to the riverbank. The big buttress on the L is the main crag.
The furthermost crag upstream in the North Esk is Castille Crag. From the Coralin bridge, continue driving a further ten minutes to a signposted dirt turn-off to the R. Park here. On the L side of the highway is a fire-trail heading north past a small dam. Follow this for about ten minutes and head down the hill trending L to the river. Downstream a little should be some buttresses. Follow the river bank to the first major buttress.
Associated links and references
Number of routes
Anywhere from a handfull to a bucketfull of routes in each of seven different crags.
In the area are the following crags: Coraline Bridge, Crystal Palace, Riverbend, Hidden Crag, Grap Furear, Dogs Head Crag and Castille Crag. The climbing varies at each crag from the usual dolerite at some, to Arapiles-like rock at Grap Furear. The cliffs are close to Launceston and have good swimming spots for hot afternoons.
• Craglets (4th edition) paper guide (only three of the seven areas have guides in this edition)
• Craglets
guides, corrections and topos online
Thanks to
Craglets for all this access info. From Launceston, take the road to Ben Lomond until at the Coralin bridge. Soon after leaving the city bounds, the North Esk
river will be crossed at a bridge, a mere ten minutes drive from the city. The first few climbs are in the gorge directly beneath the bridge.
• Craglets (4th edition) paper guide
• Craglets guides and corrections are online here
|
Number of routes About 40.
Climbing style
Guidebook
How to get there
Associated links and references |
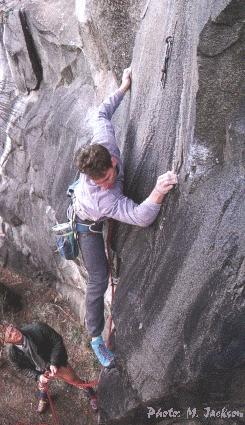 Above: Gerry Narkowicz on an Unnamed (19). Photo: Marcel Jackson (featured in Rock #29). |
Rocky Tom
Climbing style
Guidebook
How to get there
Associated links and references
Number of routes
About 90 routes over eight buttresses.
This sandstone cliff is around 8m high, but is very popular because it has a plentiful number of high-quality easy routes. It also contains its share of good hard routes. It's also popular because it's close to Hobart and has a sunny aspect. Most routes are top roped and not led due to few gear placements (although many have been soloed).
• Craglets (4th edition) paper guide.
Access by way of a 10 min drive and 15 min walk. From the city center, head for the eastern shore via the Tasman Bridge and head for Sorrell. Leave the highway 4km from the bridge at the B33 exit (Mornington etc.), turn R toward Flagstaff Gully and park 5km further on at the Flagstaff Gully Reserve. Walk to end to bitumen road. Follow 4WD road which leads down L from behind the tree in the middle of the parking bay. This soon crosses a creek and then leads uphill. After ascending for 10 mins, the road veers R and a walking track heads up to the L. Follow this for 200m up to Shadow Buttress.
• Craglets (4th edition) paper guide
• Nermut's brief overview
 Above: Marcel Jackson on Crimson Tipped Crumpet Plunger (25), Corruption Wall, Sisters Beach. Photo: Unknown. Marcel Jackson Collection. |
Number of routes About 30 spread over two walls.
Climbing style
Guidebook
How to get there [click for map]
Associated links and references |