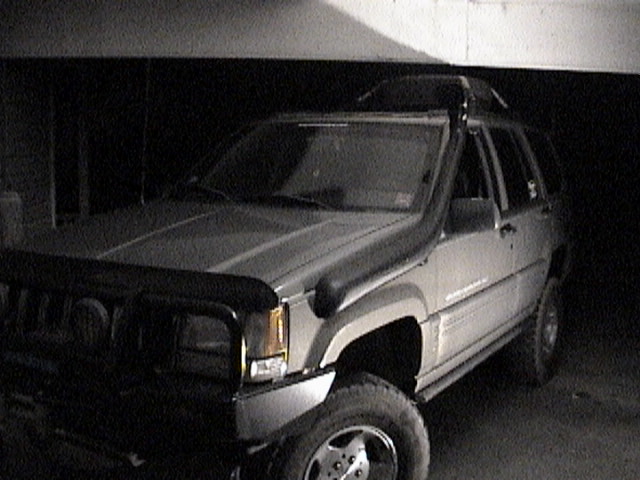
| The Grand. 1998 Grand Cherokee Laredo Limited Edition |
| Home | Front to rear coil swap by Krash80 | Links | ZJ Specs | Adventures | Geocache | Geo Tracker| MOAB 2006 | RE Long Arms! |

|
Stock
I got the Grand (aka: ZJ) in February of 2001. A 2wd ZJ Laredo LE, with leather, Infinity Gold streo.... Loaded. I love this Jeep. This is what it was like when I bought it. Totally stock. |

|
Converted
In February, I converted it from 2wd to 4wd. It is slowly becoming heavily modified. Check it out! |

|
Converted
Where it stands, now. 5.5" lift, ARB bull bar, Warn M8000, '89 XJ axle, 31" BFGs, Yeasu Ft100 and more on the way! |
Before I get started, if you want to know about Death Wobble,CLICK HERE.
Please note that there are new updates to this page, AS OF JULY 17, 2006. Scroll down!
About half way down the page, the conversion info stops and the details of mods and stuff begins.
More Quick-Links:
- Some Onboard Air stuff
- Dana 30 pics
- Tranny pics
- Front-2-Rear coil swapping (by; Krash80)
- Installing a Rubicon Express Long Arm Upgrade
- Teraflex Hi-steer conversion install
Now. The buildup.
Rank my site on TOP 4x4 Sites!!
When asked "WHY", I have several reasons why I went through the trouble to convert the ZJ to 4wd rather than going and buying one. At the time I bought it, the difference in cost between a 2wd and a 4wd of the exact trim and options was about $2,000 in my area. When you take into consideration that I only spent $1,400 in parts for my conversion, then I have to say I saved money! So, from here I begin with a stock 2 wheel drive ZJ. This is where the fun begins.
ZJ 2wd to 4WD Conversion
I bought my '98 Jeep Grand Cherokee (ZJ)in Janualry of 2001. I was hard up for a Grand, but lack of funding kept me from buying a 4wd ZJ. I took the 2wd and was happy with it. But, as with most anything else, I read into it. I got the manual so I could do my own servicing and repais as usual. But then I got to noticing that they really weren't that different. Asside from having a live front axle instead of the dead axle in the 2wd, and a 4wd tranny and transfercase, they were essentially identical.
I started my research. I read the TECH pages on the OFFROAD.com site. I read some interesting tech pieces on private web sites. As I gathered my information,I began to dream. I started to realize that having a 4wd ZJ was not only POSSIBLE, but very do-able.
So. Where is one to begin? Well, then first thing to do is know what you are capable of. If you can't figure out the difference between a two wheel drive transmission and a 4wd transmission, then you shouldn't concern yourself with this. If you have pulled a few transmissions or engines before and have the necessary tools to do so, then you are on your way.
Now. You're a capable mechanic? Think you have what it takes? Cool. Now go ask for permission to tear up the ZJ. Now. Unless you're like me. :-) The ZJ is mine. Most people have a hard time figuring that out. Lori has a BMW and lays claim to the CJ, so I get to tear up the ZJ all I want.
Parts. To convert the ZJ from 2wd to 4wd is fairly straight forward. I won't bother defining any terms here. If you don't know, find out. There is a very, very simple way to do the swap. Go to a salvage yard and find a "complete" donor ZJ. Transmission, transfercase, driveshafts, linkages and shifter. You;re better off to get the parts form one single vehicle. If you don't, you;re going to run into a LOT of headaches with mis-matched parts. This is a guarantee. To follow is a short parts list. It's a general list.
- ZJ Parts needed
- Dana 30 front axle (complete)
- Transmission (with torque converter) for your particular year of ZJ
- Transfercase to fit transmission
- Front and rear drive shafts
- Transfercase shifter linkages to include the body side of the bellcrank
- Shifter position indicator panel
- Back-light pigtail for tranny and tcase shift indicators
- About 3ft of 14ga electrical wire (tell ya later)
- Transfercase skid from donor ZJ
This is a tenative list, and could change a bit later.
Front Axle

The front axle.... the guts of the front end. This is pretty simple if you think about it. Removal of the dead axle and installation of the live axle. Here's a question... What did you get your axle out of. A donor ZJ? Maybe a XJ Cherokee? Any ZJ axle is a direct bolt in. They all have ABS tone rings. Some are less desirable with CV joints instead of Ujoints. But, the main consideration is to alignment. The ZJ axles have the "cam bolt" on the axle end of the lower control arm. The XJ, on the other hand has the alignment parts on the frame side in the form of a U-shaped bracket and bolts. If you were to use a XJ axle, then you are gonna have to elongate the holes in the lower control arm mounts and add tabs for the alignment. Another noe of interest. If you look at the lower control arm mounts on the ZJ, you will note 2 holes in back of it. Also, there is a part of the metal on the side that "makes room" for bolt movement... if that hole was elongated. If you use a XJ axle, it is up to you how to get the alignment thing sorted out. You could just resort to adjustable lower control arms, which are readily available... if not a bit pricey depending on your tastes.
Why a XJ axle? Well, in the late 80's, the XJ used a "high pinion" Dana 30 front axle, usually with a "disconnect" axle shaft. If you are adding a NP231 transfercase, this will disconnect one axle shaft side. That causes the carrier to spin inside the axle, but wont spin the driveshaft causing undue wera nd stress onthe front output and chain. A What a "high pinion" axle provides is strength. A front high pinion "reverse rotation" axle is stronger and reduces the pinion angle of the front end. That'll reduce vibes and possible driveshaft problems when you lift it. It also puts the input shaft of the higher.
Removal of the axle according to your manual is easy. One person can do it, but a second pair of hands makes things go easier. Support the ZJ by the "frame" and remove the tires. Let her hang. First thing to get removed are the bolts on the sway bar, then the shock bolts at the axle end. This will allow the axle to expend completely. Now is also a good time to take calipers off and hang them up. Also remove the sensors for the ABS. Loosen up the clamp bolts at the base of the front springs. If you watch what you're doing, you can spin the spring out of the clamp and pop the spring out. All thats left are the control arms and steering linkage.
Here is a BIG tip for you. That steering arm? Dont try to remove it with the "pickle fork". You're gonna destroy the boot. I found it easier to loosen the alignment sleeve and spin it off, leaving the "tierod end" mounted to the pitman arm. This is assuming you snatched the whole steering linkage off of the donor ZJ/XJ. The Trackbar is easy. Take the bolt off at the axle end. It has a tierod style arrangement at the frame side. Dont worry about marking the tabs on the axle. You're putting another axle in. Go ahead and set your mind to it. An alignment will have to be done anyway.
Once you got that big sucker out, slide it out a gawk at the ZJ. Looks like someone who had thier whole lower jaw removed.
The new axle will slide under and bolt in in the reverse of installation. At this point, if you are installing a Budjet Boost (b/b) or any other lift (I DID), now's the time. The driver's side when done first will pop in with little or no effort. The passenger's side will require a person standing on the axle a forcing it down. I have another idea, which is pictured below. Grab the cylinder jack and crank and a small peice of a 2x4. Lay the 2x4 on the mount for the track bar and place the jack FIRMLY to the frame above the axle with enough room for the coil spring to slide home. Stay clear with the long crank. "JACK UP" the axle to give the required room to get the spring in. Shouldn't take much. :-)
Now, about those nasty cam bolts. If you're having trouble getting them to slip into the tabs, try this. Get your HiLift. You have one, right? Put the foot into the fender and the "lift" on the axle. I put mine on right below the upper ball joint.
At this point, you can bolt up the front driveshaft. You should now have 4wd. After getting everything set, you can go confirm this in a soft dirty location nearby. Remeber. You just added w whole bunch of new parts to your ZJ and you have really NO idea how they will perform together. This is a time for learning and experimenting.
----------------------You can go HERE:ZJ Dana 30 pics to see the pics of the install of the front axle. There are 8 pics, and they are high quality, so if you're on a dialup like, please be patient. :-)
The Transmission
I will start here believing that you have gotten a matched tranny and tcase from a donor ZJ of same year. The tranny is easy. Really. Providing a few simple things are followed. #1, you should have a proper jack for the chore. The tranny is HEAVY. At least 150lbs. Removal of your tranny and tcase should be followed according to your service manual. I have a Haynes Manual. It's fairly detailed. It;s far from perfect, but it makes things easy. I suggest actually READING what to do before even getting near the ZJ.
Removal should be followed by the manual. I don't think I'll add much to this except the following:
When trying to remove the bolts on the torque converter, insert a flat head screw drive into the teeth of the flywheel through the starter hole. This will allow you to hold the crank still to break the bolts loose. You can also use the screwdriver to turn the crank. It works. Plus, you don't have to keep getting up and moving around.
Also... Get a jackstand to hold the engine up. Just stick it under the back of the oil pan. (you should know this if you're gonna do the swap....)
Again... there really is no need to go buy a speacial adapter to remove the fliud line from the tranny. Mine moved freely within its plug on the side of the transmission. I used a wrench and removed it as I would any other line.
One thing... when you slide the tranny up, make sure you get the exhaust pipe support in it's rubber mount. Do it now.... or else....
I will start with the instalation of your transission. If weight is of concern to you then I suggest removal of the tranfercase. It does help taking that 50 lbs off the end. Installing this thing really is easy, if you have help. If not, it is a bear. The 2 larger bolts in the bellhousing also have dowel pins in them to align the housing with the block. If you are twisted to one side, carefully get it lined up with the "higher" bolt, slip it in as close as you can. Start the bolt with a turn ot three. Then jack the transmission up until the other bolt and pin are aligned. Slip them in and start the bolt. Now is the time you need to stop and chack your torque converter. It should be slid way back into the transmission. If it isn't, turn it and push firmly in the center. If needed, luft a little. DO NOT PRY!!! You never know what you will break.
Installation is almost alays the reverse of removeal. Here is no exception. Follow the directions in your particular manual. Don't forget the screwdriver trick on the flywheel. When installing the Transmission, you can install the crossmember as well. This will relieve the jack. Once all the bolts are on and torqued to specs, then start with the transfercase.
The Transfercase
(PART 1):
The transfercase should slide home with out any fuss. You'll need to watch the transmission mount. It doesn't allow much room for the nut on the tcase. When you lift the tcase up and get it started, hold it up there at the tail housing and grab one of the nuts and get it started. Then grab another and start on on the side. You can do this quickly. If the tcase is empty, don't worry about fluid leaking out.Once you have the nuts started, torque them to spec. One pointer. You can unbolt the crossmember from the frame and lower it a little to do the bolt on top of the tcase.
You should make sure you have the tcase in 2HI, which on most tcases is all the way toward the front of the ZJ. Check yours. Once you have that up there, then you're good to go. Now... about that extra electrical wire. In case you haven't noticed while trying to plug everything in.... your plug for the speed sensor won't reach. Cut 3 equal length peices of wire and splice them in so it'll reach. Don't cross the wires. Something will blow up. Since it all runs to the ECU... that could get expensive. :-)
Throw the rear drive shaft in and tighten it up. If you want to run it around the block now, go ahead. You'll want to know if it works. Right now, there is no pressing need for the linkage to be done. You can do it manually under the ZJ. Set the parking brake and leave the tranny in neutral. If you're gonna start it, then now is the time to check the fluids. Go ahead and bust the wallet for that expensive auto tranny fluid. Its like $2.50 a bottle in places. How much you'll need depends heavily on how much you spilled. Run the engine for e few minutes to stabilize. you'll likely note that the dipstick reads "ok". Now, run it through the gears. P,R,N,D,2,1 and back. Repeat a couple of times and return the tranny to park and check the fluid. It should read pretty low now. I ended up putting 2 1/2 quarts in mine. Trannys are usually sensitive to fluid amounts. You usually add a pint to go from "add" to "full".
---------------------
Ok. The tranny and Tcase are joint parts, so the pics of them are on the same page:ZJ 42RE pics. Again, High quality. 11 pics. I have more.. I'm just being nice. :-D
I think I separated this enough. This is where it gets compicated. This is what I had to do... and is what YOU may go though if you dont get all your parts from one place. Prepare to get confused....
THE TRANSMISSION:
Remenber. I'm in South Georgia. 4wd ZJ parts are hard to get down here. I started out locating a tranny at a yard that would ship it to me. There is a 6 month warranty on it, so that adds a little peace of mind. My tranny was out of a '98 Laredo 4wd/4.0.... that was all the info I had at the time of order.... by phone. When it arrived, I got it looked over and found it to be in very good condition. I also noted that all of the plugs were in place and I even got another Crank Position Sensor out of the deal, which was still mounted to the bell housing. The torque converter was in place as well and also appeared to be in great shape. I counted the splines, finding 23 splines. This is a special point. You should also make note of the length of the shaft and it's relation to the rear seal. This is important, as I found out later....
THE TRANSFERCASE... PART 2:
First I laid hands on a NP 231 out of a wrecked '89 XJ. Needed work. Then I found it had 21 splines. "Crap!" Well. Time to search. I then found a friend localy with a NP249... which didn't get me too happy, since it is a pre-'96 249 which has no "low lock". I took hold of it ad verified 23 splines. In a test fit, it would not slide more than 1.5" onto the rear of the tranny. On inspection, I found a sleeve in the input shaft."Crap!!!".... What now?
Well, I located another transfercase for cheap money. It had a 23 spline shaft, and a good case half, which I could use to repair the XJ NP231 for use in the ZJ. Great. I drove up to Atlanta to get it. My delight! It was a TJ NP231 with the "external" slip yoke. There is no rear seal for the rear driveshft to go into. The design was so that the rear driveshaft could be removed and you would not loose any fluid from the transfercase. Well. I took it home.
In a test fit... I found IT would not slide on either! Now I'm getting upset. Seems the TJ231 has a LONG 23 spline shaft for use on the TJ auto tranny. Well, the guy had explained that the NP231 was "serviced" since it came out of a wrecked TJ. When placed into 4wd, the case would grind when you moved. 2wd was okay. With that in mind, I took it apart. I found the sliding gear that engages the front axle had been installed backwards. I simply re-instaled it on the main shaft as it should be. There. That was solved. Now what about my input shaft?
I had a'89 XJ231, a '94 ZJ249 and a 2000 TJ231 all diassembled. I began comparing parts. I slipped the planetary set of the 249 into the TJ231. Fit nicely. I put the whole thing together and installed it in the ZJ. Fit BEAUTIFULLY!!!!.... except for one thing. The ZJ rear shaft was no too long. The "external" slip yoke design eats up about an inch of driveshaft. I got it cut and installed it. Popped into 2hi, I started to back up and got a horrible grinding. OMG!!! WTF??!?! Out came the TJ231....
I took it apart and found a problem I had not been familiar with. A guy had nentioned to me "large bearing" and "small bearing". The TJ231 had a "small bearing" and the other gear set had used a "large bearing". Using the small bearing allowed the planetary set to slip about 1/8" causing the sliding gear to disengage from the planetary while in either high range. Low range worked fine.
I began to compare the internals of the XJ and the TJ cases. Internally, they are indetical for the most part. All the castings are the same. Only a couple of accessory items are different. With that, I tapped the large bearing out of the XJ case. Then I tapped the small bearing out of the TJ case. After a comparision, I then tapped the large bearing into the TJ case. This resulted in a very firm fit for the planetary set and no slop at all!
THE SHIFTER AND LINKAGE:
If you got the transmission and transfercase installed and operating properly, then the next step is to get the linkage in. Here's the catch. If you already removed the center console and "coin holder", you were greeted by a solid panel with no real markings where the handle should go in relation to the tranny shifter. This is where I scratched my head a little. I put the indicator insert for the tcase in place and tne ran my finger right down the center of the slot and ran it back and forth leaving a "line". That would give me a good idea.
Next, used some heavy cardboard and cut it out a little at the time until I could fit the shifter through. Here's a pointer. There is a lever on one side and a piv with a snap ring on the other. The hole doesn't have to be large enough for the handle to drop straight through. Make it really tight, and then cut a "slot" so the pin/snap ring side will slip thru after the other side is dropped in. I cut mine out with a jig saw and used a carbide bit on the drill to clean it up a little and finsh fit it.
There is a "frame" side to the bell crank. If you got a ZJ mount, you;re in luck. All you have to do is remove 4 plugs and then use the bolts throught eh inside to mount it. The problem is, you're gonna have to figure out how to get the carpet out of the way to get down there. I wasn't lucky enough to get a ZJ mount. I had a XJ mount... which is one piece that is TOTALLY different. I mounted it using 3 sheetmetal screws. No complaints at this point. Seems to work very well.
Now with any luck, everything should flip around nicely. If not, don't worry. There is an adjuster so you can get everything worked out. Make sure you put fluid in the transfercase before going anywhere!!!
We took the ZJ out to stretch her legs. There had been a light rain earlier, which I thought would make things interesting, but the ZJ worked great. I disconnected the front sway bar and let'er rip. We cruised the ditches and sand bars out at the river. I was inpressed with it. I flexed it out a few times causing the rear tires to lift from time to time. The rear sway bar is still connected. The shifter worked good as well. Finally, the "finished" product could be tested and all I can say is "WOW!" It sure rides better than the CJ!
Since the conversion, the ZJ has had a couple of combinations in lift. Initially at the time of the conversion, I installed a Budget Boost From Anthony, (ACZJ on JeepsUnlimited.com. You will find him on the ZJ Tech Forum) which was 2" front and 1.75" rear. This is to compensate for a typical "stinkbug stance" that Jeeps tend to have. About 1/4" higher in the rear. This B/B was installed on top of stock 2wd springs. Soft cushy spring rate. I came up with a Teraflex 3" TJ lift kit, which I plundered. I sold the rear springs to fellow Jeeper in need and removed the B/B and installed the 3" TJ springs and moved my front coils to the back. I ran this for a while with the stock sway bar links up front. I did remove the rear swaybar. It improved the ride, but did add a little bit more body roll. It isn't noticable unless you get crazy or stupid.
I ran that setup at The Badlands in Attica, Indianna. It worked great!
Upon return to home, I reinstalled a B/B from Anthony. now, this lift wasn't perfect. The TJ coils are a softer spring rate intended for a lighter Jeep. Installed in my 4.0 equipped ZJ netted somewhere around 2 inches. Combined with Anthony's B/B, this was about 5". I have just installed a set of Teraflex front coils for 3.5" of lift. This levels out the ZJ at a solid 5.5". I am still running stock control arms front and rear. The rear uses a Teraflex rear trackbar relocator bracket. There are those who don't like a relocator bracket due to leverage and the possiblity to destroy the mount. This will be addressed in a short time with a brace that will run to the differential.The front still uses stock hardware, however there are plans to FAB a new front trackbar, and to install a dropped Pitman Arm to correct a tad bit of bumpsteer. I had "Death Wobble" when I installed the B/B, but it was quickly removed by dialing in a bit more caster.
For bumpstops, I plundered the remains of the TJ lift again. I used the spacers meant for the front AND rear on the front. With the lift springs and the B/B, I felt this was the right way to go. In back, I cut two sections of 2x3" 11ga tubing. I drilled it and used it as a spacer for each of the rear bumpstops. Again, this works fine. I Also aquired some Teraflex swaybar Quick Disconnects for a TJ. They did not have the upper adapters for the swaybar, so I made some out of 2" angle steel. This was plenty stout. They seem to be just a bit long, but with the bumpstops in place, this has fit well together.
The ZJ's rear tow hitch was ripped from the frame in a mishap at Attica. The bolts which held the tow hitch in place were the same bolts that held the rear bumper armature in also. Upon return, the rear bumper was removed. I have drawn up plans for a new rear bumper which will be contructed of heavy gage Steel tubing and will include a integrated 2" receiver hitch. I am hoping to make enough money to purchase a new front winch bumper and winch. I haven't settled on which one yet, though. I do like that Trail Ready bumper without the brushgard and integraded lights. ;-) We'll see what the future will bring.
Asside from the offroad goodies, the Zj is also my personal ride. I am a Police Officer and a Volunteer Fire Fighter. My ZJ is equipped with a Federal Signal SS2000 siren with the Smart Pad. I relocated the facory horns which were behind the right fog light. The Federal Signal BP100 speaker was installed there with a slight tilt down to help drainage... it will get wet. Round taillights from a local big-rig shop supply the emergency lights in the grill, and a pair of Halogen H3 bulbs installed in the lower blanks in the taillights. The Smart Pad was installed in the center of the dash where the littl cubbyhole was below the A/C controls. My Jeep is a certified Emergency Vehicle by the Georgia Department Of Transportation. If you have no authorization to install emergency lights in your vehicle, you better not. Law Enforcement officers tend to take that personally and have little... if any "leiniency" when stoping vehicles for those violations. Conform to your state and local laws. Don't be a criminal.
Since I am also a HAM Radio operator, I have my HAM radio installed into the ZJ. The dual band antenna is mounted on the rear hatch up high to get over the Jeep. I had it mounted low, but it hindered my transmissions to stations in front of me. Made one heck of a reflector, though. I did get into the 444.350 repeater in Valdosta, GA from Americus, GA one morning. THAT was interesting. The radio is hard mounted hidden, and the head is remote mounted. It is all that is visible. The speaker was installed in the overhead console in a empty spot between the storage pockets and the rear map lights. I used an old Chrysler (go figure...) dash "tweeter" which fit PERFECTLY under the brace that runs accross the console. I drilled out holes in the console, then used two zipties tow hold it in place.
The CB is a Radio Shack TRC 504 which was being discontinued at the time I purchased it. Thin line CB with Mic Gain and a PA. The Mic also has up/down channel selectors. Sometimes makes life easier. The CB is mounted to the center console on the passenger's side. It's generally out of the way, and since it is a slim unit, it does NOT get in the way of the passenger's power seat... which my wife is a pro at maneuvering. I mounted the antenna up high. Real high. I went to the truck stop and got a 4ft fiberglass whip with the internal element. I mounted it to the rear luggare rack slider. I drilled the proper diameter hole in the top. In the bottom, I bored it out so that the antenna cable would attach. I then dumped a big gob of Blue RTV to "seal" it. I had a real bad whistle which was highly irritating. That cured it. Tuned and peaked. The CB works great. Combined with the Yeasu FT90 2meter/440 HAM radio and a cell phone, I have almost all modes of contact covered.
Where the ZJ stands, 03-06-03
As of now(3-6-03), the ZJ is sitting at 5.5" of lift. I have a ARB BullBar on order which should be here in a couple of days. The Pro Comp M/Ts I purchased a year ago are in really god shape with approximately 9,000 to 11,000 miles on them with alot of that being run on the highway. The noise level of the tires has increased substabtially which causes a droning roar. It isn't unbearable, but is clearly audible over the stereo.
The Yeasu FT 90R was removed. HAMs, have no fear. It has been replaced with a Yeasu FT100. I located a fellow HAM local with one he was willing to part with... at a price ($$$) with a FC20 tuner. It works great! I am not able to communicate on the HF side at this point since I am still Tech only. (no code) I hope to fix this soon enough. The HF side is currently pluged into the CB antenna. With the tuner, it tunes in to 10 meters and transmits beautifully. A fellow ham teased me by making a DX contact on it for me. He made a contact from Valdosta, GA to a location in Colorado on 100w, verticle CB antenna. That... is Hamming. :-)
There will be pics posted soon on the (yet-2-arive) ARB. I am also surrently trying to gather info from others who are, or have done a 4wd conversion on thier ZJ or XJ. The info will hopefully be either listed here, or a link provided. All for your learning pleasure!
-------------------------------------------------------------------------
Today, (03-12-03) the ARB Winch Bull Bar arrived and was quickly installed. The wife and kids all pitched in to help me out with it. Pics and my impressions will follow soon. ;-)
As far as the ARB is concerned, I have pushed a busted up XJ around with it. Slid up the rocks in Moab. Winched out from a hole about knee deep in mud, booty deep in water. ..AND I've experienced a slight increase in engine operating temperature. Not too much. Been running right at 215 on the highway. Overall. I've enjoyed it.
Well. Here it is, getting cool and I'm still running around south Georgia in t-shirt and shorts. :-) I have completed a few mods, which I will explain in detail here.
I had ground the taper inside the throttle body on the 4.0 some time ago. It did improve the low-end performance, by my seat-of-the-pants dyno. It did however cause a bit of an explosion off idle. More of a sudden-on feeling. Nothing drastic, just made the Jeep touchy. I aquired and isntalled a Poweraid Throttle Body Spacer which did not really increase power, but did noticably decrease the tendency of the engine to lurch off idle. It smoothed the throttle response out. I did not exactly note any increase in economy, either.
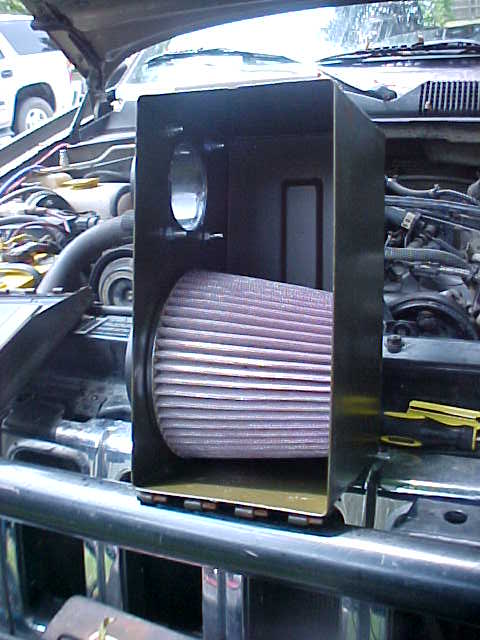
I also have been brain-storming ideas on how to incorporate the Safari Snorkel (which is currently on back-order) into the intake of the ZJ. I did come up with a possible idea that I needed to further explore. I went to a local wrecking yard and spent some time bouncing around. My memory had served me correctly. I located a 1997 Ford F-150 with a round air filter assembly. I had to peice parts between two trucks, but got one complete assembly together. The two halves hold a conical style air filter, which seals when the two halves are clamped togther against the filter's integrated seal. I know that K&N offers a drop-in filter should I need it. I will note, though that the air filter assebmly flows for a 4.6l V8, which is obviously larger in displacement, and theoratically pulls more air, so this may not be a problem.
I did have to plug a hole in one side of the canister that is supposed to have a sensor plugged in. I capped it with a piece of old inner tube and a hose clamp for now. The 4.6 air tube has a more gradual bend in it that rubbs the hood liner, and it fits a tad loose on the 4.0 throttle body. I removed the clamp, cut the rubber locating-tabs off that hold the clamp in a static position. This allowed me to explore options with turning the air tube and clamp.
After removing the OEM airbox, I slid the air filter assy in place. It is definitley a tight fit, but by golly it fits. I removed the plastic cap that covers an access hole to the inner left fender. I will note here that with the installation of both the F150 airbox and the T/B spacer, the economy of the 4.0 has increased slightly. I had seen the engine average 14-15mpg running the road. I have seen the economy increase to 16-17 mpg average. This is using the trip computer. Also, the computer indicated a best of 19mpg (on flat level road, 60mph). I have seen that up to 22mpg on the fly as of late. (OH, GOODY!!) The assembly seems to be pulling cooler air from outside the engine bay, too. The whistle of the T/B spacer is clearly audible, but is not annoying or intrusive.
Also on the mod-block... I have installed a set of Rubicon Express drop brackets for the front suspension control arms. They are manufactured and sold for the Jeep Cherokee (XJ). For those who do not know, the XJ has caster adjustment at the frame side brackets. The ZJ/TJ has the caster adj at the axle side brackets. With a XJ axle, I lost all caster adj abilities with stock equipment, but with ADJ LCAs, this was not much of a problem. The Poly bushings were more harsh and wore out too fast for my taste. In an effort to remedy all this without having to go Long Arm, I located the brackets and installed them. In addition, I went to my favorite wrecking yard and got a pair of caster adj brackets from an old XJ.
Since the XJ uses caster ADJ at the frame side, the bolt holes on the frame side are elongated to allow the movement of the bolt. On the ZJ, it is a fixed bolt hole. This has caused the bracket to be mounted slightly forward in may application. I am definitely going to be forced to fab up support brackets. I don't want to pay for the RE braces because I am not positive that the measurements will be right. I'd rather gamble with $20 of steel rather than $70+ braces. They are firmly mounted, though. The angles of the from control arms is nearly dead level. This is on a Jeep with 5.5 INCHES OF LIFT!! I was able to re-install the OEM lower control arms and set the caster at about 1/4" forward. The ride is back silky smooth. The suspension is nice and soft. I can really feel those Doesch Tech DT3000 shocks working, now. To say that I am pleased would be an understatement.
Couple the LCA drop with a new adjustable front track bar, and the ZJ is now tame again. I bought a Black Diamond bar for a 2-4" TJ. It is a little past it's prefered angle, but since it puts the axle back on it's proper points of rotaion and flex, the ZJ steers as it should. Torque-steer is gone. Wandering is greatly minimized and predictable. Bump-steer is gone. COMPLETELY. Now, the hunt is on to locate a proper length and affordably priced bar. :-)
I ordered a Safari Snorkel mod# 720SS by ARB back in November. The supplier I ordred from had it on back order for nearly 2 months because it was a "speacial order". I got it on Tuesday, Jan 19th 2004. I wasted no time in installing the beast. It was light, but was extremely strong. The plastic was thick and did not appear to be cheap by any means. I did not take any pictures of the install, primarily due to lack of a quality camera and the sun going down, but I will assure you that it was simply an ordeal of measuring 7 times (literally) and cutting once. The instructions tell you to check the template and the foam "gasket". Since my application is different, I just used the supplied cardboard template and made my own, marking all holes that needed to be cut.
In doing so, I positioned the snorkel so that it matched the rake of the windshield and sat properly above the door and did not restrict the door in any way. I ended up cutting the big hole and drilling the bolt holes out. The bolt holes had to "ovalled-out" a little to get everything in there. Also, the snokel is molded to fit the curvy fender of the Exterra. It took only a little pushing on the center, but I got ALL the bolts to start and sinch down with no problem. Connecting the the snorkel to the intake was the toughie. There is one thing to note here. There is an opening in the inner fender supports, but the opening will have to be enlarged. To do so, I used a combination of 3" air powered cut-off tool, hammer, air hammer/chizel, jigsaw and shears to get the stuff trimmed back. And it has to be cut WAAAY back. Almost all the way up to the mounting area of the fender. What makes it tough is the double-wall contruction at the top.
I had already installed a air filter assembly from a '97 Ford F-150 (4.6) on the ZJ. The other day I went ahead and shortened the air tube by cutting my original rubber elbow at the first "bellow" commingfrom the engine. I also cut the Ford tube at the first "bellow" from the airfilter. I ended up cutting the Ford tube a bit more, and then stuffed a 3" section of exhaust pipe (Autozone) through. I then connected the 3" tube to the Jeep elbow. With its sharper bend and (now) shorter length, it settled down nicely on top of the ABS pump.
But how to get the snorkel to feed into the airbox?! Welp. The 720SS comes with a S-shaped peice that I tough woutl work, but there just was not enough room. I ditched that idea. Instead, what came to mind was cheaper and "cooler" looking. I had checked all the local parts suppliers. The cheap flexible ducting was $7 and the pricey ducting was $20. All in the 3" variety. Remeber, I had to get this stuff to do 2 90+ degree bends! I had a simple solution. HELLO HOME DEPOT!!! I got a section of 3" flexible aluminum dryer ducting. for under $6. I cut one peice too short, but got it right with the second. I ended up using the included hose clamps in this way.... I slipped the rubber connector over the aluminum tube. The exit of the snorkel and the duct are both 3"... or so. The rubber piece fit snuggly and nicely on the duct. I clamped it down firmly... but tried not to squish the aluminum. I then slid the duct onto the outlet of the snorkel. I formed two VERY TIGHT 90* bends in the duct. Then I slid the airbox into place and clamped the duct onto the airbox. I will go back and RTV all the connections with the snorkel. As for now, it works excellent. There is absolutely NO increase in sound levels inside the ZJ with the windows up unless full throttle is applied. The pics that I do have are below.


SUH-WEET!!
In the last couple of months, I have gotten some new things done. I had a decent shop install my new 4.56 gears in the D30. I also installed a Lockrite in the D35. A Con-Ferr rack was installed on the roof as well. I sourced the rack from RhinoLinings of Valdosta. They are some good people there. ;-) There are some things that I would like to pass on about that locker. If you are running a "high" lift on OEM arms, expect the inside rear tire to "walk" under the Jeep in a sharp turn under accelleration, mainly from a dead start. This is amplified by the swaybar disco'd and being on asphalt. It is spooky, but predictable. I have had NO unfavorable reactions at highway speeds with or without the swaybar disco'd. Oh, and that rack does add some wind noise at interstate speeds... particularly with a STRONG headwind.
Here's one for ya! Dec 28, 2004... I went down to a creek. I had forgotten that there had been recent steady rains. The ground was soooo soft. Anyways, the ZJ got stuck. BAD.


As of today (June 3, 2005), I have a new transmission in the ZJ. The pump went out in the tranny. Instead of rebuilding it and dumping a load of money into it, I found another one at a salavage yard and installed it. It isn't tested yet, though. I found all of ONE quart of ATF+3 in Nashville.... so I took it slow. As it was, between my back killing me my neck being sore from laying under the Jeep, I havent been able to move too fast. The tranny was warrantied for 90 days, unlimited mileage. Basically, I am going to try and get the wife to drive it to and from work for a week or 3 to run it through it's paces. ;)
Got an order in for some new parts. Got a Teraflex High Steer Kit coming. Consists of a new passenger side knuckle and the tierod and drag link. Gonna add a new adjustable rear trackbar also. (write-ups on both coming) Between that and the CV rear driveshaft I had made for me by Arizona Driveline the vibes should be gone. Also have to regear the "new" 1994 ZJ D30. Thats right. The XJ H/P D30 grenaded on me. The crossshaft came out of the carrier, hit the pinion gear.. it was ugly. It appears that the shop that regeared the axle for me didnt put the drift pin back in. Guess it helps to know they are now out of business. Loosers. Basically, I got a lot to do soon. Between the ZJ upkeep and the repairs on the Tracker... I'm busy guy this year. Gettin the ZJ ready for MOAB!!!! September 2006! YEA!
I have another great mod to talk about! I have aquired a Teraflex Dana 30 High Steering Conversion from Quadratec. The kit is installed. All the detils are HERE!
I was asked for a longterm update. Ok. I can handle that.
The ZJ is pushing 98,000 miles. I have a check engine light that I clear out with my OBD2 reader sometimes. I get the codes for both 02 heater curcuit problems. I'll have to trouble shoot it soon. When I keep the codes clear, the engine runs great. I have a set of gears for the D30, and I will install the Aussie Locker when I put the gears in. Still, no replacement locker for the D35. I have been looking at alternative air intakes to use with the snorkel. There is a company that makes a cold air intake system that will be compatible... but at $200+, I am holding off on that one. I have aquired a tranny temp gauge. Gonna keep tabs on my tranny now. Dont wanna overheat this one. I have also noticed what appears to be a slight leak on the right side tank for the radiator. Not good... not good at all. With a Moab trip slated for Sept 9, 2006 the little things are starting to bite me.
I still have not come to any solid decision on the front swaybar. Still disco'd since the steering swap. Still no stabilizer. No DW... still no alignment either. I know. I'm a dummy. I'll get it eventually. Installed the Currie adj rear trackbar finally. Realined rear axle. readjusted all adj control arms in back. VERY minimal driveshaft vibes, now. I had suspected that the axle was off just a tiny bit and was contributing. It appears I may have been right. Still working on it, though.
After installing the tranny temp gauge, I have continued to dump alot of thought into having a mixture gauge as well. Since the ZJ has intake and exhaust mods with a Jet Stage2 chip and since the 4.0 engines are programmed lean from the factory, I finally made my mind up. I located a gauge that looked mostly the way I wanted. I also nabbed a 2 gauge universal pillar pod and installed it last night after work. I got one new O2 sensor and I'm gonna have it installed soon. The mixture gauge isn't connected to the O2 sensor jsut yet, but the install turned out ok. Doesn't PERFECTLY match the Faze temp gauge, but the new iEquis mixture looks right at home. :-)
In regards to the rear locker? I found a TracLoc from a '93 ZJ on eBay and got it at a pretty decent price. It's in the shop now, waiting for a chance to do the install. I also got the D30 4.56 gears installed in the front axle with the assistance of a friend who wanted to get dirty. The Aussie Locker was installed at the same time. I installed the "new" yoke due to a sheared bolt... but was unable to locate both straps and all 4 bolts for it. Gotta wait on a new bolt and strap kit to try it out. The gears went in pretty easily. I actually just eye-balled the shims on the 3.55 set I removed and took a guess. I ended up dead on for the carrier and had to add .004 to the pinion. The setup was tight... right on the lower allowance for backlash. When I say right on... I mean RIGHT ON IT. I buttoned it all up and figure I'll give it a good test run. When things settle down here, I'll try and post up a pic of the new gauges in the ZJ. Which brings to mind... I haven't posted a recent pic of the ZJ. I took some poser shots in the side-lot the other day... so here ya go...


It took me long enough, but work and kids has crowded my brain lately. Anyway, I recently tossed my stock airbox in favor of a ricer-style cone airfilter. I have been goofing around with fiberglass sheets and resin trying to work something out that would connect to the snorkel, with a few dollars spent, but no progress. Welp. A couple of days ago, I was sitting in the shop... had the unmodified stock airbox laying on the floor of the shop next to the one I have been goofing around with. I realized what I was trying to do might work... but it was very "iffy". So I'm scratchin my skull and thinking. Something catches my eye. What is waterproof, metal, has a lid, compact, easy to weld to and very easy to find? There was a .50cal ammo can helping prop the '03 4.0 engine sitting in my shop against the bench. A few days later, I find that it fits in place of the stock airbox.
I then tried the airfilter. It fit... well, the filter fit... but the rubber peice wouldn't. This is where I found that the rubber peice on the back of my filter is essentially a giant grommet. I pulled it off, made a template, cut the hole, slid the filter in, and popped the grommet in place. Perfect. I slid it in, and ran it without the lid. No problems. I then went to the local AutoZone and grabbed a 3" flexible intake hose and a 3" airhose adapter to mount to a flat surface. I cut the holes, RTV'd the connector to the box and torqued it down with 4 10mm bolts. I then connected it to the snorkel. All previous issues with turbulent air are resolved. This one is very quiet, and there is no intake resonance until about 4,000 RPM. I'm happy. I now have a sealed airbox with a reusable filter that I can run "uncapped" for more airflow if I think I need to.


Yes, yes.... a busy little boy I have been. :-) I aquired a VIAIR 450c and install kit from Quadratec. I had held onto the tank for an old Campbell/Hausfeild compressor that was my Mom's. It is a 2 gallon unit. As it turns out, the threads for the VIAIR pressure switch and relay are the same.
GO TO PAGE 2 FOR THE ZJ!!!
Please sign the guest book below to leave comments or just to say you dropped in.
Sign Guestbook View Guestbook
HOME --------------------------------------------------------------------------------