Before delving into the art of soldering, it might be helpful to acquire an understanding of the processes and the various items involved. There are many pitfalls that can be easily avoided with some knowledge. Many articles have touted the superiority of pet processes, but no single method or tool is best in all cases. In some work, success may be extremely difficult with the wrong ways and very easy with the right ones. In general there is no need to invest in a large variety of equipment unless you plan to do production, repair work or fancy modifications to brass models. But do not skimp on the equipment or accessories you select. In the end the savings may well be lost by shoddy work, damage or injury. With over 50 years experience in soldering, I learned some things the hard way, including the loss of some irreplaceable items. Know how and plan before doing.
 DANGER!!: Due to the possible
hazards encountered, extreme caution must be exercised during use of any
of these processes. Hot metals, flames and tools can produce severe burns,
damage or fire. Work area must be clear of obstructions and free of
inflammables. Shielding and other protections must be used to avoid contact
with hot objects. Good ventilation or even possibly a respirator may be
required, since many resultant fumes are toxic. Some alloy components and
fluxes are toxic in solid, liquid or gas form.
DANGER!!: Due to the possible
hazards encountered, extreme caution must be exercised during use of any
of these processes. Hot metals, flames and tools can produce severe burns,
damage or fire. Work area must be clear of obstructions and free of
inflammables. Shielding and other protections must be used to avoid contact
with hot objects. Good ventilation or even possibly a respirator may be
required, since many resultant fumes are toxic. Some alloy components and
fluxes are toxic in solid, liquid or gas form.
Closely related, soldering, brazing and welding are arts that can prove very useful in applications where glue, screws and rivets will not do. There seems to be nebulous dividing points between each of the processes and some overlap. To confuse the issue soldering is divided into soft, intermediate and hard.
A general break down is:.
- Soft soldering__ below 600 º F.
- Intermediate soldering__ 600 º to 1100 º F.
- hard or silver soldering and low temperature brazing__1100 º to 1600 º F.
- high temperature brazing__1600 º to 1800 º F.
- welding__1800 º to 6000 º F or more.
Soldering and brazing normally use a catalytic metal alloy which is liquefied below the work piece melting point. There is a mutual dissolving and dispersion of molecules which forms a new alloy bridge at solidification. This is not usually as strong as the base metal of the work. Alloys vary drastically to cover temperatures and strengths. Solders may contain lead, tin, silver, cadmium, bismuth and many others. Brazing, due to its close etymological relationship with brass, should use alloys containing large amounts of zinc and copper.
Welding normally consists of softening or melting the base metal pieces and forcing or fusing them together, with or without a catalyst alloy or flux. Usually the very high temperatures required are provided by electrical arcs or torches with oxygen and gas mixtures. Normally it finds only specialized use in hobby modelling.
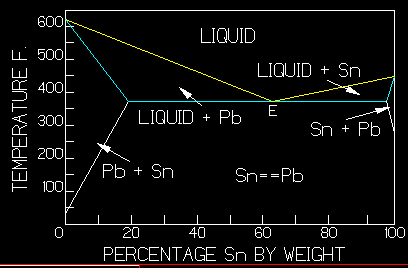
Alloys exhibit some apparently strange characteristics in that in most combinations, they may liquefy at a higher temperature (liquidus) than they solidify (solidus) with a semi-solid, slushy state between. They also form solid solutions with minority components dissolved in the majority one. However at one ratio the two points are the same, with no slush. This is the eutectic ratio which normally provides the lowest liquefication temperature.
Probably the most common and least expensive solder is tin-lead with varying weight percentages of each. The very expensive eutectic alloy, with 63 % tin by weight and liquidus of about 361 º F., is also the strongest alloy, according to Kester. This is contrary to the popular opinion that Plumber's alloy of 50-50 is. Commonly used in electronics, the possible eutectic, reject alloy of 60-40 is very close and a lot less expensive; melting at 374 º F. The more expensive 63-37 is more commonly used in printed circuit board use; melting at 361 º F.
The following may enhance or confuse you understanding of solder.
Note: Adjust brightness and contrast for optimum viewing.
Graph of tin-lead solder alloys.
Above the liquidus line (yellow), all alloy components are completely melted or liquefied . Below the solidus line (blue) everything is solid. The horizontal section is at 361 º F, while "E" is the eutectic point. Between the lines, exist two slushy areas consisting of liquid with molecular sized solid suspensions of lead on the left and of tin on the right. The three areas below solidus are solid solutions with tin dissolved in lead on the left and lead in tin on the right. The center area consists of a quasi mutual solution of both. Irregularly shaped islands of each metal form with rapid cooling. Their size diminishes as cooling time increases. The final state is a crystalline structure. Insufficient heating, rapid cooling or movement during cooling produces large islands, resulting in so-called cold solder joints. By controlling these factors in processing some other alloys, they may be annealed or softened and hardened, even in specific areas or surfaces. Under very strong magnification, the graphs outer solid solution areas are analogous to grainy wood, while the center resembles a very fine grain, hard wood.
Each with its own graph, various other metals are often alloyed to raise or lower melting point. These are most frequently sold by trade name from Tix at 275 º F to Silfos at about 800 º F. In general lower temperature solders are referred to as soft and higher as hard. A common misconception is that silver solder is hard, but many silver bearing jeweler solders have very low melting points. Using higher temperatures, to solder major components, and lower when soldering smaller detail parts can reduce the danger of the major joints melting and falling apart.
With none-eutectic alloys, re-liquefying them often changes and diminishes their properties. This is due to uneven precipitation of the component metals, while passing through the slushy state, during previous cooling. This is particularly true with rapid cooling, since insufficient time is allowed for reaching proper equilibrium of the solid solution. On re-melting through the slushy state, the elements seem to alloy differently. These characteristics are also very critical in alloyed metal casting.
DANGER: CADMIUM fumes are very
toxic. Either avoid heating alloys or use a respirator.
Because zamak (zamac), commonly used in die cast parts, is mostly zinc and aluminum, standard solders and fluxes do not work well with its alloys. Over the years several methods have been offered, but none has been fully successful.
Solder is available in ingot, bar, wire and specialized dot forms. Probably the most common and convenient are the many gauges of wire, sold in coils and spools by weight. To avoid excess, fine gauge is used on small detail work, but inconveniently long feed lengths would be required for large sheet work.
In most cases, a flux is applied to aid flowing of the liquids and to remove and reduce oxidation. It may be separate, internal to the alloy core or externally coated as on many welding rods. These may be very specialized for the alloys used, but common are acids and resins in liquid or paste forms. Acids are very corrosive and must be removed by washing and neutralized after use. Activated resins work very well and are easily cleaned with flux removers, liquid or in spray cans. Use of flux does not eliminate thorough preparation in cleaning and oxidation removal. Separate fluxes are available in liquid or paste forms.
For most applications, probably the most convenient is resin core, wire solder. The amount of flux applied is about right for most jobs. However there are many cases, where special flux applications improve process.
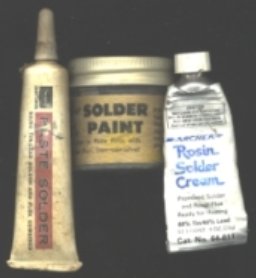
There are some so called solder paints, which contain mixed, pulverized solder and flux in a water or gel suspension, packed in tubes, jars or syringes. Although very convenient, care must be taken in selection to assure that both solder and flux are of the type required. Often components separate and must be re-mixed. Shelf life for the mixes is usually about six months or less and some may require refrigeration.

Note: Adjust brightness and contrast for optimum viewing.
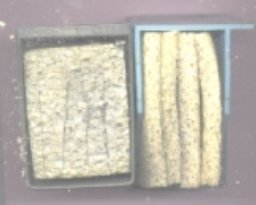
Resin paste
Note: Adjust brightness and contrast for optimum viewing.
Pre-mixed solder-flux paste, paint and cream.
To avoid unwanted scorches or burns, a clear, non-flammable work surface is a must. Metal may be used, but will conduct heat from joints in contact with it. For flat surfaces some ceramic tiles serve well along with some commercially available mats which may accept tee-pins for holding parts. Very hard, dense wood survives reasonably well for jigs at lower temperatures. Particularly with torch flames; in spite of all the negative and unwarranted hype, asbestos cloth is still the best flexible shield. None of the substitutes, tried to date, proved close to satisfactory for higher temperatures. Be aware that even with care, occasional drips of molten solder can fall on you or carpets.
Before any solder job, all joint surfaces must be thoroughly cleaned and rid of oxidation, oils, paints, coatings or other impurities. Since these block the molecular bond, solder will not adhere through them. Only shiny metal should remain at the joint. Once cleaned, avoid oils from finger contact. Various cleaning methods may include chemicals. fine abrasives, wire brushes wheels or sand blasting.
The application of flux will vary, dependent on the type. Anti-fluxes may be applied to prevent spreading to unwanted surfaces. Separate liquids or pastes are applied sparingly, immediately after cleaning. More conveniently, internal core types are applied almost automatically as the solder melts. The flowing and bubbling of flux does not necessarily indicate the joint is hot enough to flow solder.
One secret to success is to apply the right amount of heat at the right place as quickly as possible. The right places are the work pieces as close to the joint as possible and not the solder. The larger part should be the one that is heated. As any good plumber knows, heat is applied to the fitting and not the pipe; since solder tends to flow into the joint, toward the heat, even up hill. When soldering wire leads to terminals, heat should be applied to the terminal and not the wire. This applies to other joints as well. A good close, solid mechanical connection or fit reduces weak solder bridges and poor flow.
Tip of iron must be clean and properly tinned with a thin coating of solder. After all oils or residues are removed, flux is applied and tip is heated, then solder is touched to and melted on only surfaces to be used. Some stubborn cases may require an acid such as Salammoniac to clean to bare metal. During soldering , tip should be cleaned before each use by wiping on or through slits in a dampened sponge. Flux and solder frequently erode and pit tips, requiring filing to reshape plus re-tinning.
Note: Adjust brightness and contrast for optimum viewing.
Dampened sponge holders, Slitted and deeper tweezers type.
Quite frequently to protect other joints from melting, heat sinks are strategically located to conduct heat away from them. These may be anything from metal clamps to water soaked wads of cloth, cotton balls or paper. The larger the contact surface and sink the better. These should be placed at the protected joint or between it and the heat point. The object is to conduct heat away from protected area or to absorb it.

Note: Adjust brightness and contrast for optimum viewing.
Heat sinks. Lower is used to hold wire leads.
Applying solder to a joint is an easily learned art. As with glues, solder is usually weaker than the base materials, so the secret is to apply just enough to bond the joint and to ensure that it flows completely around the mating surfaces. Extra solder contributes almost nothing to the strength, but does create a mess. Sometimes, at the start, a small bead of solder added at the tip end will aid heat conduction to the joint. In most cases, pre-tinning or coating joint parts thinly, before actual joining, will facilitate the flow and form better bonds. Frequently used in sheet metal work or large joints, entire surfaces are pre-coated. More often done with a heavy iron or torch, this is commonly referred to as sweat soldering.
By touching solder to the joint, and not the iron, check for a quick melt and easy flow. Then sparingly apply the amount needed. Continue heating only until flow is complete. Quickly remove the heat source and do not disturb the joint until it cools. Water or other rapid cooling is not recommended, since unequal contraction of components may ruin joint. Insufficient heat or movement during cooling can produce the proverbial, dull gray, cold solder joint. These are poor electrical conductors and generally very weak. The joint should shine brightly when cooled. Finally when cool enough, test for a solid joint by feel. With a length of solder extended, larger spools can sometimes serve as a third hand to position solder; permitting one hand to hold work and the other hold iron.
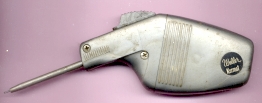
A handy tool for applying solder is the Weller Kormat, containing a small internal spool. Wire solder is advanced through the tube by the push knob at the top. For convenience, a common trick is to place a length of wire solder along a small dowel and to coil it around both, back toward the free end.
Note: Adjust brightness and contrast for optimum viewing.
Solder feeder.
Next clean up to remove any flux residue. When cleaning acid fluxes, scrub carefully with a mild alkaline such as soap and running water. Complete removal and neutralization are essential; since even months later, corrosion may ruin an excellent paint job.
Since not every solder job will be perfect, excess may be removed carefully with a sharp knife and some scraping. The larger part should be the one that is heated. For the fastidious, a final treatment with an air eraser or small sand blaster, using a fast cutting grit, will remove remaining solder excess. With lead and soft alloys excepted, solder is much softer than brass or most other stock materials and disappears very quickly.
Often it is necessary to remove solder with specially designed tools. The simplest is a braided wire or solder wick, which sucks up solder by capillary action. Once filled, the used part is cut off and discarded. Many suckers contain a triggered, spring loaded piston to create a vacuum. Some use a squeeze ball possibly with heat. The fanciest use external pumps connected by tubing. Most have replaceable tips and some have various sizes. With wire brushes, various cutters and probes, soldering tool kits are offered, but most are ineffective; since joint often cools before their use is completed. However the slotted end probe, often included, is useful for unwinding wire from terminals.

Note: Adjust brightness and contrast for optimum viewing.
Solder wick and suckers.

Note: Adjust brightness and contrast for optimum viewing.
Heated sucker.
There are many heat sources to suit different jobs. Since each case presents its own characteristics, there is usually one device that does the job better than the rest. There are no rules to follow in selection, except large masses require large heat sources and contact surfaces. In many cases, choice is by what will fit and still supply the heat needed, without melting adjacent joints. Experience and thought are required.
At the high end for welding are hot GAS TORCH flames and electrical arcs. Brazing and hard soldering usually use medium torch flames. Jewelers use small Bunson type torches at lower temperatures. Often in the past, Plumbers used gasoline torches with a hook device for holding irons or ladles; which were used to pour solder or lead into soil pipe flange joints, Flame or electrically heated, metal tipped IRONS AND RELATED GUNS cover most lower ranges. Solder pots are common for production dip soldering, while printed circuit boards with components mounted are wave (vibration) dipped in special pots (vats). RESISTANCE SOLDERING devices may cover a wide range of temperatures from very low to brazing. In a pinch, a gas range burner may be very carefully used. As claimed by some, even a match may serve as a heat source.
With a little practice and some knowledge, anyone can learn how to produce good solder joints.
BACK TO METHODS
BACK TO METERS
SOLDERING-HEAT SOURCES
