|
Programming Tutorial
Robolab
is a powerful new technology that lets students construct and program robots.
This page will describe:
Instead
of having computers teach children, Robolab's programing capabilities enable
students to teach computers!
S. Papert (creator)
 First
students will build robots using Lego blocks and pieces (including gears,
pulleys and motors). Students will build the RCX box within their robot
construction. First
students will build robots using Lego blocks and pieces (including gears,
pulleys and motors). Students will build the RCX box within their robot
construction.
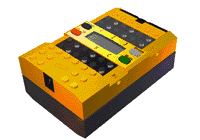 RCX programmable LEGO Brick RCX programmable LEGO Brick
The RCX box, which stands for
the Robotics Command System, is a microcomputer, built into a LEGO brick.
The RCX is the brain that controls the movements of the robots students
build. You can program the RCX using your PC, and transferring the
information via the inferred tower.
The RCX has three Input ports(1-3)
and three output ports(A-C), as well as a speaker to produce beeps and
tones. The RCX also has three internal sensors including a counter which
records events, a timer and a message holder to receive messages sent form
other RCX units. (Mindstorms Inventions User Guide) (Back
to Top)
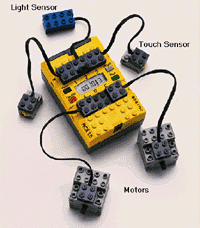 |
INPUT ports(1,2
&3: grey strip). Receives information from sensors (including
light and touch sensors).
OUTPUT ports(A,B&C:
black strip). Provides electricity for motors and lights. |
 |
Robolab is an icon
driven program that is extremely user friendly. We suggest that students
use the INVENTOR program for basic programming
and the INVESTIGATOR program for data collection.
(We feel the beginner program PILOT is too
basic and limited). |
The
Programming Process (Back to
Top)
-This Nasa Learning site gives the details
behind the steps taken in programming.
A program is essentially a list of commands
for the robot to follow. Programming is very logical in nature, however
one must be explicit with every step. The most important element in programming
to remember, is to finish everything you start.
Each program needs to be initiated with a
start icon  . .
Each program must be completed with a stop
icon  . (These will always
appear on the screen). . (These will always
appear on the screen).
Start and Stop program icons
Motors(forwards and
backwards), lights, beeps, reverse
and stop commands
for OUTPUT ports
Sub-Menus (WaitFors,
Loops, Modifiers, Counters, and Mail).
|
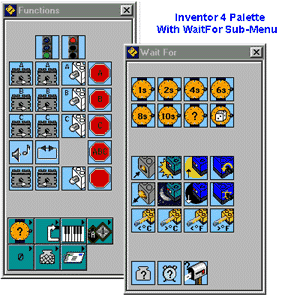 |
The FUNCTIONS
PALETTE can be found under the WINDOWS
pull down. It contains the majority of programming icons you will need.
To access an icon you simply need to click on the desired icon and drag
it onto the screen. The bottom green icons with horizontal arrows contain
sub-menus. In this example the Waitfor and sensors sub-menu are revealed. |
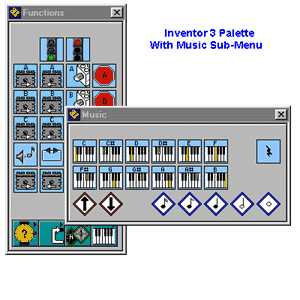 |
The Green bottom
icons with horizontal arrow can be opened up to reveal sub-menus.
The MUSIC sub-menu offers 12 notes, a pause signature, along with duration
and octave modifiers.
MODIFIERS
(diamond shaped icons): are connected below the programming element they
are modifying. |
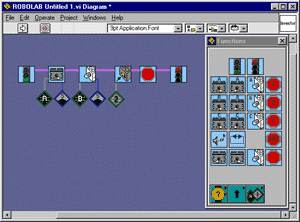 |
The Main program
screen looks like this. Programs are created by dragging individual icons
over from the functions palette onto the screen.
Click
here to see an animated example of this process.
Once on the screen,
the icons can be shifted and moved anywhere you desire. To DELETE
an icon you simply need to click on it once until you see a black and white
border around it, then hit delete.
If you do not understand
an icon, simply click on it, and an explanation of its functions will appear. |
PROGRAMMING
ICONS AND THEIR FUNCTIONS (Back
to Top)
This link provides clear and detailed explanations
of most of the programming elements.
CONNECTING
PROGRAMMING ICONS TO COMPLETE THE PROGRAM
*A TOOLS PALETTE
can be selected from the WINDOWS pull down,
which can change the function of the mouse pointer. A spool of thread
can be selected in order to string the elements of the program together.
In the above image, note the pink wire(string)
which links the programming elements together. These wires need to
be intact for the program to run. Bad wires will identify themselves by
turning black and white. To remove them simply press <Control B>, or
UNDO
BAD WIRES under the EDIT pull down.

|
*MODIFIERS(diamonds)
are connected to the bottom of the programming element they are adapting.
These wires will be blue, green or brown depending on the type of modifier.
It is essential that you specify which
ports you are programming (ie. Motor A or touch sensor 3).
The top right diamonds change the power level
or motors and lights.
The rectangular box can be used to specify
values or numbers. (ie. Loop 5 times, wait 23 minutes, light value of 40) |
When connecting Programming Icons, it is important
that you wire them from the END target to the BEGIN target of the next
icon. To do so press the LEFT MOUSE KEY on the END target and hold it down
until the BEGIN target of the next icon appears.
MULTITASKING
You can program your robot to do many different
things independently at the same time. To do so, you need to split the
program wire into a new chain of commands.
To initiate a new task connect the program
wire to  the multitask icon. You can continue the program
string from its two branches. You may branch your program as many
times as you like. However you must rejoin the wires or add additional
end functions to complete the extra tasks.
the multitask icon. You can continue the program
string from its two branches. You may branch your program as many
times as you like. However you must rejoin the wires or add additional
end functions to complete the extra tasks.
Samples
of Robolab Programs
This site offers many examples of robolab
programs using a variety of programming elements including jumps, loops,
containers, beeps and more. It is a very good ideas to check some of these
out.
DOWNLOADING
YOUR PROGRAM TO THE RCX BOX (Back
to Top)
-
If your program contains no bad wires and it makes
logical sense, it can be downloaded to the RCX box. To check this,
look at the ARROW in the upper left corner of the screen. If it is
broken, you have a problem. If you double click on it, a box will appear
explaining where the problem is.
-
If the arrow is solid, you are ready to download.
-
Make sure your RCX's infrared is 10-15cm is away
from the infrared tower, which should be securely connected to the COM
port of your PC.
-
Make sure your RCX box is turned on and SET TO
THE PROGRAM NUMBER you desire.
-
Click RUN(arrow). A message will tell you
when the program as finished loading.
-
If there is a problem a schematic will show you
where the error is occurring.
Teacher
Tips for Programming (Back
to Top)
1. Robolab software should be
installed on classroom computers and available to students during all robotics
periods to program.
Testing
and Re-programming to debug programs is an essential process in the problem
solving objectives of this unit.
2. Teachers
should give programming tutorials before students begin attempting programming.
If students have a basic understanding of the program they will be more
equipped to explore independently. Visuals should be used when explaining
the program, as it will help children to understand and recognize the program
better. Projecting the program on a screen or Smart Board can be
very effective. The Smart Board can enable the students to try moving
the icons around.
3. If computers are limited,
students can write out ideas for their program before they go to the terminal.
Teachers can print the icons with a colour printer and mount and laminate
them on magnetized backings, so that students can practise physically manipulating
their program before they go to the terminal.
4. Remind students not to cover
the infrared strip on the RCX box for it needs to be exposed in order to
receive programming.
5. Have students save their programs,
so that they can come back to them to make changes.
6. When children present their
robots, have them print off a copy of their robots, to help them explain
their process.
7. If a student does not understand
an icon, double click on it, and a description will appear in a text box.
(This will also reveal default settings).
 Back
to Top Back
to Top
Thank you to the http://ldaps.ivv.nasa.gov/Curriculum/Technology/elements.html
site for many of the symbols.
|

