|
|
Tutorial
Loading, Displaying and Storing Bitmaps in
MS Dev'97 Visual C++
|
This is a tutorial for opening, displaying and saving windows Bitmap files by the help of Visual C++. The following gives a step by step procedure to make a file called Bitmap.exe. This file when run will open, display and save 24 bit Bitmap files. The capability can be enhanced easily to open all the other formats of Bitmaps by simply adding some code to the existing code. If you have any problems with that, email me and I will see if I can help.
So here are the steps:
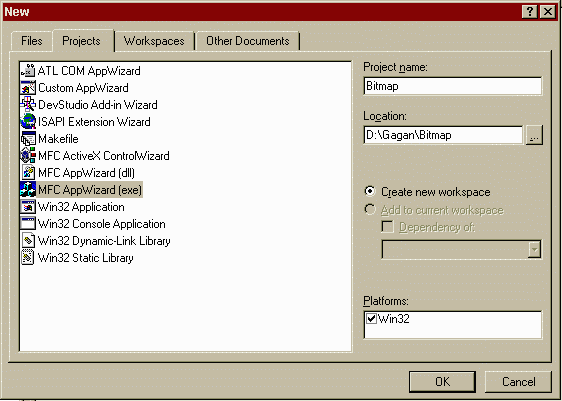
1. Run the Microsoft Development Studio'97 and click at the File menu. Select New and the "New" dialogue box is displayed. Make a new MFC AppWizard Project and call it Bitmap. The rest of the information need not be changed. Place it in a suitable location (In my case, I have placed it in the D:\Gagan directory). Your "New" Dialogue box looks like this:
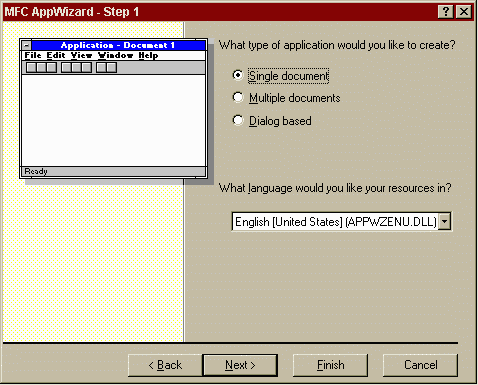
After this, there are 6 steps that follow. These are fairly simple steps and are illustrated in the following 6 figues. The first step involves selecting the type of the project. Choose "Single document' and press 'Next >'.
Step 2 is shown in the following figure. There is no need to make any changes here.

Similarly, the Step 3 Window can be accepted as it is presented by default. The following figure shows the step 3 window.

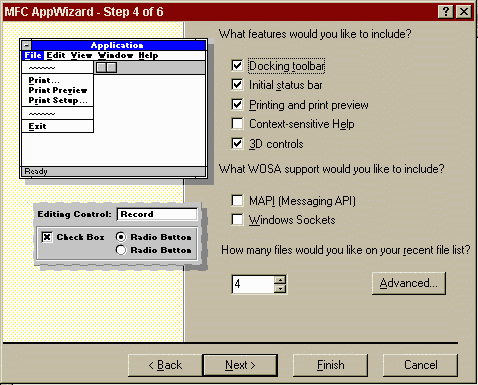
Step 4 controls a lot of the visual aspects of your program. You can uncheck the check boxes on this dialogue and the example window on the left side will change accordingly. You can choose any of the features here. For this exapmle, I simply accept the default configuration. The recent file list mentioned at the bottom of this box contains the number of files stored in the recent file list. This list is presented as the last item in your File Menu. The step 4 dialogue box is as follows:
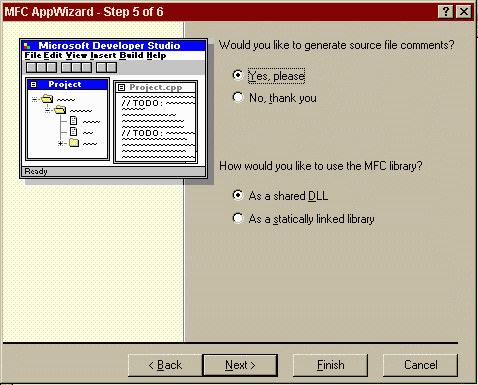
That brings us to Step 5. This step deals with the source file Comments and the MFC library. Its advisable to have the source file comments generated. This helps in the programming as it keeps guiding the programmer where to place the codes. This will become clearer as we proceed to the actual writing of the code.
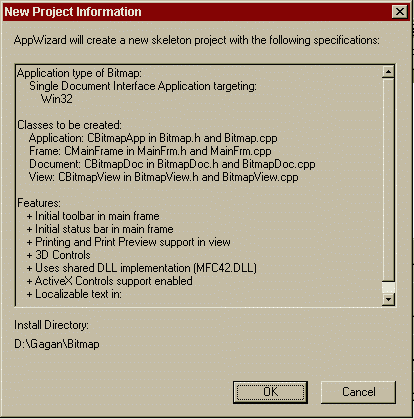
That was the last major step. The 6th and final step shows you the famililar checked flag, indicating that you have completed the basic steps. It shows all info about the various classes created. All you need to do is to press the Finish button and you are on the roll!

Finally, the entire information about the new project you just created is displayed. This displayes the various files associated with the different classes created. The features are all listed down as well. Typically, this information dialogue box looks as follows:
Now you are ready to go to the programming stage where you write the code that eventually opens, saves and displays the 24 Bit Bitmap. It is important that you know the format of a 24 bit Bitmap file before you proceed any further.
The following code is to be added to the files in your project. At first, lets see the "BitmapDoc.h" file. This is the header file for the document class. Simply cut and paste the code given below inside your file.
  class CBitmapDoc : public CDocument
  {
  protected: // create from serialization only
	CBitmapDoc();
	DECLARE_DYNCREATE(CBitmapDoc)

  // Attributes
  public:
	// MY code starts here ===================================
	unsigned char *bits;
	BITMAPFILEHEADER bmfh;
	BITMAPINFO bmi;
	// MY code ends here  ===================================

  // Operations
So, one unsigned char array, one BITMAPFILEHEADER structure and one BITMAPINFO structure has been declared.
Now, in the "BitmapDoc.cpp" file, the code for opening and saving the bitmap file will be added. The code appears as follows:
void CBitmapDoc::Serialize(CArchive& ar)
{
	if (ar.IsStoring())
	{
		// TODO: add storing code here
		// MY code starts here  ==============================

		// This code is for 24 Bit Bitmaps only.

		int i,j,k;  // These are the loop variables


		ar<<bmfh.bfType;           //bmfh: Bit Map file Header
		ar<<bmfh.bfSize ;
		ar<<bmfh.bfReserved1;
		ar<<bmfh.bfReserved2;
		ar<<bmfh.bfOffBits;


		ar<<bmi.bmiHeader.biSize;   //bmi: Bit Map Info
		ar<<bmi.bmiHeader.biWidth;
		ar<<bmi.bmiHeader.biHeight;
		ar<<bmi.bmiHeader.biPlanes;
		ar<<bmi.bmiHeader.biBitCount;
		ar<<bmi.bmiHeader.biCompression;
		ar<<bmi.bmiHeader.biSizeImage;
		ar<<bmi.bmiHeader.biXPelsPerMeter;
		ar<<bmi.bmiHeader.biYPelsPerMeter;
		ar<<bmi.bmiHeader.biClrUsed;
		ar<<bmi.bmiHeader.biClrImportant;


		//there is no colour table for 24 bit bitmaps

		long int cnt=0;		// counter
		for(i=0;i<bmi.bmiHeader.biHeight;i++)
		{
			for(j=0;j<bmi.bmiHeader.biWidth;j++)
			{
				for (k=1; k<4;k++)
				{
					ar<<bits[cnt];
					cnt++;
				}
			}
			for (j=0;j<bmi.bmiHeader.biWidth%4;j++)
			{
				ar<<bits[cnt];
				cnt++; //image has a double word boundary.
			}
		}
		// MY code ends here  ===================================

	}
	else
	{
		// TODO: add loading code here
		// MY code starts here  =================================

		int i,j,k;

		ar>>bmfh.bfType;		//bmfh:BitMap File Header
		ar>>bmfh.bfSize ;
		ar>>bmfh.bfReserved1;
		ar>>bmfh.bfReserved2;
		ar>>bmfh.bfOffBits;


		ar>>bmi.bmiHeader.biSize;	//bmi: Bit Map Info
		ar>>bmi.bmiHeader.biWidth;
		ar>>bmi.bmiHeader.biHeight;
		ar>>bmi.bmiHeader.biPlanes;
		ar>>bmi.bmiHeader.biBitCount;
		ar>>bmi.bmiHeader.biCompression;
		ar>>bmi.bmiHeader.biSizeImage;
		ar>>bmi.bmiHeader.biXPelsPerMeter;
		ar>>bmi.bmiHeader.biYPelsPerMeter;
		ar>>bmi.bmiHeader.biClrUsed;
		ar>>bmi.bmiHeader.biClrImportant;


		if (bmi.bmiHeader.biBitCount==24)
		{
			// 24 bit bitmap ===============================

			bits=(unsigned char *) malloc (       ((long int)
                             (   ( bmi.bmiHeader.biWidth*3 +
                                   bmi.bmiHeader.biWidth%4 ) *
                                   bmi.bmiHeader.biHeight   ))  *
                                   sizeof(unsigned char));

			long int cnt=0;

			for(i=0;i<bmi.bmiHeader.biHeight;i++)
			{
				for(j=0;j<bmi.bmiHeader.biWidth;j++)
				{
					for (k=1; k<4;k++)
					{
						ar>>bits[cnt];
						cnt++;
					}
				}
				for (j=0;j<bmi.bmiHeader.biWidth%4;j++)
				{
					ar>>bits[cnt];
					cnt++;
				}
			}
		}
		else
                    MessageBox(NULL,"Sorry, this is not a 24 Bit Bitmap.",
                    "File Open Error",MB_ICONSTOP|MB_OK);
	}
		// MY code ends here  ===================================
}
Now we have the code for opening and saving the Bitmap files. The next part is used to display the bitmap on the screen. This is done in the view class. This is done in two steps, first we modify the header file and then the source file. First, we open the "BitmapView.h" header file. The following modifications are made:
class CBitmapView : public CView
{
protected: // create from serialization only
	CBitmapView();
	DECLARE_DYNCREATE(CBitmapView)

// Attributes
public:

	CBitmapDoc* GetDocument();
	// MY code starts here  ===================================
	RGBQUAD *bmicolor;
	BITMAPINFOHEADER bmih;
	BITMAPINFO bmi;
	// MY code ends here  ===================================

// Operations
public:
Having made these changes, we need to add code to diaplay the bitmap. This is done in the "BitmapView.cpp" file. The following code can be added in.
void CBitmapView::OnDraw(CDC* pDC)
{
	CBitmapDoc* pDoc = GetDocument();
	ASSERT_VALID(pDoc);

	// TODO: add draw code for native data here

	// MY code starts here  ===================================
	int ht;
	int wh;
	ht = pDoc->bmi.bmiHeader.biHeight;
	wh = pDoc->bmi.bmiHeader.biWidth;

	bmi=pDoc->bmi;
	int bitcnt=(int)bmi.bmiHeader.biBitCount;

	HDC hdc=::GetDC(m_hWnd);

	SetDIBitsToDevice(hdc,0,0,(DWORD)wh,(DWORD)ht,0,0,0,
		(WORD)ht,pDoc->bits,(LPBITMAPINFO)&bmi,DIB_RGB_COLORS);
	// MY code ends here  ===================================
}
This code uses the SetDIBitsToDevice function. All documentation about this function and about all the other functions used in the above example can be found in the help files. The MSDEV 97 help is pretty good and has covered practically everything one would want to know.
 |
The file that you have just created can be run and you can open Bitmap files by it. If you face any difficulties, feel free to contact me. For your convenience, I have put up the executable file on my server and if you wish, you can download a zipped version by clicking at the icon beside. |
Your comments are welcome at the following address: eng50667@nus.edu.sg.


Back to Top
![[Back]](buttback.gif) Click here to get back to Skylight's Visual C++ Page. Click here to get back to Skylight's Visual C++ Page.
![[Home]](homecol.gif) Click here to get back to Skylight's home page . Click here to get back to Skylight's home page .
|