
![]()
![]()
![]()
![]()
![]()
![]()
![]()
|
|
Bullet Proofing your OB4 Gear-Diffby Eric Perez
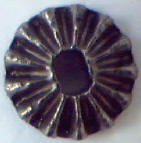
Intro:Once Again NitroTouring.com bringing in the goods. As many of you already know weak gear differentials are one of the Achilles heels of the Ofna Nitro OB4 and Nitro OB4-Pro. I've been trying out different ideas to increase the reliability in this vulnerable area. This article reviews in great detail what I found to be the best solution to the problem. Hope you enjoy it! Gear Design Iterations:The good news is that Ofna has tried to address the issue with the weak gear diffs -the bad news is that although there is evidence of slight changes to the gears; like adding shims here and there... I was never 100% convinced that they had solved the problem, because I still tore up the version 2 gears faster than the original version 1 gears. The latest batch of gears don't look any different than their predecessors. Here is a brief history. These are some pictures of the original gear version 1.
Notice the wear patterns on the middle of the tooth. These are the one's that make the rear diff feel rough.
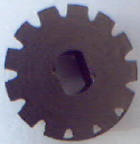
These are some pictures of gear version 2. (Note: New gear, no rear step)
There is a version 3 that has a solid back but without the step in the rear, it too was junk.
Back to the Drawing-Board:So what do we do when the factory parts and spare replacements don't cut it? We look for upgrades -What happens when no upgrades are available? We improvise! HPI to the rescue...
The Break-Down!
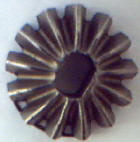
HPI's New revised (with washers) diff gear set for the Nitro RS4 series. The lightly colored gears are the HPI one's the darker gray gears are Ofna's rev level 3 gears. Note the quality of HPI's castings and the true beveled tooth profile; they look like real gears. New Ofna gears look like they come "pre-worn" from factory.
I'm sure you've noticed there are some dissimilar points between the gear. Take out your Dremel we are going to work! but first the disclaimer... You must know how to operate a dremel and understand how to set the speed for the bit that you using based on the material that your cutting. Always wear eye protection when using the dremel. Follow all safety procedures for operating the items/tools needed for this article. We will need a multi-speed Dremel tool. Depending on the bit that you are using you will need to either increase or decease the RPM. When using the cutting tools on soft metals you need to increase the speed until the bit does not jump or chatter. If the RPM is to high the tool will be hard to control and it will want to wander inside the engine -not a good thing. The polishing/grinding tools can be used at lower RPM, this will vary depending on the force being applied to the tool.
For more information on Dremel cutting bits go to: www.dremel.com Parts needed:
Step 1: Bevel Gear modificationsNote: most of the Racers tend to have most problems with the rear gear differential. If you already have a ball diff or have solved the diff problem some other way and just need to re-do the front diff I have good news for you. There is no gear work needed for the front diff!
Bevel Gear Modifications for the rear differntial. Use Dremel bit #3 and the drum sander to remove the step in the rear of the gear. You can finish the job with a flat file. The left gear is modified, the right gear is stock.
HPI Bevel gears are a direct drop-in for the front differential (No modifications are needed)
Step 2: Spider Gear Shaft modifications
Take out the Dremel cut-off disk and cut the shafts until they fit snuggly in the diff cases. Use the sanding drum to remove any burrs from the cut end.
This picture shows the final product (Short is stock, long one is cut HPI).
Step 3: Preparing the Diff Cases
This picture shows the difference of the stock "wimpy" screw and the heavy-duty 2mm cap head screw.
Don't forget that you'll need to use different size drill bits for the engaging side of the diff (bottom case) and the clearance side (top case).
Step 4: Final Assembly
For the rear diff, Install the large flat spacers that came with the HPI diff kit behind the bevel gears. Do not install the shims behind the spider gears or the mesh will be too tight. Assemble the rest of the diff per the Kit's instructions.
Another tip is to slide an additional shock bushing between the case and the out-drives. This will prevent the fluid from leaking out the out-drive shaft and the case.
The front diff only requires the shims on the spider gear shaft -No other shimming is required.
fill the rear diff with 30K diff oil, seal with clear nail polish (don't use the seals) and torque the cap head screws in a star-shaped pattern. The front diff can be filled with 50K diff oil.
Note: The screws will not be completely flush with the face of the diff case. This is not a problem because the diff is not held flush with the diff spacers in the bulkheads. The combination of the screws and the sealant (nail polish) won't allow the diff fluid to leak out of the case.
Maintenance:Maintenance of a gear diff is relatively straight-forward. You should get used to how a new diff feels like when you hold the case stationary and turn a wheel. Feel the resistance of the gears and the thick lube. The gear should feel slow, but not rough or notchy. The purpose of the lube is to slow down power transfer from the inside tire to the outside tire on the corners. The easier it is for the diff to transfer power, the more traction you will get and the easier it will be to over-power the tire when the car is punching its way through the corners. You should occasionally check the resistance of the diff before and after a run. If you notice that the diff is freeing up, then this usually indicates that the fluid is leaking out of the diff. I've found that simple green and a stiff-bristled paint brush are the best things to quickly clean and drain a diff from old fluid. Rinse with denatures alcohol let dry and re-fill with your choice of diff fluid. Note: It's normal for the diff to feel a bit looser after a long run. If you open the diff and the fluid is clear, that's a good sign. If you open the diff and the fluid is gray, that's a bad sign. Gray silicone fluid means that the gears are grinding each other away and that you are basically lubricating gears with small particles of metal. Ofna gears shimmed or not always turned the silicone gray, this coupled with rapid gear-tooth deterioration where telling me that the Ofna gears where not working. After 3 Sunday races with HPI gears I changed the lube to a different viscosity; I noticed the old lube was still transparent. This plus the fact that the gear-mesh was smooth leads me to believe that the HPI gears would be dependable alternative for the stock one's. The diff fluid included with the kit is in the 50K range. Remember that 30K from manufacturer "A" may be more viscous that 50K from manufacturer "B"; so stick with one manufacturer. Ofna and Mugen silicone diff oils seem to work equally well in the OB4. Enjoy! Wrap up:I hope you enjoyed this article -Now go out there and win some races! Whoop some R/C car butt!!! Eric Perez Team NitroRC.com If you have any questions or would like to discuss any of the topics presented in this article, feel free to e-mail me.
|


 All this go-fast parts
don't mean much if you are still using wimpy miniature cheese head screws. Use a
3/32 drill-bit and drill out the old screw holes to accept a larger 2mm cap head
screw. Don't forget the clearance holes on the other side, these will be made
with a 7/64 drill-bit.
All this go-fast parts
don't mean much if you are still using wimpy miniature cheese head screws. Use a
3/32 drill-bit and drill out the old screw holes to accept a larger 2mm cap head
screw. Don't forget the clearance holes on the other side, these will be made
with a 7/64 drill-bit.


