

Build Your Own Portable Sand Table
Simon Davison shows how to create your own portable sand table
Sand and Deliver
 |
For me, the perfect medium for wargame terrain is sand. As with any surface we wargamers play on, it has its advantages and disadvantages. The main arguments against are obvious enough. Firstly it’s pretty heavy stuff especially when wet. You therefore need a well-constructed table almost certainly permanently erected. Other minor irritations include not putting your hand down on the battlefield to aid balance whilst moving forces about, not rolling dice on the sand and the ever present not letting your mates poke wee holes and fill them with beer on the edges of this wonderfully realistic new wargaming world. These drawbacks aside, sand is brilliant stuff!
To be honest, for most types of wargame where only a flat field is called for, sand is a pain in the behind. Sand tables really come into their own when you need features. I have used a sand table for all kinds of periods from the Assyrian invasion of Egypt to the siege of Badajoz.

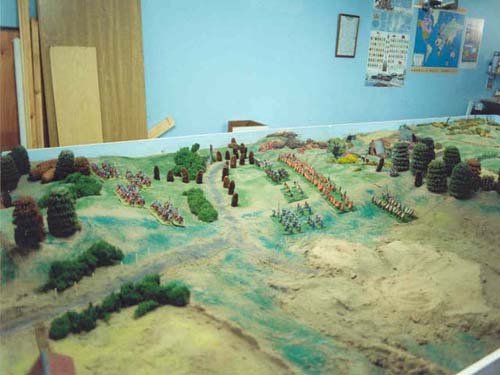
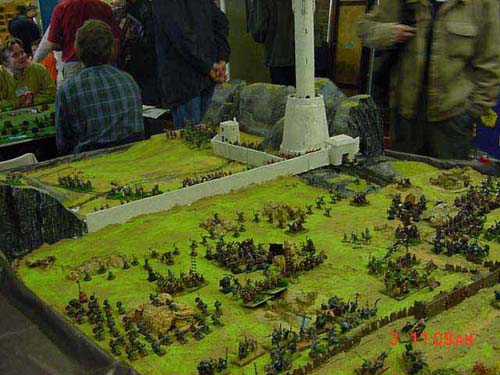
You can have virtually any terrain feature you wish from sand dunes to walls and glacis, you can sap up to walls, have realistic river banks and beaches, hills, cliffs, Roman camps, valleys and defiles, but in my humble opinion the wars of the 20th century show just how versatile the sand table can be. You can have trenches and dugouts with no need of half figures or having to have an earthwork taller than your average skyscraper. Name the feature and you can simulate it. It is great to have dry stonewalls and ruins you can really drive your tanks through! And you can leave your tracks behind you. This is good in more ways than one. No cheating (as if any wargamer would stoop so low) you just has to follow the marks in the sand. Anti-tank ditches, craters, ploughed fields and mine fields with buried mines are easy.
Having whetted your appetite and got you thinking about the medium I will tell you how I have overcome to a large extent the major bars to the use of the sand table. But firstly my credentials.
I have been studying the problem for a number of years. I started wargaming very young and it stuck with me. Ever since 1973 when my dear understanding mum let me take my 54mm Airfix WW2 army into the back garden and go nuts, I’ve known that there is no substitute for real terrain. Mum was going to have grass laid, but before this was to happen, this patch of clay heavy earth and the garden hose were mine!
The years went by. My Uncle Robert bought me a book by Donald Featherstone called “Battles with Model Soldiers”. It crystallised my half-formed thoughts on wargaming and, along with the suggestion, showed a black and white photograph of some figures in action on a sand table. I moved to Scotland with my wife to her hometown. It was a substantial detached building with a huge loft space. Being 22 years old, married and therefore skint I turned to my mate Mike, then serving in the Royal Marines, he offered me substantial funds to get my project under way. Where he was going on exercise all winter he couldn’t spend his “hard earned” anyway. The result was a 16’x10’ monster of a sand table in the loft. It needed two holes in the middle to get access to the entire playing surface.
I learned a great deal from this experience. 1) Sand is heavy. 2) Even heavier carried up ladders a bag at a time. 3) When it dries out it can find it’s own level leaving you with a curious inverted cone shaped hole in your world and a new hill under your table. A few more years and another move, this time to an old out building and the perfect place to have a ground level sand table. No more ladders for me! This time I did my homework properly and with the help of a couple of mates from the Phoenix Club and my son Chris we built the present version. It is 6ft wide, the most comfortable distance to reach in at each side, and is 24ft long, and the greatest possible length for the room. It carries 2 tons of builder’s sand.
It is all very nice but you can’t take it down and go to the club with it of an evening.
The solution came to me 18 months ago. A tray to put the sand into would be just as difficult as taking a whole table to the club in your car. Even sectionalised it would be as tricky as carrying terrain boards. The answer is to take only what you need to turn any table, group of tables or floor space into your sand table.
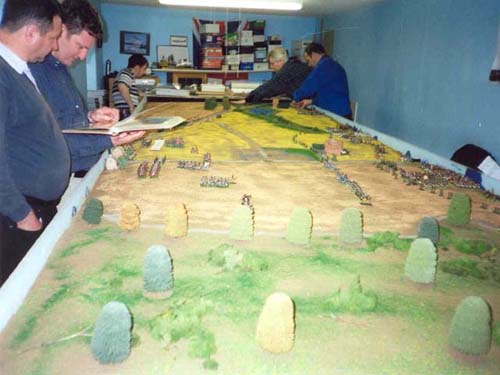
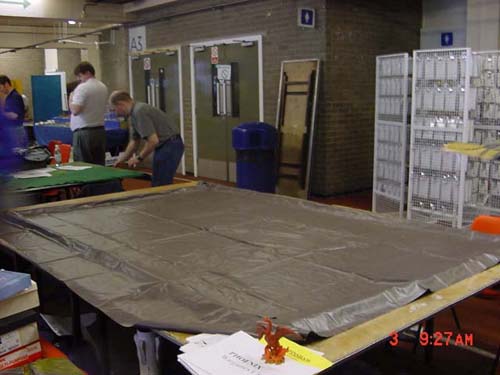
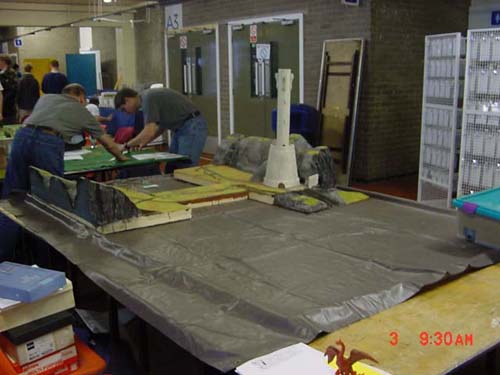
All you need is an edge or lip for the table and a ground sheet. The edge, in this case, is a folding frame, hinged to open out into a 5’x7’6” rectangle joined by a hasp at one corner. At the club three 2’x8’ tables are erected and shoved together creating a 6’x8’ surface. The frame is put on top and a 6’x8’ plastic tarpaulin is put on top of that. Enter the sand, contained in two B+Q plastic see through containers about 18” wide by 2’ long by 4 or 5” deep with clip-on lids and little roller wheels underneath. Each container holds about 30-40lbs of sand. This gives a coverage of about an inch over your whole 7’6”x5’ table.
It takes 20 minutes to put up (including all the scenery and features) and takes 15-20 minutes to take down again. This obviously adds to the length of preparation time and deducts from playing time but the resulting terrain is well worth it. The whole thing fits easily into your car and is only the weight of a small person to transport. It’s a job for two. We have a rule that anyone in the club may use the table but it must be operated by at least two people.
The sand stays damp in the containers but sometimes, if the table has been used somewhere and dried out a bit I use a small hand sprayer to dampen it down. The only other bit of equipment needed not normally associated with wargaming is a dustpan and brush set, essential to the clearing up operation.
One inch of damp builders sand does not sound like much but this is plenty deep enough for 20mm figures to entrench in. Usually we scrape the sand from where it’s not needed, say a river feature or antitank ditch, and use it for a hill. Alternatively, you can carry additional tupperware type boxes with just enough sand in it to make a particular terrain item, perhaps a ridge or dunes. The only bar to anything you want to do is how much you want to carry and how long you have to spend putting up your terrain.
You will need a periscope. It will soon become apparent that even when you have patted down all your sand into place that you are left with subtle undulations leaving areas of dead ground almost impossible to see from the wargamers usual “birds eye” view.
You do not need stands on your trees or fences. As not every battle takes place in a desert, making the desert bloom with green could not be easier. One average bag of flock covers the entire table. For roads, just draw two lines in the sand were you want the road to run (put in roadside drainage ditches if you like) and scatter a little black flock along it. I sometimes like to spray paint roads or even sand made walls and ruins. It’s quick and easy and dries fast. When the game is over, all the flock, paint and features, of course, just disappears.
The next time you use your sand table there is no sign that it has ever been used before. You may, therefore, wish to take a “snap shot” of your creation as unlike scenery boards once you take it all down its gone for good. Packed away the table can be put in the boot of a car, or pushed under the bed in the spare room, or stacked in the bottom of the stores cupboard at the club, or even just kept in the garden shed or the garage. It’s 2x boxes of sand 1x folded frame 1x sheet and a carrier bag with a dustpan and brush and plant sprayer in it.
If you say to me “Simon it’s 40 extra minutes I don’t have on a club night” then that’s ok. We take ours to shows and if it’s not used for a while it doesn’t go “off”, any one can use it whenever they wish. If you want to make a mobile sand table you can follow the steps outlined above, or you can get in touch with me, Simon Davison, c/o The Phoenix Wargame Club. Alternatively, you can e-mail me at:
Simondavison@castlehead100.fsnet.co.uk
There are other uses, hints and tips for the construction and use of both static and mobile sand tables not covered in this article. It may be that there is some interest generated in which case another article may be forth coming.