mirc*.exe
and if the file is on your hard drive it should show up.
The mIRC Home Page has a lot of useful information about how to download mIRC from the internet, and those instructions are here. Here is a summary of the information on that page:
Firstly, there are a few ISP's who work slightly differently to the others. If you're using one of the providers listed below, here are some links to some more relevant information for you.
webtv From what I gather, you have to use WebTV's own built-in chat program, but you can use it to connect to the same servers as you can with mIRC. Take a look http://www.irchelp.org/irchelp/misc/webtv.html for more detailed instructions on how to connect.
AOL Have a look at http://members.aol.com/cmmoon12/winsock/mirc/ which should give you more information about how to use mIRC from within AOL.
mIRC is distributed in a self-extracting file that will install mIRC on your PC. You don't need any external programs to install and setup mIRC on your PC, just follow the instructions below.
mIRC comes in two flavours; a 16-bit version for Windows 3.x, and a 32-bit version for Windows 95. The mIRC home page recommends that if you are not sure which flavour to use, try the 16 bit mIRC version. I say you could try the 32-bit version first, and if you can't get that to work, then try the 16-bit version.
Go to the mIRC download page and select a file to download. To download a file and save it to your hard disk instead of viewing it, right-click on the link to the file. Select 'Save Link As..' from the popup menu. A file save window will pop up prompting you for the directory in which to save the file. Please remember where you saved the file!!
Sometimes your web-browser will confront you with a warning message like : "Unknown File-type. No external viewer configured for this file. Do you want to configure a viewer now OR save file to disk ?" In these cases select "Save file to disk".
Once you have downloaded mIRC, you are ready to install it. During the install procedure mIRC's files will be automatically set up and all necessary steps for starting mIRC will be taken. If you're upgrading an older version of mIRC you will be able to keep all your old settings.
If you're using Windows 3.x, open the File Manager (you can find its icon in the Main group in Windows). If you're using Windows 95, open Windows Explorer (click start, select programs, and Explorer is at the bottom of the list of available programs). Locate the mirc 5.4 file which you just downloaded and saved to your harddisk. It should be named mirc54s.exe for the 16-bit version and mirc54t.exe for the 32-bit version (depending on how Explorer is set up to display files, you may not see the .exe bit).
To start the installation process just double click on the file. The installation program will be started automatically.
Determine the place on your harddisk where you want mIRC to be installed. Normally the proposed c:\mirc will do fine. Upgraders just browse to the directory where their current mIRC version is found and select that as destination directory. If you want the installer to keep backup copies of all eventual older files, keep the "Make backups" option selected. If you want the installer to add a mIRC program group to windows and set up the mIRC icons, keep the "Add icons" option selected.
Select 'OK' and you're done! The installer will take care of all the
work.
Download problems
Can't find where you saved the file you downloaded? In Windows 3.x, open
File Manager, and select Search from the File Menu. In Windows 95, click
Start, Find, Files or Folders. In either case enter mirc*.exe
and if the file is on your hard drive it should show up.


Once you have downloaded and installed mIRC, start it running. A message will appear from the author of the program asking you to register it. This message will appear every time you start mIRC unless you click on the tick in the bottom right hand corner. This switches off the window. The next window to appear is the one on the left, and initially all the fields below the "Connect to IRC Server" button are blank.
Full Name: You don't have to enter your name here, but you must enter something. Some people type in something like 'ask me nicely.....' or simply a line of stars.^Danny or
Danny_. Note that only the first nine letters of your nickname
count, and that you can always change your nickname at any time.Select a server by clicking on the down-arrow next to "Random US DALnet server" and picking one from the list. The server list states the IRC network the server is on, followed by the server name. It doesn't really matter which network you choose for your first foray into IRC, but if you want to meet certain people in a certain channel then you have to know which network the channel is on and pick a server which is on the same network. Popular networks are EFNet, DALnet, UnderNet, and IRCnet. Bear in mind that although there may be a channel called #mirchelp on both UnderNet and DALnet, they are two separate channels, with different people having different conversations. If you want to narrow the choice of servers you see in the list (and there are new IRC networks and servers appearing every day, it seems), you can select a network using the "IRC Servers" drop down box.

One final thing to do before connecting to the server is to select the 'Local Info' tab and check the 'on connect, always get local host' checkbox. Now go back to the 'IRC Servers' tab and press Connect! If the server you have chosen isn't fully loaded you should be on-line and (almost) ready to chat.
If you were unable to get on to the IRC server of your choice, then try again. If you are unsuccessful after a few tries, try a different server (if I can't get on using a server in London I may try one in France, or Holland, for example). If you are still having no luck, try disconnecting from the internet completely and reconnecting. This final resort has always worked for me.
Potential Setup problems
Once you are connected you will see the channels dialog box. If you know
the name of the channel type it in here (don't forget the #). If the channel
didn't already exist it will be created for you - you can tell this has
happened because you'll be the only one there! If you have a channel that you
use regularly you can click the 'add' button to add it to the list, so you
don't have to type the name in, or you can get
mIRC to join the channel for you automatically as soon as you are
connected.


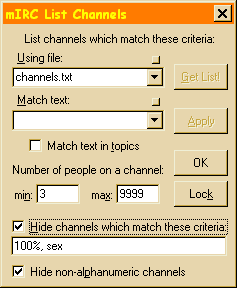
| Click the 'list channels' icon in the toolbar. |

A window pops up into which you enter some parameters for
listing channels.
Using file: mIRC will save the channel list to a text file in
your mIRC folder. By default this filename will be the same as the name
of the network you are on, (e.g. dalnet.txt) but you can change it here.
Match Text: enter some text in here if you only want to see channel
names or topics with this text in them. I usually leave this blank.
Match Text in topics: Tick this box if you want to match your
selected text against channel topics as well as the channel
name.
Min: Set this to, say, 3 or 4. If you set Min to 1 then you will get
all the channels, including ones where people are just sitting there not
talking to anybody! You want to make sure you've got at least one other
person to talk to, right?
Max: You might as well leave this at 9999.
Hide channels I'll warn you now that there are a lot of 'pornographic'
channels on IRC where people trade pictures, and a lot of these channels
start with something like #100% so they appear near the top of the list. IRC
is one of the prime examples of the internet which is impossible to police,
so if you don't want to see them, ask mIRC to hide them from you, as I've
done in this example.
Hide non-alpha channels: Tick this one, as this eliminates a lot of
garbage from your list.

Select 'OK' when you are ready for the list, which will probably take a few minutes to compile. The list shows the name of the channel, the number of people in the channel at the time the list was downloaded, and the channel topic. Bear in mind that the name of the channel and the channel topic may bear no resemblance whatsoever to the actual chat going on inside that channel. You can right-click in the channels list for a pop-up menu which allows you to change the sort order of the list among other things. If you see a channel you like the look of, the easiest way to join it is to double-click its name in the channel list. You can be in as many channels as you wish, the only limitation is the number of simultaneous conversations you can follow!
When you first join an unfamiliar channel, hang around for a while to get the
feel of it. Some channels are full of people who seem to be keeping very
quiet - they may not really be quiet, they may all be talking to a few
friends in private chat windows and not
talking in the main window. If you don't like the way the chat is going you
can simply leave. Don't jump straight in by asking what people are talking
about, it's considered rude.


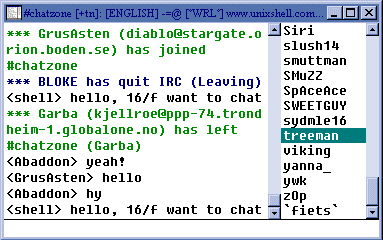
This is an example of a chat session in progress. There are several things
to point out on this window. The nickname list is on the right, and
shows everybody who is in the channel, and the nicknames are shown in
alphabetical order. The main channel shows people joining and
leaving the channel in green, and people quitting from IRC in
blue. All actual chat is shown in black, and is preceded by the nickname of
the person 'speaking'. The empty box at the bottom which runs the width of
the window is called the edit box and this is where you type your
messages. Now this next bit may sound obvious, but when you finish typing
what you want to say all you have to do is press the enter key, and I only
mention this because it is a problem I have seen in the past. At the top,in
the title bar of the window, is the channel name (in this case #chatzone),
the channel mode (the [+tn] bit), and the
channel topic.


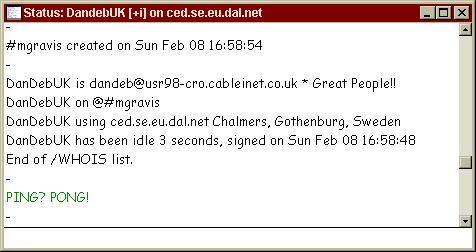
The status window shows you system messages. When you perform a Whois on somebody, the results are shown in the status window. PING requests and their replies are also shown here, as well as certain messages when people leave the channel or quit from IRC. The contents of the status window are constantly changing, and they can be distracting for a new user. You can minimise this window and ignore it without missing out on anything too exciting. There are also several options in mIRC to redirect certain messages from the status window to the active window, so you can see them as they happen without having to look at the status window all the time.


