mIRC Tips and Tricks
Changing default colours
Changing the screen font
Colour in text
Capturing URL's
Whois
PING
Flashing windows
Finding text in windows
Playing sounds
Changing default colours
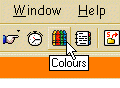 |
Selecting this option brings up a window in which you can change the
default colours used by mIRC. |
 |
You can
change the colour setting of any of the standard mIRC functions from here.
Don't worry, though, pressing the Reset button will bring back all the
defaults! |
Changing fonts
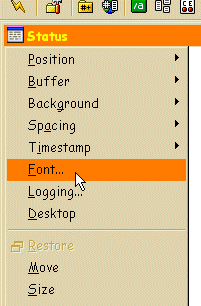 |
Click the icon in the top left corner of a window and this menu appears.
You can select the font from this menu. Initially the font is only applied to
the window you selected, but you can check the 'save as default' box to apply
the font to all windows. |
Colourful Text
mIRC can make text appear in lots of different colours. You have to prefix
a colour change with <CTRL>+K (i.e. press the CTRL key and the letter K
simultaneously). Then you enter the colour code. There are 15 colours and
they are defined below (they are in the mIRC help file as well). Then you
enter the rest of what you want to say. For example, to enter a word in
blue, type something like:This is a then press
<CTRL>+K, type 4, then type blue then press
<CTRL>+K then 2, then type word. Phew!! This will make the
sentence appear as follows: This is a blue
word. As colour coding like this is quite tricky, a lot of people set
up some of their standard aliases (see below) to appear in different colours,
and leave all their normal chat text in the default colour.
Whenever you press <CTRL>+K a pop-up
window will appear telling you what the available colour codes are (you can
disable this by checking the relevant box in the Extras section of the
options dialog). You can click on the number in the
pop-up window to insert the number into the editbox. Also colour 99 is now
treated as a transparent colour, i.e. it will match a users current background
colour. The main purpose of this is to allow you to use numbers after a
<CTRL>+K without a problem, eg. /echo ctrl+k5,9954 would
display the number 54.
The colour codes available are:
| 0 white |
1 black |
2 blue |
3 green |
| 4 light red |
5 brown |
6 purple |
7 orange |
| 8 yellow |
9 light green |
10 cyan |
11 light cyan |
| 12 light blue |
13 pink |
14 grey |
15 light grey |
Capturing URL's
 |
URL's are web page addresses, and quite often on IRC people will type in
the address of a page they may want you to have a look at. You now have
several ways of looking at this page. You could open up your web browser,
type the address in, and correct your typing errors when it says 404 File Not
Found. You could scroll back up the chat window to find the URL and cut and
paste it into your web browser. Or you could take the simplest option, and
let mIRC do it for you! In order for this to work, you need to prepare mIRC
for it. Don't worry, this is a one-off operation, then you can forget about
it. Firstly, click on the General Options icon (you should know which one
this is by now!) and select the 'Catcher' tab. I have mine set up as in this
diagram.
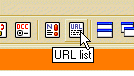 | Clicking
on the URL icon brings up another window which lists all the web addresses
which mIRC has spotted for you. In order to view the web page you have to
highlight the address in the list, right-click with the mouse and select View
from the pop-up menu. Alternatively, you can double-click the address in the
list and then select 'Get Active URL' from the dialog box which appears.
|
When mIRC recognises that a URL has been
typed in, it allows you to click on it directly in the chat window. The
cursor changes to a pointy finger, and when you click in it your browser
should open straight away. A similar thing happens with email addresses, but
you have to shift-click on an email address as mIRC doesn't recognise them
directly (there are too many phrases which look like email addresses but
aren't, apparently).
Whois
 |
This is one of the ways to find out a little bit about the other people in
the channel. Highlight the person's nickname in the nickname list, then
right-click. A pop-up menu will appear, and the top item on this list says
Whois. Select this option and have a look in your status window. The
information may take a second or two to appear. This tells you the person's
nickname, the ISP they are using, the 'real name' and 'email address' they
entered when they set up their IRC program, the server they are connected
through, what other channels they are on, and how long they have been idle.
The most important piece of information (in my opinion) is the list of other
channels a person is on. Not only can this be an invaluable way of finding
popular channels, but you can get an instant idea of someone's personality by
looking at what else they are doing. Bear in mind also, that anyone else in
the channel can request the same information about you. Channel operators can
kick people from a channel or ban them from it based on what other channels
they are in, so if you want to keep a channel well-policed, do a whois on
everyone you don't know and report anything you don't like the look of to a
channel operator. |
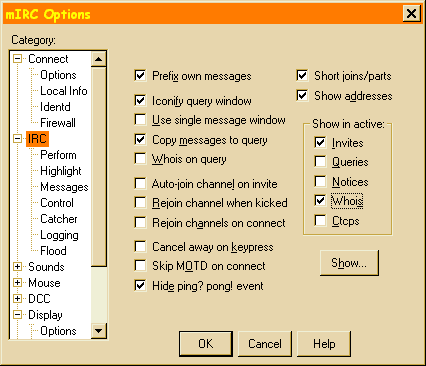 |
If you check the "/whois" box in the "Show in active" section on
the IRC options screen, then when you type /whois Somebody in a
channel, query/chat, or custom window then the results of the whois are
displayed in that window instead of in the status
window. |
PING
While you're using mIRC and you have your status window open you will
occasionally see the words Ping? Pong! appear. What this means
is that the server sends a signal to your computer to see if you are still
there (the PING) and you send a reply back (the PONG). If the server doesn't
receive a reply within a certain timespan then it will assume you have
crashed and throw you off the server. Of course you wouldn't notice being
thrown off the server, because you'd be busy rebooting your PC at the time.
PING is presumably named after the similar operation performed by submarines
(they send a signal down to the sea bed and time how long it takes to get
back. The signal makes a pinging noise, hence, PING).
You can send PING signals to anyone else on the IRC network as well. The
time taken for the PONG reply to come back will give you an indication of the
lag time on the server (lag time is caused by the server receiving too many
messages from too many people to process them all quickly, so a backlog
appears). A ping response time of anything up to 4 or 5 seconds or so
is normal, and if it is longer than 30 seconds I'd consider disconnecting and
reconnecting using a different server. The PING command is on the CTCP
section of the nickname list popup menu, or you can type /ping
{nickname} instead.
Flashing windows
Quite often when people are chatting using mIRC they are doing other things
on the computer as well. Checking emails, surfing the net, writing novels,
that sort of thing. The point is, people don't pay attention to mIRC all the
time. Consequently they may miss something. This new option causes the mIRC
titlebar (and the mIRC button in the taskbar if you're using Windows 95) to
flash if it picks up a message and is not the current application. The only
disadvantage to this is that if you have four or five windows open then
mIRC will start flashing almost as soon as you go and do something else!
Finding text in windows
In any window pressing Control-F will open up a text search dialog which
enables you to search the text buffer of that window for matching text.
Useful if you have a large text buffer and don't have time to search manually
for a particular phrase or word.
Playing Sounds
This is one of the more 'fun' aspects of IRC, and happens more in some
channels than others. Basically, there is a command in mIRC which enables you
to play a sound (wav or midi) file. Not only that, but it also sends a
request to everyone else on the channel, so they play the sound as well! Cool!
There's just one drawback. What if you don't have the sound file that someone
else is playing? No problem - a bit of tweaking and everything will be
running smoothly.
The first thing to do is go to General Options and select the Sounds tab.
Then tick every box you can see. Close the window. Then, open Remote Events
and type in:
on 1:NOSOUND:/msg $nick ! $+ $nick $filename
Don't worry about what this means for now, trust me, it'll work. For a
description of what this is, open the mIRC help file and search for 'sound
requests' and 'on nosound', it's all explained perfectly adequately in
there.
Oh, by the way, the command to play a sound file is /sound
hello.wav, which will play hello.wav and instruct everyone else who
has it to play it as well. Of course, you can't play a wav file if you don't
have it to start with!

Aliases

Suppose you have a phrase that you seem to be typing in all the time. You
can set up an alias for this phrase so that all you have to do is type in the
alias and mIRC substitutes it for the phrase. Click the alias button to open
the mIRC Editor and see some of the standard
aliases set up for you.
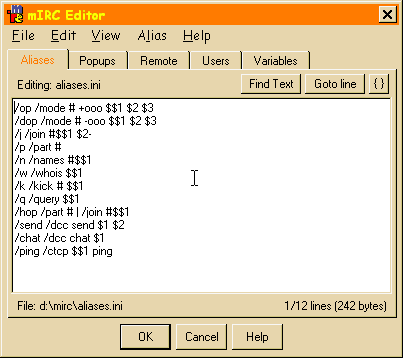
To add a new one, go down to the end of the list and enter
your alias. Aliases start with your chosen substitute text, followed by a
standard mIRC command, usually either /say or /me. Examples:
/here /me are Danny and Debbi from Manchester, England
/idt /say Please stop acting like a complete idiot
When you enter new aliases remember to save the file before you exit the
editor window. Whenever I now type /here, mIRC prints up
* DannyDeb are Danny and Debbi from Manchester,
England
. Whenever I type /idt, mIRC says Please
stop acting like a complete idiot. You can set up as many aliases as
you like, and it is possible to enter aliases which appear over more than one
line, or which contain more than one command. For example:
/byebye /say I've have had enough of this for now | /say
I'm gonna go..... | /say BYE! | /part
This command puts
three separate lines of text to the screen and then leaves the channel.
Leaving the channel like this is considered a bit rude, because you didn't
hang around long enough to see if anybody said goodbye to you, but it
illustrates an example. The | character is called the 'pipe', and on my
keyboard (yours may be different, especially if you're in the US) it is
shift-backslash, next to the 'z' key.
Aliases can also take parameters. A parameter is a piece of data
which the alias needs in order for it to work. This is best illustrated by
example.
/hug /me gives $1 a great big hug!
The only part of this which should be unfamiliar is the $1, which is the
parameter. In order for this alias to work properly, you need to type
/hug Debbi. mIRC substitutes
$1 with Debbi, and
everyone on the screen sees * Danny gives Debbi a great big
hug!
If you forget to add the parameter (i.e. type /hug on its
own), mIRC will show * Danny gives a great big hug!, which
doesn't make a lot of sense. Changing $1 to $$1 in
the alias will tell mIRC not to run the command if a parameter is not passed
to it. With $$1 in the alias, if you type /hug,
mIRC will reply to you in a private message: /hug: not enough
parameters.
If you are always forgetting to give the parameter you can change the alias
to prompt you for it. Changing the alias to read /hug /me gives $$1 a great big hug! $$?="Name of huggable
person?" will mean that when you type /hug mIRC
pops up a little window asking who you want to hug, and then sends out the
hugging message.
Aliases can also issue other mIRC commands other than saying text to the
screen. An alias such as /pic /dcc send $$1
photo.jpg will send the file photo.jpg from your default mIRC
directory (it will report an error if the file is not there!) to the nickname
specified on the command line. So typing /pic Debbi will send
the file photo.jpg to Debbi (whoever she is!) Note the $$1 in the alias means
that it won't do anything if you forget to provide a nickname.
Popups
Popups are very similar to aliases, in that they are
shortcuts to a lot of fun and frequently used commands, but instead of having
to type /here in the chat entry box, you can use the right-hand
button on your mouse to bring up a pop-up menu. There are several popup menus
you can define (or modify) and these are: Status Window, Channel Window,
Query/Chat Window, Nickname List and MenuBar. Yes, you can even customise the
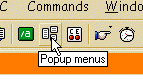
menubar in mIRC! Clicking on the popup menus button indicated here will open
the mIRC Editor ready for modifying popup
menus.
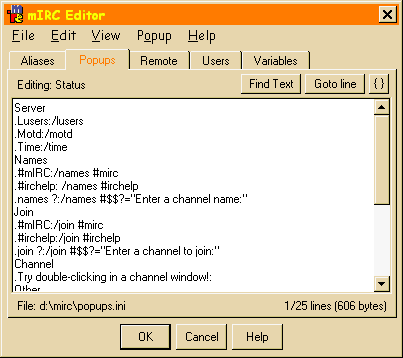
Quite
often you would have the same (or very similar) popups defined on different
menus. Open the popup editing screen and select Nickname List from the
View menu. This shows you the default menu which pops up when you right-click
on someone's name in the nickname list. As you can see, whois is
the first item on the menu, and it has been defined as Whois:/whois
$$1. The bit before the colon is what will appear on the popup. The
bit after the colon is the command to be executed when the menu option is
selected. The $$1 is a parameter for the popup; parameters are
explained in the previous section on aliases.
Let's create a simple popup menu to do the same thing as the aliases we
defined earlier. The first thing to decide is, which popup menu should it
appear on? The nickname popup is mainly (but not exclusively) for commands
which relate to a particular person, and as the /hug alias
relates to a named individual we'll add that to the nickname popup. The other
aliases can be added to the chat window popup. (But hey, don't take my word
for it, you can add your popups to whatever menu you want to add them to!)
There are quite a few steps to this, so follow them closely and you should
be ok. Open the mIRC Editor, make sure that
the popups window is selected (as in the image above) and choose nickname
from the view menu. The edit window shows what happens 'behind the scenes' on
a popup menu. Selecting Popup from the menu will show you what the popup menu
looks like when it is in action. You will see that all items prefixed by a
dot appear as sub-menus on the popup. You will also notice that a single line
with a hyphen on it causes a separator line to be inserted into the popup
menu.
We're going to insert a menu item called 'Say things', which will appear
after the first separator. Move your cursor down to the beginning of the line
that says 'Control' and type in:
Say Things
.Who We Are:/me are Jack and Jill from California!
.idiot:/say Please stop acting like a complete idiot
Hug:/me gives $$1 a great big hug!
-

Choose 'Popup' from the menu and you will see that you have a new
section with 'Say Things' and 'Hug' in it. The hyphen at the end caused
another separator to appear below 'Hug', making the new bit appear in a
section on its own. There is an arrow at the end of 'Say Things' indicating
there are more items available on a sub-menu. If you move the mouse over 'Say
Things' a sub-menu will appear with 'Who We Are' and 'Idiot' on it. Note that
you do not need mIRC to prompt you for the parameter in the hug popup. This
is because this is going to run from the nickname list, so the highlighted
nickname will be your parameter. Hey, now you don't even have to remember
your aliases any more (all you have to do is remember where you put
everything on the flaming popup!)
Now choose 'Query/Chat' from the 'View' menu. A different menu will appear.
Go to the bottom of this (i.e. the line below .Send) and enter:
-
Say Things
.Who We Are:/me are Jack and Jill from California!
.idiot:/say Please stop acting like a complete idiot
Hug:/me gives $$1 a great big hug! $$?="Name of huggable person?"
Note that we have put the prompt back in for the hug menu item. This is
because the popup is from a chat window, so mIRC needs to know who to send
the hug to.
When you are happy with the structure of your popup menu, choose 'Save and
Exit' from the 'File' menu. You are now ready to use your popups when
chatting to other people!
Don't worry if you haven't understood everything in this section. There is a
lot of information here, so take it slowly and run through it a couple of
times.
The limit of things you can do with popups is limited by your knowledge of
IRC and mIRC commands. One thing I have not yet mentioned is that you can
get mIRC to play text files i.e. write them to the chat window one line at a
time - this is normally used to display pictures such as this:
         ,
        /|      __
       / |   ,-~ /
      Y :|  //  /
      | jj /( .^
      >-"~"-v"
     /       Y
    jo  o    |
   ( ~T~     j
    >._-' _./
   /   "~"  |
  Y     _,  |
 /| ;-"~ _  l
/ l/ ,-"~    \
\//\/      .- \
 Y        /    Y
 l       I     !
 ]\      _\    /"\
(" ~----( ~   Y.  )
~~~~~~~~~~~~~~~~~~~
You can play sound files to other people. You can offer people drinks, or
shower them with confetti. All IRC commands used in aliases and popups are
described in the mIRC help file.
Loading in Pre-written popups
You don't have to write all your popups youself (although you'll learn a
lot that way!) Occasionally someone may send you a popups file, or you could
find one to download. Before installing the new popups have a look at the
file you have acquired and make sure you understand everything in it. It is
very easy for someone to send you a really nasty file which you install
without knowing what it does (this is how script.ini got distributed)
You will need to know what type of popups are in the file - are you
loading in a nickname popup menu, a channel popup menu, or replacements for
all the popups? Popup files are sometimes split into sections, separated by
a heading in square brackets. If you edit the popups.ini file which came with
mIRC, you can see that the first line says [mPopup]. This
identifies the server popup menu. Later on is [qpopup] which is
the query/chat popup menu. The others are [lPopup] - nickname
list, [cPopup] - channel and [bPopup] - menu. If
your new popup file doesn't have sections in it then it is probably a
nickname list popup (most of them are).
Ok, you've got your new popup file, you know what they all do (lots of
pretty colours and disgusting insults, usually) then you're ready to load it
into mIRC.
|
|
Open the popups editor |
 |
Before you load the popup, you have to select which one you
want from the view menu. In this example I'm loading a nickname popup.
| |
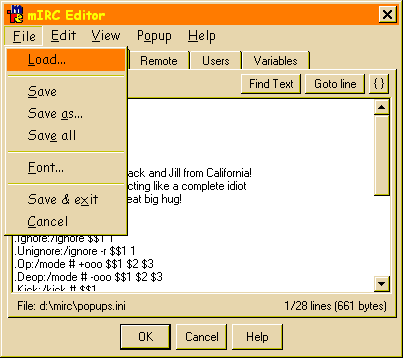 | Finally,
load the popup. Popups are simply text files, and can therefore have almost
any extension. Most popup files are .ini, .mrc or .txt
files. |
Once the popup is loaded, you can close the
mIRC Editor and start using your new popups! The eagle-eyed of you may
have noticed that if you have a popup file with definitions for more than
one popup menu (i.e. a nickname popup and a query popup) then you'll have
to go through this process again, once for each of the popup menus you
wish to load.
Alternative method: There is a quicker way of loading popups (isn't
there always?) The mirc.ini file specifies which popup file it is going to
use for each popup menu. There is a section in mirc.ini which is as follows:
[pfiles]
n0=popups.ini
n1=popups.ini
n2=popups.ini
n3=popups.ini
n4=popups.ini
The lines here correspond to the items on the View menu in the mIRC Editor (i.e. n0 is the status popup, n1 is
the channel popup etc). To load in a different popup, simply change the name
if the file to use, for example:
[pfiles]
n0=popups.ini
n1=popups.ini
n2=popups.ini
n3=nickpops.txt
n4=newmenu.ini
This indicates that the nickname popup menu is to be derived from the
[lPopup] section of the file nickpops.txt (or the entire file if
it is not split into sections) and the menubar popup is to be derived from
the [bPopup] section of newmenu.ini. All other popups are to be
derived from the relevant sections of popups.ini (I hope this is all making
sense!). Then save the changed mirc.ini and relaunch mIRC, your new popups
should be in place and ready to go.

