
Tillering
Oh boy, this is the fun part. I get to break out my super cool tillering device.
The truth is, I started floor tillering yesterday just to see how stiff it was, and something bad happened. I kept hearing "snap" "crackle" "pop." I hate that sound. I inspected the backing, the belly, and everything, but could not discover the source of the mischief. So I decided that today, I would thin down the belly a little. I used my belt sander to do that. Just as before, I used facets to keep the D-shape. That weakened the bow a little, but I'd rather have a weak bow than a broken bow. Wouldn't it be a shame if, after all we've been through, this bow broke? I shudder to think of it!
Here's me floor tillering today.
Wahoo! No cracking sounds! But it still make me nervous that whatever it was, it will come back to haunt me.
And now I want to introduce you to my super cool tillering device. Here it is.
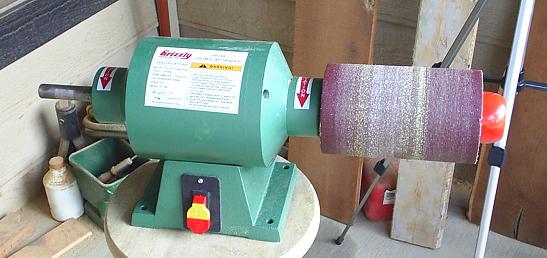
That there is a Grizzly pneumatic drum sander. It has a 1 HP motor, and it comes with two inflatable sanding drums and a flap sander (which I never use). These inflatable drums are great. They're squeeable.

I just use a little hand held bike pump to inflate them, and my finger to deflate them. You can vary how squeezable they are by varying the air pressure. This wonderful device is perfect for tillering. You never get those little bumps you get with a belt sander, and you can smooth out those facets on the ELB with no problem. It is almost impossible to get a hinge when tillering with this sander. I love love love love love it! It's my favourite power tool.
Ever gotten a cramp in your shoulder from trying to sand a fiberglass bow? This drum sander is perfect for fiberglass bows. You just put a finer grit sleeve on it (I use 120 grit), and you can sand it in seconds. It's great for tillering a fiberglass bow, too.
Let me wipe the spit from my chin, and we can continue.
I decided to use my sanding drum to thin down the backing just a little. After that, I sand the back with grits 100, 120, 220, 400, and 1000, to get it smooth as an android's butt. Imperfections are hotspots for splinters, and the last thing we want is a splinter.
After floor tillering, the next thing I do is put my bow stringer on it and excercise the limbs.

It seems like whenever I glue up a bow, it starts off being deceptively stiff. In my efforts to unstiffen it, I end up taking off too much wood, and the bow is too light. To prevent such deception, I excercise the limbs like this. Without taking off any wood, it will loosen up a little. I do this about 50 or 100 times. It's good excercise for the bow and me both.
The next step is to file temporary nocks. I'm not going to put the antler tips on until after it's tillered.
That's right! I'm using antler tips. I made the decision last night after looking at some pictures on the internet and doing some reading. All I've got to do is figure out how I'm going to get my hands on a 1/2" boring bit ground in the shape of a "V". Surely I have a friend somewhere with a bench grinder. I wonder if I could use my dremel tool. That would probably take all day, though.
Back to our story. Here's how I do the temporary nocks. First, I draw a line across the back one inch from the tip.

I use that to guide where I cut the nocks on both sides. This isn't the usual way I cut nocks. There's a much easier way. You just start filing across the back of the bow and work your way around. That way, you're ensured to have even nocks. But I'm not doing it that way on this bow, because I don't have tip overlays, and these are just temporary.
Anyway, I start my cut with a triangle file. Then I continue with a rattail file.

It's easier to start with a triangle file, because then you don't have the file slipping and sliding all over the place while you try frantically to hold it steady. The triangle file makes a groove, and then the rattail file fits in it and doesn't slide around.
The next step is to use a long string--one that is under no tension when used to string the bow. I have a flemish loop at one end and a timber hitch at the other end so I can adjust the length. Here I am giving it a pull.

What I actually do in situations like this is look at my reflection. You see, I have a sliding glass door on my balcone, and I just stand in front of it, pull the bow several times, and watch the limbs bend. Ideally, I'd use a tillering tree, but since I live in an apartment, I can't nail anything to the wall on my balcone.
Taking pictures helps, too, because then you can study your subject as long as you want without fear that you're going to cause excessive set by having it bent for so long. It's also easier to see imperfections with pictures. The only problem is that it's time consuming to take a picture, put it on your computer, then go back to the bow.
I can feel the bow bending in the handle when I pull it back, and that scares me, so for now, I'm going to stay away from the handle, about five inches on both sides, while tillering. I'm also going to stay away from the tips about five inches, because when I get ready to put the antler tips on, I'm going to round out the tips, and that will require that I remove wood from them. So I want to keep them stiff for now.
Each time I remove a little wood, I excercise the limbs at least 20 or 30 times, depending on how patient I am. The more the better. I'm probably going to be extra careful with this bow and go slow, because I've invested too much time in this build along to have it break.
You have to keep track of which limb is the upper and which limb is the lower, because you don't want to look at a picture, say "I need to work on the upper limb" and then go work on the lower limb. Usually the way I do this is to look for some kind of distinctive mark, defect, or peculularity on one of the limbs and declare that limb to be the top or bottom limb. That way, even if I take the string off, I'll always know.
Last night I read two discouraging things in The Traditional Bowyer's Bible, Vol. 1. I read that Osage isn't that great for English longbows, because it's too dense and heavy which causes a lot of hand shock. Yew is lighter and doesn't cause as much hand shock. That, I wasn't too worried about. But then I read that Osage that is lighter in colour is not as strong as Osage that is darker in colour. The Osage I'm using for this bow is lighter in colour than most Osage I've used.
Anyway, this is the first bow I've made that bends in the handle, and it's an eerie feeling to me, so I've been working on getting the outter limbs to bend more so the handle will bend less.

I don't remember if I mentioned this or not, but I'm not shooting for any specific draw weight. As long as it's at least 30#, I'll be happy if it just survives to become an ELB.
Notice how the colour changes in the pictures as you move from left to right. That's because the sun is coming up.
It's hard for me to tell the difference between these pictures, but I can definitely feel it when I pull the bow back. It bends less in the handle, and it's weaker.
I'm going to go ahead and brace it.
Here it is braced just a couple of inches, and me tugging on it a little.

It feels like it's bending in the handle more than it looks like it's bending in the handle. The lighting was getting so bad, I think had to bring my picture studio indoors.
After excercising it some more, I braced it higher.

It seemed to me that the bottom limb needed to start bending closer to the handle, but as I worked on it, the brace profile shifted to where the bottom limb was weaker than the top limb.

Once I got the bottom limb bending like I wanted, I weakened the top limb to make things more even. In the process, I finally got the bow to full draw.

Here's a look at it unstrung.

In the end, it came out at 41 or 42 lbs at 28". It may lose a little when I sand it down. I'm tempted to take the fishing line off the handle area and glue on some wood both on the back and the belly. I'd feel better about the handle then, because it would be a little more stiff. That would probably also bring the bow weight up a little. Right now I'm so sleepy I can hardly think.