 |
|
|
|
|
|
|
|
|
|
|
|
|
|
|
|
|
|
|
|
|
|
|
|
|
|
|
|
|
|
|
|
|
|
|
|
|
|
|
|
|
|
|
|
|
|
|
|
|
|
|
|
|
|
|
|
|
|
|
|
|
|
|
|
|
|
|
|
|
|
|
|
|
|
|
|
The Speaker Guy
Dedicated to Really Cheap Audio Enthusiasts |
|
|
|
Low-Cost Satellite Speakers |
|
|
|
Initial Design and Box Assembly |
|
|
|
|
Finishing and Final Assembly |
|
|
|
 |
|
|
|
|
|
|
|
|
|
|
|
|
|
|
|
|
Machining the Baffles |
|
|
|
|
Making the SpeakerGrills |
|
|
|
|
|
|
|
|
|
|
|
|
|
|
|
|
|
|
|
|
|
|
|
|
Finishing and Final Assembly |
|
|
|
|
|
|
|
|
|
|
Building the Crossover |
|
Testing and Conclusions |
|
|
|
|
|
|
|
|
|
|
|
|
|
|
|
|
|
|
|
|
|
|
|
|
|
|
|
|
Mechanical Drawings |
|
|
|
|
|
|
|
|
|
Finishing. Sigh. I have some nice veneer. I have a paint sprayer and a compressor. But I am not going to cast pearls to swine. I went to Home Depot and bought some black marble contact paper.
Contact paper is a roll of self-adhesive vinyl covering in a variety of colors and styles. I wanted to do the paisley � not! Actually there was an oak and a pine style which could be used in the future. The great thing about contact paper is if I decide to paint this in the future I can peel the paper right off! |
|
|
|
 |
|
|
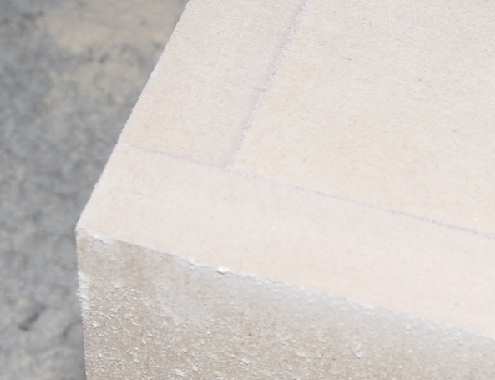
To prepare for the paper the boxes were sanded smooth. My original crude method of using masking tape for clamps yielded pretty good results. I mostly sanded to remove the glue which oozed out of some of the joints. Figure 15 shows a corner after sanding. I used a belt sander to make the job go quick.
The final assembly begins with installing some internal damping to prevent any possible resonances. I had some � inch egg-crate foam I scavenged at work. This was consistent with the budget so far. I used this to line the top and bottom, back and sides. The piece for the back and sides is made from a single piece, with the back side lightly scored to provide a sharp bend inside the box. This piece also holds the top and bottom in place.
I then took the boxes and a leaf blower outside and removed virtually all the dust, inside and out. |
|
|
|
|
|
|
Figure 15. Corner detail after sanding |
|
|
|
|
|
Apply the paper to the front and back first, allowing an inch of overlap to the sides, top and bottom. Then cut a single piece to wrap around from the bottom, up one side, across the top, and then back down the other side to the bottom. The seam is out of site. Also, this �strap� around the case overlaps the front and back edges, where they have been folded over. This will prevent peeling. |
|
|
|
 |
|
|
|
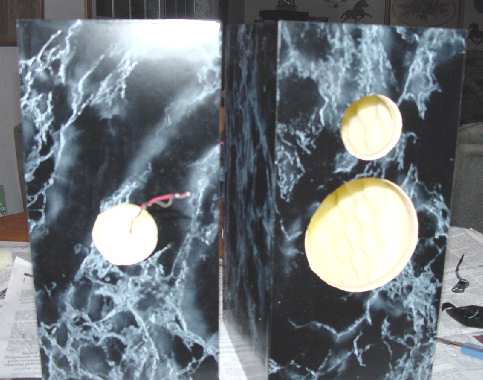
The wires from the crossover to the rear terminal cup were poked through the egg-crate foam, then soldered to the connectors on the terminal cup. Figure 16 shows the two enclosures, front and back, prior to mounting the drivers. |
|
|
|
|
|
Figure 16. Boxes covered awaiting drivers |
|
|
|
 |
|
|
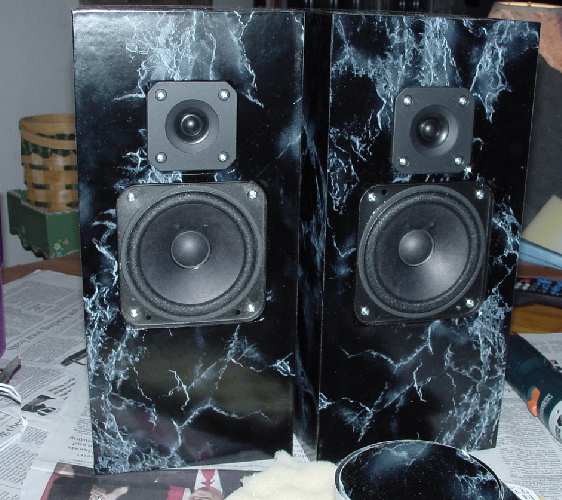
The Woofer and the terminal cup were mounted using #6 x 1/2 inch sheet metal screws and the tweeter used #4 x 1/2 inch sheet metal screws. I was going to but T-nuts, but again the cost of the T-nuts would exceed the cost of the speaker.
Figure 17 shows the speakers where I finsished them, surround by the debris from their construction.
The contact paper was cut to match the through hole diameter, not the recess routing. That way the pattern from the contact paper extends around the edges of the speaker for a very smooth look.
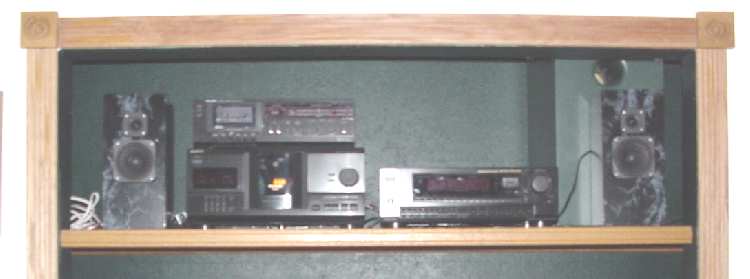
Figure 18 shows the speakers installed in my system. There is a Sony D790 Pro-Logic Receiver with a Sony CX220 200 disc CD changer. Behind the right speaker is an 8 inch DVC subwoofer with a passive crossover. The sub is painted the same hunter green as the closet for stealth and SAF puposes. It is a single-reflex bandpass enclosure. |
|
|
|
|
|
|
Figure 17. Boxes covered and drivers mounted |
|
|
|
|
|
 |
|
|
|
Figure 18. Speakers installed, listening to "Who's Next" |
|
|
|
Initial Design and Box Assembly |
|
Finishing and Final Assembly |
|
|
|
|
|
|
Mechanical Drawings |
|
|
|
|
|
|
|
|
|
|
|
|
|
|
|
|
|
|
|
|
|
|
|
|
|
|
|
|
|
|
|
|
|
Machining the Baffles |
|
Making the SpeakerGrills |
|
|
|
|
|
|
|
|
|
|
|
|
|
|
|
|
The Speaker Guy Home Page |
|
|
|
|
|
|
|
|
|
|
|
|
|
|
|
|
|
Testing and Conclusions |
|
|
|
|
Building the Crossover |
|
|
|
|
|
|
|
|
|
|
|
|
|
|
|
|
|
|
|
|
|
|
|
|
|
|
|
|