Mitzrah's Get IT Right Column!!
Merging the Plates
Updated : Sunday, August 23, 1998
|
 |
This is a tutorial which is carried on from Making the Menu Plates.
Now we are going to use Paint Shop Pro to merge our plates together, and so we can make a
new menu out of it.
Again we will proceed with each step and I will explain each element
as we go along.
- By this time, you should have 4 versions of the plate, once again, I
have made several as an example that we can use.
 |
 |
Not selected, not cascaded |
 |
 |
Not selected, cascaded |
 |
 |
Selected, not cascaded |
 |
 |
Selected, cascaded |
- For the sake of simplicity, I only will have 2 categories, you will
of course have more, but this tutorial is designed to teach, you must put in some effort
ya?
- Ok, few things to notice, the dimensions of the links are as follows
- Width = 100 pixels
- Height = 20 pixels
- I will now open my Paint Shop Pro 5.0 and I will open the 8 plates
that I have here with me.
- Next, I will want to open a NEW image (CTRL + N) and enter the
information required as follows:
- Width = 100 x 4 plates = 400 pixels
- Height = 20 x 2 plates = 40 pixels
- Image type = transparent
- Notice the way I specified my dimensions,
- The width is 4 x the width of each individual plate.
- The height however is determined by the number of categories that you
have x the height of each plate.
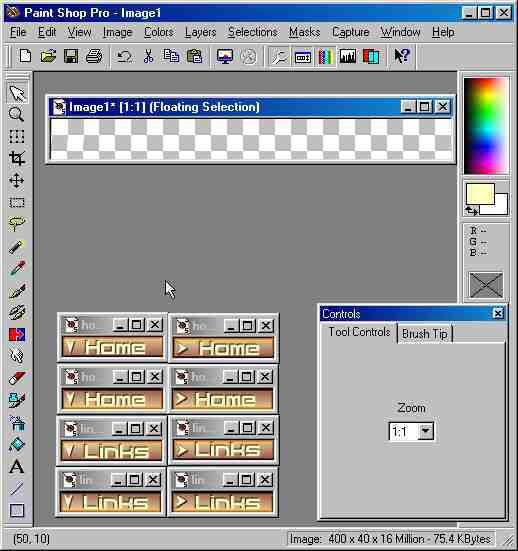
- If everything goes well your PSP screen will look something like this
here :
- The arrangement of the plates should be in this fashion :
Not cascaded,
Not selected |
Cascaded,
Not selected |
Not Cascaded,
Selected |
Cascaded,
Selected |
|
|
|
|
|
|
|
|
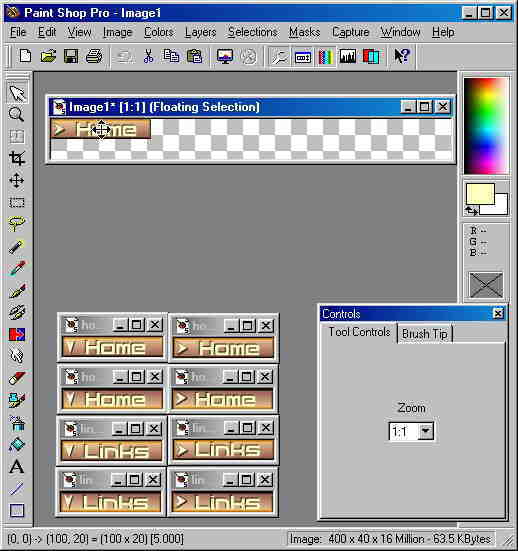
- I am now going to do a lot of copy and paste procedures, so now,
let's select the first plate that should go on there, and that will be Home (Not cascaded,
not selected) I click on the image's bar and thus, making it the active image. I then
press CTRL + C to copy the contents. Then I activate the new image, the transparent one,
and press CTRL + E, to paste the copied image into this bigger one.
- Your cursor would change from whatever it was before to a move object
cursor, the object is floating but still stuck to the cursor. Now all you have to do is
move the cursor and keep your eye on the Co-odinates at the bottom left hand corner of the
PSP program box. I want the edge of the plate to coincide with the edge of the would be
menu image. So I keep a sharp lookout for when the co-ordinates change to be (0,0) ->
(100,20) = (100 x 20). What do these numbers mean?
- The first set of co-ordinates are the location (on the master image)
of upper left hand corner of the plate.
- The second set of co-ordinates are the location (on the master image)
of the lower right hand corner of the plate.
- The third set of co-ordinates are the dimension of the plate being
pasted.
- Once we have (0,0) for the first set of co-ordinates, we left click
on the image to PASTE/ANCHOR the plate there. There would also be a ringed effect on the
plate, but don't worry we needn't fret about that.
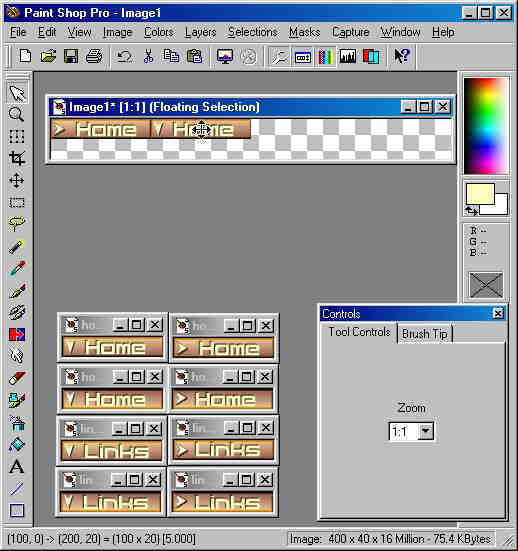
- We then repeat the copy and paste technique for the second HOME
plate, remember? Activate the Home (Cascaded, not selected) image by click on the bar, and
press CTRL + C to copy. Then, activate the master menu and press CTRL + E to paste the
second image there.
- If you have been catching on you would know that this image need to
be lined up against the first image. The surest way to guarantee that is to look at the
co-ordinates again, remember the first set of co-ordinates? Yes, it must now be (100,0) in
order to line perfectly with the first image!
- We then need to repeat the process for the other 2 plates, first, not
selected, cascaded @ (200,0) then cascaded, selected @ (300,0)
- Now we need do the second category, links.
- I begin with the not cascaded, not selected on first, and paste it
this time with the first set of co-ordinates at (0,20).
- I follow on and do the rest, co-ordinates are (100,20), (200,20) and
lastly (300,20), With luck we should get something that looks like so :
- We then need to save the creation and we can now proceed with the
code for the menu bar! Congratulations!
Into the breach again we go, this time with the code! Good luck! And if you encounter any problems,
E-Mail me?
Notes from Alex:
If you found my guidance helpful, please drop
a note by my guestbook! So I know that you have dropped by and benefitted from my efforts,
it took me quite sometime to get these tutorial up! Click on home and then SIGN GUESTBOOK! I will also visit
your homepage and will sign your guestbook too.