http://www.oocities.org/xadrezrex
Written by Arnaldo Rodrigues D'Almeida
Published in: April / 2002
Revised in: June/2002
8- Board
The board is constituted of 85 hexagons, circles or rectangles (Figures 1a, 1b and 1c), filled in white (27), black (27) and grey (31) colors.
Figure 1a: REX board constituted of hexagons.

Figure 1b: REX board constituted of circles.

Figure 1c: REX board constituted of rectangles.
The board consists of n rows, parallel,
neighbors and alternate, with n and n + 1 hexagons or
others formats, where n is a larger odd number than 3. The total
number of hexagons of the board is n2 + [(n
- 1)/2]. Two neighboring hexagons and booth are neighboring other hexagon, all
the hexagons have different colors
or patterns. The boards shown in Figures 1a, 1b and 1c have 9 rows (n
= 9).
REX Board construction
Lists
of materials
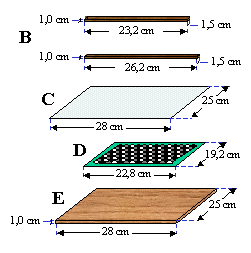
1 - wood board of 28cm x 25cm x 1.0cm (Figure 2-E);
2- printed paper of the file ../Tabul_REX.ppt
in format A4 paper (210 mm x 297 mm);
3 - adhesive (sticker) transparent plastic film of 28cm x 25cm (Figure
2-C);
4 - 02 pieces of wood of 23.2cm x 1.5cm x 1.0cm (Figure 2-B);
5 - 02 pieces of wood of 26.2cm x 1.5cm x 1.0cm (Figure 2-B);
6 - sandpaper "thick" (60 or 80 mesh);
7 - sandpaper "fine" (120 or 150 mesh);
8 - semi-dull colorless varnish (200 ml);
9 - paintbrush;
10 - scissors to cut paper;
11 - plastic glue;
12 - dry cloth (for application of the adhesive plastic film);
13 - 12 nails (1.4cm to 1.8cm of length);
14 - hammer.
Figure 2: Specification of the material for the construction of the board.
Preparation
of the pieces
1 - remove the roughness from the surfaces and borders of the board
(Figure
2-E) and of the pieces of wood (Figure 2-B) with the "thick" sandpaper and
after this, the "fine" sandpaper;
2 - apply the varnish on the board and on pieces of wood. When the woods dry
to
the touch (at least 4 hours) you must apply varnish again. Wait for the pieces
of wood to dry completely (at least 12 hours);
3 - cut the printed paper of the REX board (Figure 2-D), only the green rectangle;
To
set up the board
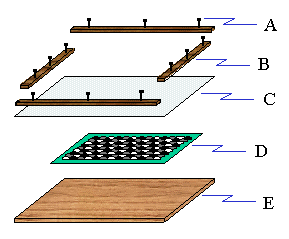
1 - set up in agreement with the Figure 3.
Figure
3: Set up
of the board.
a - centralize the printed paper of the board on the wood board (Figure
4) and to maintain it fixed in the center, you must glue two points in the
same side with some glue;
b - apply the adhesive plastic film in the direction of the border from
the smaller side to the opposite side (Figure 4).
Figure
4: Application of the adhesive transparent plastic film on the wood board.
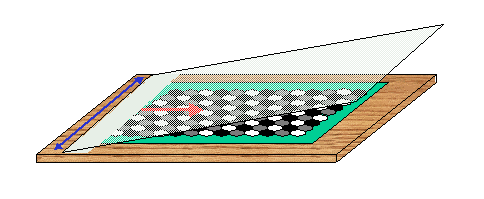
Note: Application of the adhesive plastic film: remove about 2cm of the paper from adhesive film and bend 180o. Put on the wood board covering all top surface, avoiding the contact of the exposed adhesive part. Pass the dry cloth in the direction of the blue arrow (Figure 4) and glue the 2cm of the adhesive film. Continue passing the cloth dry in the direction of the blue arrow (to avoid the formation of bubbles), while the other hand pulls the paper, slowly, in the direction of the red arrow (Figure 4).
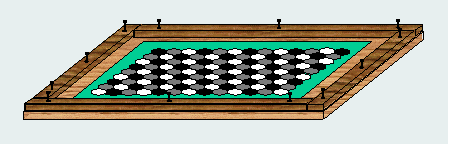
c - you must put in each piece of wood 3 nails without penetrating it all, one
in the center and the other ones in the extremities, distant about 1cm (Figure
3-A and B);
d - put the pieces of wood in the periphery of the wood board (Figure
5). Hold strongly one of them and nail of the middle one first and then the others. Repeat this operation for the others pieces of wood.
Figure 5: Putting the pieces of wood.
Note: In case you don't want the nails to appear, before putting the
nails in the pieces of wood (item
c) you must hole it 0.1cm of depth with drill of same
diameter of the head of the nails. Keep the wood powder that was generated by
drill. After putting
the nails, mix some of glue and wood powder and fill in the holes with
some excess. Wait until dry (24 hours) and sand the place with fine sandpaper.
Apply varnish in the top of the wood pieces. Between 4 and 6 hours after that
apply varnish again.
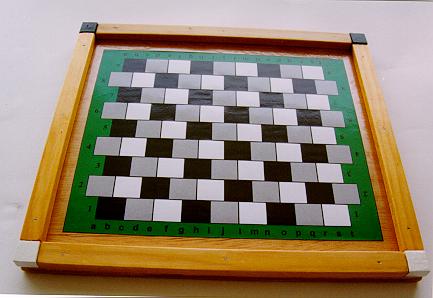
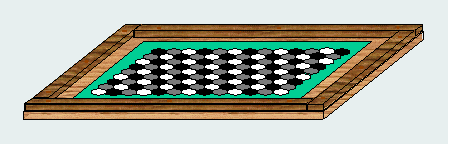
Figure
6: Ready board.
Chess
pieces
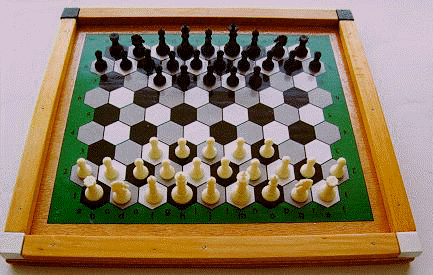
There are in the national market (Brazil) proportional
size chess pieces set to that board size. Remember that REX
chess pieces set are 1 Bishop and 7 Paws plus FIDE chess pieces set. It will
request 2 FIDE chess pieces set (Figure 7).
Figure
7: Board and pieces in the
beginning of the game.
REX
by computer
The file .. /Tab_REX_ini.ppt
has a REX
board with the pieces in the game's
beginning. Those pieces can be moved by clicking the
mouse on them and dragging them for the
wanted place. That file can be used to play
a game. The file .. /Tab_Peças_REX.ppt contains an empty REX board and
chess pieces in the three fund colors (black, white
and grey). That file can be
used to solve problems of REX. You
must have installed in its computer the software POWER POINT by Microsoftware.
Information or comments send e-mail to: chessrex@bol.com.br

1- Introduction |
2- Rules |
3- Notation |
4- The game |
|
5- Strategies |
6- Matches |
7- Problems |
8- Board |
| 9- Downloads |
| 10- Links |