Page 1 Page 2 Page 3 Page 4 Page 5
Working with Fonts and Text as Styles
What I’m planning on teaching you next only works in the newer browsers, you must be using either Netscape vers. 4n or Internet Explorer 4n or 5n. (The n stands for any of the version numbers that are available.) Any browser older than that will not show STYLES code. Most people have at least a version 4 browser by now and should be able to view what is coming next.
There is a lot to learn about < Style >, but for now I will show you a fun and easy thing you can learn in a couple of minutes. The Style attribute I’m going to show you will only live in the paragraph you want it to live in, so you will be adding code to the < P > tag to make it happen. But now, since you have added some additional activity to the < P > tag it becomes a two-sided tag, and you will have to close it with a closing < /P > tag. See, that’s not hard so far!
The first thing I’d like to do is make Font Sizes easier to use. Most people have used a Word processor, such as Microsoft Word or WordPad, and already know about changing Font sizes by choosing Point sizes. For example, 72 points is equal to one inch; the rest is easy division. Take a look:
144pt
72pt text
36pt text
18pt text
9pt text
This whole document has been made in 12pt and is quite easy to read. What if you could make your Web page text in such easy to understand point sizes too? Well you can, and that’s what I want to teach you next.
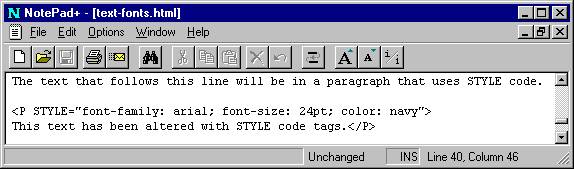
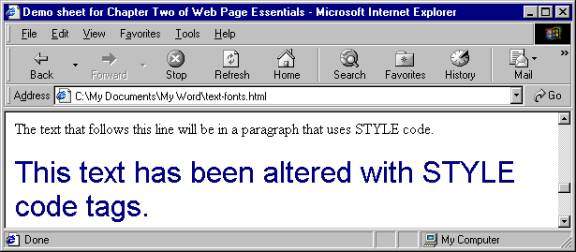
Let’s take a look at using style attributes in the paragraph, understand there are other ways to accomplish this, but I want to make it easy for you to learn about its characteristics. Look at the code below.
You can see the Web page results on the next page, but since this is printed in black and white, you’ll have to trust me that the text has turned to “navy” in color. Notice that in this example I’ve changed the way you have to write the Font tags. Now I’m using a term called "font-family: yes there is a hyphen between the words and that is a colon at the end. I used the Sans Serif Font called arial and used a semi-colon at the end so I could add on more tags. The next tag I used was the font-size: I used font point sizes I remembered from using a Word Processor. There are other forms of measuring Font sizes but this will do for now.
Let me show you what text that is very tall could look like, don’t forget before I showed this type of tag to you, the largest text was < FONT SIZE="7" > How about text that is 2 inches tall?

There is one more thing that can be added to this chapter. Changing the Font size for the whole page in just one spot. The < HEAD > can hold a special tag that will alter the size of the text on the Web page; it’s called the BASEFONT tag. For example, < BASEFONT SIZE="4" > would increase the default size font from three (3) to four (4). If I use that tag I put it just before the closing < /HEAD > tag. It’s that easy!
Well that just about wraps up what I have to say about Fonts and Text on a Web page. What I have taught you in this chapter will hold you for quite a spell. There is a bit more to learn but it is more advanced for the intention of this booklet on beginning HTML tags.
Page 1 Page 2 Page 3 Page 4 Page 5 TOP