Modifications Info

"Yoshi" in Japanese
 I've had a lot of requests for info and
tips on modifying their Toyotas. I myself am very new to all of this,
so I probably won't be able to give you detailed info. However, I have learned
a few basic rules from hanging around people who know what they're doing.
The biggest one is: Keep it simple at first! The worst thing you
can do is to run out and buy an expensive, radical cam. The car will run
terrible and you will be mad that you spent a lot of money to get your car
running bad. The result will be that you will give up. So take it easy
until you know what you're doing, then go crazy! It's always best if you
can find someone who knows Toyotas inside and out, like a mechanic who's
also a Celica freak. If you'd really like to get in on some in-depth
Toyota modifications discussions, join the Toyota Modifications Mailing List
. Better yet, there is a list devoted solely to 1985 and older Celicas.
I've had a lot of requests for info and
tips on modifying their Toyotas. I myself am very new to all of this,
so I probably won't be able to give you detailed info. However, I have learned
a few basic rules from hanging around people who know what they're doing.
The biggest one is: Keep it simple at first! The worst thing you
can do is to run out and buy an expensive, radical cam. The car will run
terrible and you will be mad that you spent a lot of money to get your car
running bad. The result will be that you will give up. So take it easy
until you know what you're doing, then go crazy! It's always best if you
can find someone who knows Toyotas inside and out, like a mechanic who's
also a Celica freak. If you'd really like to get in on some in-depth
Toyota modifications discussions, join the Toyota Modifications Mailing List
. Better yet, there is a list devoted solely to 1985 and older Celicas.
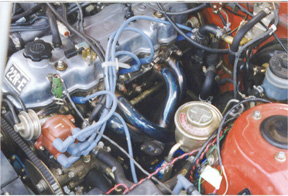
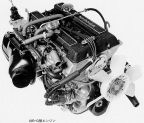
The AFM mod involves cutting the silicone seal on the black cover to gain access. Once inside, there's a "curly brace" looking metal clip in the upper left corner being held down by a Phillip's screw. Mark with nail polish or similar, the original position of at least one of the ends. Then, WHILE HOLDING THE LARGE GEAR WHEEL, loosen the screw allowing the metal clip to go slack. Turn the gear wheel clockwise to lean the running mixture, and counter-clockwise for richer. The idle mixture is largely unaffected by this adjustment. Do not adjust any more than 3 teeth in either direction with a stock system. Once you have the gear wheel where you want it, tighten the Phillip's screw again to make the metal clip hold the wheel in place. Supposedly, a stock system shouldn't need any adjustment, and won't benefit much from changes. It's a trade-off; leaner helps off-the-line, richer adds to the top-end.
You can adjust the idle mixture by carefully drilling out the aluminum plug in the lower right "corner" of the AFM near the outlet to the throttle-body. Tightening the screw beneath the plug makes the idle richer, loosening it leans the mix.
Another item to consider adjusting is the throttle-position sensor itself. It's the black square box on the driver's side of the throttle-body. There's 2 screws that hold it in place. Loosening them allows you to rotate the sensor. Clockwise advances the changes relative to throttle position. Too far and you'll "disable" the idle position. If you retard it too much, you'll go into lean misfire around 3000 rpm. It should go from idle setting to mid throttle around 2200 rpm, I think. I wish I had throttle-plate degree measurements or something more precise, but I don't. The plastic cover comes off so you can see the switch actions inside, which may help in adjusting it.
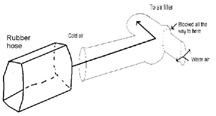
The cold air induction setup is very, very simple to do. I used the stock scoop that comes with the air filter box. The scoop is T-shaped and has a forward air intake that goes thru to a back warm-air intake and turns sharply (90 degrees) towards the box. What I did was simply to block the warm air intake and attach a rubber hose (rectangular) from the forward intake to a hole I made just behind and above the right headlight towards the center of the car. I did feel a small improvement, mostly in upper revs.
Q: I heard that TRD [Toyota Racing Development]
has a street legal cam made for the 22RE. I was
wondering if any one has heard any reviews on this cam. I'm wondering if I
should go and buy this cam for my 4runner. Or should I get one that's not
legal and just switch between stock everytime I go for a smog check...
I don't know about TRD cams, but I have run a few different ones. The stock
flapper door EFI should handle a pretty wild cam, but it may not pass emission
testing. With my programmable EFI [Electromotive TEC-II] I just got a CompCams 268S to pass with
flying colors. All I needed was a new cat and late ignition timing. It was
very clean so I think it would have passed with my good driving settings.
There is no doubt that the stock cams kills these motors. Even a mild torquer
cam is a big improvement. For a stock computer, I would go with a duration
less then 260. I think the street perf CompCam was around a 255. They had an
all out race cam that was 280 butI doubt it would idle at all. Crane cams
makes split pattwern cams with larger exhaust side to compensate for the
smaller exhaust valves. I used equal pattern for the turbo.
Tom, I had an 85 Supra and to say the least they are a ball buster to put
a good stereo in. The rear speakers are special 5x7 because the mounting
points are bent up or down depending on the size. Here's what I did to
mine:
1. Remove factory radio. Bought a Toyota mounting kit from Circuit
City. Installed a Sony CD player which I had to butcher the Toyota trim
ring for it to fit (BTW the Celica trim ring is better for after market
radios because its hard plastic. The one on the supra is rubber covered
and a more expensive to buy).
2. Installed 5.25" speakers in rear (where the 5x7 were) and cut some
hard plastic to fill the gaps around the 5.25" speakers.
3. Installed an MB quart separate system (one tweeter and one Mid-bass
per side) in the front (saw this from a car stereo mag) . I installed
the tweeters in the front right and left A/C vents and cut 5.25" holes in
the door for the Mid-bass.
4. Cut a sheet of plywood to fit in hatch area. Attached to this
plywood was two 8" Bazooka tubes (all the way at the back), two 6x9 in
boxes in front of the tubes, and three amplifiers right behind the rear
folding seats. All the wiring coming off the plywood had quick connects
so it could be removed for more room when I needed it.
I hope this give you some ideas. Be careful of the radio you install.
There's not a whole lot of room behind the radio. I think the
Crutchfield catalog states a maximum of 6 inches deep. Also I really
liked the Bazooka tubes. They require very little power (6 watts) and
move a lot of air. If I can be of any assistance just shout.
| Back to Yoshi's Home | Celica & Supra Info | Celica & Supra History | Yoshi's Friends |