MY SECOND TRIKE PAGE 4
BACK TO MY MENU
HAROLD'S HOME
BACK TO PAGE 1
BACK TO PAGE 2
BACK TO PAGE 3

Here is a shot of the gear shift. I am useing the side shift on this one also. I like the side shift. I turned the shifter completely around so it would point to the front. In outher words I took the guts and reversed them on the shift handle so the bend would face the front. This makes the shift come straight out the side. I had to put a universal joint in the shift line near the tranny. I used a 1/2" socket universal. I also added a 6" piece of 1/2" all thread in the line so I could adjust the length of the rod.
 This shows the shifter from the side. I will probably add another shift bushing (white here) about 4 inches back on the rod. This will help stabilize the shift rod. It won't be tight, just more or less a guide.
 Here is a different angle which shows the universal on the left side of the picture. this will be under the seat. Any questions on the details of the building of this trike, or anything on this site, please feel free to email me at halliburton@nctc.com.
  Well I finally got back to work on the trike. The trip to Sturgis knocked me for a loop. ha I have been trying to catch up on my setting down for a month now. I think I finally have it up to date. I added this framework around the back of the trike. I have the pattern cut for the skirting that will cover the sides of the trike.
 This is just another shot of the framework around the back of the trike. I don't know what I am going to do in the rear yet. I guess I will just let inspiration lead me. Thats what I have done on the handlebars.
 Here I have started the handlebars. I used two pieces of 2" angle 1/8" thick, cut to an angle for the top piece, then a 1/8" diamond tread for the bottom. They will have a style that should go with the rest of the trike.
 Here is another angle on the handlebars. I have ordered some 7/8" OD tubeing that will be added to the ends of the v and also used to mount the handlebars to the risers. I will take more pictures of them as I progress, so you can follow the makeing of these bars.

Well today, Aug 29th, 2004, I worked some more on my handlebars. They are still in the rough, and a long way from being finished, but you can see where I am headed. At least I can steer this thing now. Not too many days before the maiden flight of the, what??????
 These two shots here are just different angles on the handlebars. I am about ready for the skin for the rear.
 It is March 31, 2005. Here are some shots of the skin I am putting on the rear of the trike, (finally). I am useing some Chromed screws to attach the skin. I can remove each pannel if I need too.
 I also started to bondo the tank to get it smoothe I have reworked it so much it is pathetic. ha It will take a gallon of bondo to make it smoothe. ha
 You can see the pannels here, and if you look close you can see the screws that hold it on. I will add more screws in the final stages. I already have the holes drilled.
 Well I guess this shows How to cover up a mess and make it look natural. ha This is the beauty of building a trike from scratch. I missed my measurement for the motor height by about 1 inch, so I added a deck lid that is hinged and can be raised to look under it If needed. I don't know why I would need too, but it made my mistake look better. ha
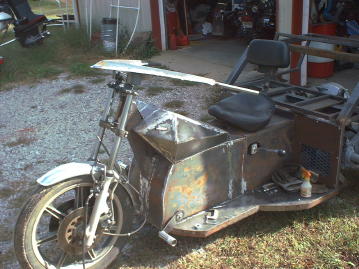
 This shot shows the trikes overall lines, less the drivers seat. I still like a lot of work , wireing, painting, bondoing, fenders, etc. I still like one more piese of skin on the very back. Also some upholtering. I hope to try it out in a wk. or so, before I continue with the finishing.
Thats it for now. Thanks for dropping by. Check back later to watch the progress of the building of this, my second trike.
BACK TO MY MENU
HAROLD'S HOME
BACK TO PAGE 1
BACK TO PAGE 2
BACK TO PAGE 3
PAGE 5