First
of course
you need a ultraviolet source. Thanks to a relatively new
breakthrough in LED's, light emitting diodes, this is no longer the
problem it used to be. Ultraviolet LED's are easy to obtain and
they use electricity like a miser uses his money.
If your
local radio shack does not carry UV LED's you can order them
from
HOSFELT ELECTRONICS, INC. http://www.hosfelt.com/
You will
also want to order some 1/4 watt 100 ohm resistors. Radio Shack should
also carry these. you need one for each light you plan to make. I would
make two or three lights. When I made my first one everyone I showed it
to wanted one. Next you need to find a flashlight that uses either
three or four 1.5 volt batteries. Take
the light bulb
out of the flashlight, secure it by it's collar with a scissors clamp
and heat the base of the bulb till the glass bulb can be removed by
pulling on it. Be sure to use a clothe and extra care not to burn
yourself. Now heat the solder on the bottom of the
base
with a soldering gun or iron. When the solder has melted and with the
base still secured in the scissors clamp tap the shank of the scissors
clamp sharply against your work bench so the meted
solder
is knocked off. Use eye protection! Another way to remove the solder is
to use a solder wick which is available from Radio shack. Place the
wick on the solder and heat it with a soldering gun or iron and the
solder is wicked off. Now there should be a hole through the
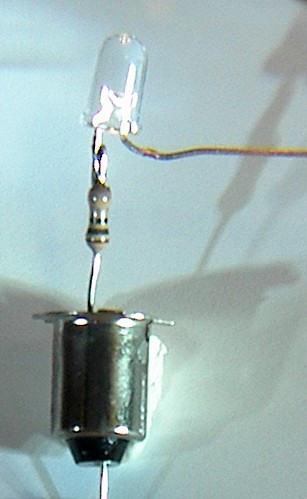
bottom of the base. Set the bulb base aside for now and carefully
solder the 100 ohm resistor to the + lead on the LED. First bend the
short - lead to a 90 degree angle extending from the body of the LED.
Now shorten the longer lead to where you can just get a pair of
scissor clamps onto the lead up next to the body of the LED and
leaving enough lead protruding beyond the clamp so the 10 ohm resistor
can be soldered to it. Shorten the leads on the 100 ohm resistor to 1/4
to 1/2 inches. Solder the 10 ohm resistor to the lead that
originally was the longer or + lead from the LED using the clamp as a
heat sink between the soldering gun and the diode or LED. Use a little
flux and heat enough so the solder flows but not more than two seconds.
Now insert the longer lead into the top of the bulb base and
down
through the hole in the bottom. Position the LED as close to where the
original bulb was so the light will be focused close to optimum. The
free lead of the resistor should be at a 90 degree angle and it should
drop into the slot on the side of the base where there is a blob of
solder. Hold the LED centered and in position and
bend the
resistor lead down toward the bottom of the base and bend the long lead
that is sticking out the bottom of the base 90 degrees. Now solder the
minus lead to the the
blob of
solder on the side
wall of the
base using rosin flux. Clip off the excess lead. Now solder to the base
of the bulb the lead extending from the base and cclip it off or clip
off the excess!
Bend the lead a couple of times so no part of it extends past the
outside walls of the bulb base and flatten it down against the bottom
of the base. This is you bottom contact with the flashlight. If you are
using a three cell flashlight you are done. Just insert the new LED
bulb into the reflector and reassemble the light and you have you UV
flashlight. If you are using a four cell light one of the cells must go
or the current will burn up your LED. I use a flashlight that uses four
AA batteries and I cut off a piece of dowel that is the same diameter
as the batteries and just barely shorter than the
batteries. Tightly wrap the dowel with tin foil, top
sides
and
bottom. This is your dummy battery. Now remove one of the batteries
and replace it with the dummy battery. Assemble the flashlight and
presto! Portable UV light.