
Maintenance
CURING THE CARBS 
| Home | |
| Maintenance | |
| Riding Skills | |
 |
Dismantling and cleaning
 THE
much higher outputs the Japanese managed to extract from smaller and smaller
engines means that they employed more and more cylinders of decreasing
size. Witness the five cylinder Honda 125 racing bike of the late Sixties.
THE
much higher outputs the Japanese managed to extract from smaller and smaller
engines means that they employed more and more cylinders of decreasing
size. Witness the five cylinder Honda 125 racing bike of the late Sixties.
This trend continued into the 70’s and eighties with road bikes of
250cc with four cylinders. When it comes to restoration, all of this miniaturisation
has to be paid for. Corrosion and dirt remain at the same scale whatever
the sophistication of the machinery. It just becomes more of a problem
relatively. An old Amal carburettor could have been given a quick blow-through
of the jets and a rub down and it would be ready for service on any of
a number of British single cylinder machines. A bank of Keihins off a
multi-cylinder Honda is in a different league Pic one.
A plethora of O-rings, gaskets
and tiny, easily blocked, jets makes the whole job more exciting. Everything
is smaller, making cleanliness a top priority. And all of those bits have
a purpose so they must be checked and replaced in the correct position.
All is not lost though. Providing you are careful, it is possible to strip,
clean, refurbish and set up classic Japanese carburettors without too
many headaches. The first job is to clean the outside of the bodies. If
the carbs are really dirty when you take them apart, some of that dirt
is likely to find its way into the internals. If the carbs are covered
in brown, petrol-based lacquer, a solvent like cellulose thinners will
clean the muck away. Do the job outdoors to avoid the fumes and keep away
from naked flames or sparks. Make sure all of the screw-heads are cleaned
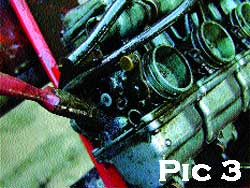
out well to make them easier to work on. If you have an oily mess like
the CB400F ones in the pictures, Gunk and a good jet of water will sort
them out Pic two. Get into all the nooks and crannies Pic three and dry
them off quickly to avoid corrosion.

Once satisfied, get some small
bags or pots and a marker pen. The Japanese did some interesting things
with carburettors, like using different jets for different cylinders,
so beware. Jetting is often different for the same bike sold to different
countries; sometimes for climatic reasons or for pollution control legislation.
This means that the carbs on your American import may not perform properly
used here in the UK. Mark where everything came from to save time during
reassembly and setting up. Pay particular attention to any linkages, movement
stops and springs, as these can be quite perplexing later on. Take some
pictures or draw a few sketches. Remember that even good photographs may
seem confusing later so take plenty Pic four. Unlike the British, the
Japanese used sensible materials for their carburettor slides so you shouldn’t
see any appreciable wear Pic five. The needles and jets can wear due to
high-frequency vibration. Close inspection of the jet should reveal no
ovality caused by the needle wearing at it. Likewise, the needle should
be a plain taper and it should be circular in section all the way up.


The next item likely to cause problems on an older bike is the float valve. This acts like a toilet cistern ball-valve and allows fuel into the float chamber until it reaches a pre-determined level then shuts the fuel off. This maintains a constant level of fuel for the mixing part of the carburettor. If the level is too high or low, the fuel air mixture will alter and performance will suffer. The float valve has a tapered seat into which the float needle fits. The valve is often rubber tipped but will eventually wear unevenly allowing the fuel level to rise. Fuel will leak out of the carburettor, wasting fuel and making a mess of your bike.....
* Graham Curtis.