
Maintenance
THOSE DIRTY RINGS 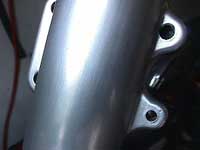
| Home | |
| Maintenance | |
| Riding Skills | |

How to Replace Fork Seals
Lets say you see those tell-tale rings of oily dirt on your fork tubes, and you're starting to get the idea that a little thing like a leaky fork seal can become a life-threatening problem. Well, we're here to verify your fears: it is. And it always amazes us that, when pointing out an obviously leaking seal, some riders come back with: "Well, dude, it was leaking for a while, but it stopped, so nothing's wrong." Duh, you numbskull, you're probably out of oil, or the seal has absorbed so much dirt that it's piped a bunch down into the fork, turning the stuff formerly known as oil into a mean glob of sludge.
Fork seals should be replaced at the first sign of oil appearing on the stanchion tubes' legs. At first, there will be a black ring of oily dirt at the top of the fork's travel. If allowed to go on unchecked, the leak will worsen until there is enough oil accumulated on top of the dust seal to run down the back of the fork leg, straight onto the brake calipers. Eventually the fork will run out of oil, seizing the bushing surfaces that allow the fork halves to slide, thereby locking up the front end.
How to fix a leaky seal? Simple: Replace it by following the procedure outlined in this article.
Begin by loosening the upper triple tree's pair of bolts that clamp down on the fork legs, and then loosen the fork caps atop each leg. Just a half turn or so, don't unscrew them. (If you have air-pressurized forks, bleed the air pressure off first!) Next, loosen the brake caliper bolts and the front axle. Then -- and this is the most important step in the job -- prop the front end safely and securely up off the ground. Numerous methods abound, with the costliest and easiest route being a dedicated front-end lift -- look for a sturdy design that has a pin that slides up into the triple trees. If your bike has a center stand, then placing a jack under the motor will lift the front end, too. The last, and least stable way, is to leave the bike on its side stand and use the jack to lift the motor from the other side, tipping the bike up onto the side stand. Obviously this puts a lot of stress on the stand -- if it's old or weak it may not take the pressure -- and the front end will always want to fall to the side your stand is on, making the job more difficult than it needs to be. Obviously, this isn't such a good idea, but it'll work in a pinch. And remember to place a 2 X 4 block of wood between the jack and the engine to prevent holing the cases or otherwise damaging your pride-and-joy!
 Once
safely aloft, remove the brake caliper(s), speedometer cable, front fender,
and front wheel. Depending on your bike's model, you may also need to
loosen or remove brake hose clamps, the handle bars, or air caps. Loosen
the triple clamp bolts that secure the fork leg, and pull the fork down
and out with a twisting motion. It is advisable to work on only one fork
assembly at a time so you don't mix up parts that have mated together
through wear and tear over time -- they're happy together, so keep it
that way.
Once
safely aloft, remove the brake caliper(s), speedometer cable, front fender,
and front wheel. Depending on your bike's model, you may also need to
loosen or remove brake hose clamps, the handle bars, or air caps. Loosen
the triple clamp bolts that secure the fork leg, and pull the fork down
and out with a twisting motion. It is advisable to work on only one fork
assembly at a time so you don't mix up parts that have mated together
through wear and tear over time -- they're happy together, so keep it
that way.
Place the upper half of the fork vertically in a soft-jawed vice (one with brass or lead inserts), being careful not to damage the chrome plating. In order to get the fork cap off, there must not be any vice pressure near the top of the fork leg, so leave about six inches or so sticking out above the vice. If the forks have air-caps, make sure the pressure is bled off. Otherwise, back off the spring preload adjuster and remove the cap carefully; expect the spring inside the leg to push the cap off forcefully. Usually, you can hold your hand over the top of the cap while turning it with a box-end wrench, preventing it from flying across the garage. Remove the spring and drain the oil into a container. Stroke the fork a few times to get all the oil out.
Notice that the fork will only
extend a certain amount then stop. The two fork halves are held together
by the damper rod, and the amount of fork travel is determined by the
length of the damper rod. A socket-head cap screw (commonly referred to
as an Allen bolt) runs through the bottom of the outer leg and into the
bottom of the damper rod, holding the two pieces together. The length
of the rod passes through the bottom opening of the inner tube, stopping
the inner leg's travel with its head, which has a small spring attached
to cushion the rod/inner tube when the fork "tops out."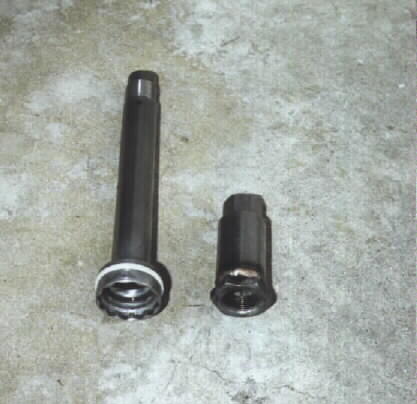
In order to separate the fork halves, the bolt hidden within the bottom of theouter tube must be removed from the damper rod. To prevent the rod from merely spinning with the bolt, a tool is inserted down the inner tube to fit into the head of the damper rod. The manufacturers sell special tools for this, but a proper-sized nut welded to the bottom of an old spark-plug socket works just as wellfor a fraction of the price (see photo at right).
With the damper rod free, the forks will almost separate, but are stopped by the lower slide bushing (on the inner tube) hitting the upper guide bushing (on the outer tube). Remove the dust seal at the top of the outer leg to reveal the metal spring-clip underneath. Pry it out with a small flat-blade screwdriver. Now the seal is free to come out with a little persuasion. Clamp the outer tube in a vice using the brake caliper mounting tabs, and firmly grasp the inner tube. Now pull hard. Harder! You wimp! What's happening is that the slider bushing on the bottom of the inner tube is trying to drive out both the upper guide bushing and the fork seal at the same time. The only other way to remove the seal without banging it out is to fill the fork assembly full of oil and pressurize it so that the oil actually drives out the seal. You can imagine the mess that is made when the seal busts loose, and there is still all that pressure on the oil. Your garage floor will soon look like Alaska's coast after some idiot Exxon driver turfed a tanker.
Now that the legs are apart, it's time to clean and inspect. Clean all the non-rubber parts in a solvent tank (which eats rubber, so don't be sticking them in there!) to remove the contaminated oil. Look carefully at the chrome surface of the inner tube. Pay particular attention to the area swept by the seal. Any pitting, scratches, or rust spots must be removed in order for the new seal to work. Use wet-n-dry emery cloth soaked with oil, or an oiled honing stone to take off the rough edges of small pits. If the pitting is severe, or the chrome has worn through to the underneath layer, the leg needs to be replaced. Cheapskates can get by for a while by filling in the nicks with Loctite Weld -- the liquid welding stuff that sets sooner and is stronger than JB Weld -- but we don't recommend it, as it'll eventually pop out and you'll have to rebuild the forks again. Now would also be a good time to make sure that the leg is actually straight. Hold the narrow edge of a metal ruler or straightedge parallel with the fork across the area held by the lower triple-clamp mount. If you can see daylight anywhere along the length of the ruler, replace the leg. If you're not sure your ruler is straight, us a glass pane.
Inspect the two bushings. The one on the bottom of the inner tube has a Teflon coating on the outside, and the bushing should stay on the leg. It's not necessary to remove it for inspection, and some manufacturers specifically say not to take it off unless you're replacing it. If the gray surface is showing any signs of the brass underneath it, junk it for a new one. The upper guide bushing that came out with the seal has its coating on the inside. If it looks worn, give it the same treatment. In fact, because of the banging it gets on its way out, most manufacturers recommend replacing it with the seals, and so do we.
Assuming everything is in order, it's time to re-assemble the fork. There should be an exploded view of all the parts of the fork in the factory service manual that you have open in front of you. Installation is the reverse of the disassembly, with the exception of banging the seals back in. With the damper rod installed and tightened, slide the upper guide bushing over the fork leg and into the recess where it sits in the outer leg. Ideally a seal driver should be used for this part, another expensive factory tool, but you may have something laying around in your garage that will work just the same: If you've ever changed a set of steering head bearings, and thought that the old damaged races that came out were just useless junk, well think again. With a little luck, they just may be the perfect size to use for a make-shift seal driver. Just make sure that the bearing race doesn't get jammed in the same housing the bushing is going into. If it looks like it's going to work, use a heavy hammer and a flat-blade screwdriver on the bearing race to gently drive the bushing in. Make sure to start the bushing carefully, tapping around the circumference of the driver, so that it goes in square. Grease the lips of the new seal before sliding it over the fork leg, and drive it in the same way. Install the clip, making sure that it seats in the groove all the way around the leg, followed by the dust seal.
Using the factory service manual (something for which, much like a Porsche, there is no substitute), fill the fork leg with the specified amount of the recommended weight of oil. And don't even think of dumping the old oil -- recycle it! If you can't find any fork oil or are just plain cheap, use automatic transmission fluid. Now, if your bike had a mushy feeling front end to begin with, under-sprung and under-damped like a pogo-stick, it may be beneficial to go with a thicker weight of oil. If the book says 10 weight, try using 15 or 20 weight. When mixing oils -- not a good idea to begin with -- remember that one part 10 weight oil mixed with one part 20 weight oil does not make 15 weight. Rather, it's 13.3 weight. Anyway, heavier oil will slow the forks' rebound damping significantly, and the compression damping to a lesser degree. Coupled with stiffer after-market fork springs, you should notice a remarkable improvement in the feeling from the front end.
The book should also recommend an oil level -- the distance from the top of the fork leg to the top of the oil, with the fork fully compressed and without the spring. This is a more accurate measurement of how much oil is in the forks. Make sure to stroke the fork a few times to fill the damper rod and purge any air before measuring the oil level. The last inch of travel will be very slow, but make sure the fork is fully compressed or you'll get an inaccurate reading.
Re-extend the fork and install the spring, any spacers, and the fork cap. Insert the fork leg up through the lower triple clamp, make sure that the cables and hoses are routed around the leg properly -- especially the brake lines -- and tighten the clamp bolts. Now do it all again for the other leg.
To make sure the forks are aligned properly when installed, take a pane of glass and put it across the exposed upper fork tubes. If it doesn't sit flat, something's crooked. If you've crashed the bike and made sure the fork tubes are straight, then there's a good chance that the triple clamp was bent. To fix this, remove the top triple clamp -- which only acts as a brace, and is rarely ever bent -- and drop both fork tubes down so they sit flush with the bottom triple tree. Tighten the bolts to firmly hold the forks, and put your pane of glass across the fork tubes. Then you can see which way the triple tree is bent -- luckily, it'll almost always be tweaked in a two-dimensional "front to back" plane, so just grab the bottom of the forks and pull (or push, as needed) really hard. It's not rocket science, but this will bend the triple tree back rather easily.
When the front end is completely re-assembled, set the suspension's sag, or the amount of travel used from full extension -- when the bike is upright without supporting either it's own weight or the rider's -- to the amount it "sags" under it's own weight and the rider's. Unless your bike is some raked-out chopper or a dirt bike, the sag should be 1.25 inches for sporting types, a bit more for street riders. The sag can be set with the spring pre-load adjusters on top of the forks. If there is no provision for adjustment, simply insert spacers on top of the springs.
Now go out and ride!
By Motorcycle Online Staff