
Maintenance
Disc Brake Maintenance 
| Home | |
| Maintenance | |
| Riding Skills | |
How-To Revitalize and Maintain Your Disc brakes
By Michael Kresnicka
Torrance, California, October
30, 2000 --
Most of us can't afford to run out and buy a new bike every time something
goes wrong or needs adjusting. So as consumers, we are familiar with the
ever-so-painful and expensive trip to the local dealership or mechanic.
You may have pondered the idea of performing simple maintenance tasks on your own, but may be overwhelmed with questions and the possibility of making things worse than they already are. Well fear no more because when it comes to disc brakes, they're all pretty much the same and reasonably easy to tackle by the average do-it-yourselfer. However, you must use a great deal of caution when dealing with brakes because of how important they are to safety. If you don't feel comfortable working on your brakes by yourself, then by all means have someone with more knowledge and experience help you.
Whether you ride a sportbike or a modern cruiser, the elements in the braking system are pretty much the same. They all take advantage of a fluid element that is pressurized to provide the required forces (better known as hydraulics) to squeeze the brake pad material onto the rotor. As easy as this sounds, there are a few key tricks to making sure that your brakes are up to spec.
First and foremost is making sure there is no air in the hydraulic system. Air is your enemy and can get you into serious trouble if the necessary precautions are not taken. The second most important aspect of your motorcycle's braking system is the amount of friction material on your brake pads. As you use your brakes, the material is slowly burned away in order to provide enough friction to stop your motorcycle. The third most important aspect is the condition of your brake fluid. Brake systems are not set-and-forget items on your bike. As the fluid gets old, it starts to degrade and absorb moisture, reducing its ability to perform its job.
Replacing stock or worn brake pads is the quickest way to get increased braking power out of a tired system. Various manufacturers make all kinds of different types of replacement brake pads for today's motorcycles. Some claim to last longer, while others claim to give more feel and braking power. However, be forewarned that the manufacturer of your motorcycle put a lot of time and effort into developing your braking system, and there is no telling what a different type of pad material might do to your rotors or how well different pads will work with the overall design and setup of your bike. If you have any doubts, then stick with genuine factory parts.
 EBC
"Double-H" Brake Pads
EBC
"Double-H" Brake Pads
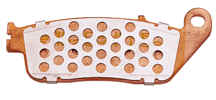
 EBC's
Standard "Black" Kevlar Pads
EBC's
Standard "Black" Kevlar Pads
I chose to forego my own advice and try a set of EBC "Double-H"
Sintered Brake Pads on the front brakes, which claim to be nice on your
rotors and still provide massive stopping power over the stock setup.
However, on the rear brakes I choose not to upgrade to a better pad material
simply due to the fact that the rear brakes are way more sensitive to
locking up the the fronts, and replacing your stock rear pads with an
upgraded type can provide too much initial bite and get you into some
serious trouble. So, I chose to stick with EBC's "Standard Black
Kevlar Pads" in the rear.
Removing the calipers from
the rotors is the first step in checking your brake pads. In dealing with
your front disc brakes, first remove the
 Front
Caliper Mounting Location
Front
Caliper Mounting Location
two main bolts that attach the calipers to the forks. Notice the bike
I am working on has floating calipers and floating discs. The floating
disc allows the inner portion of the disc mounting system to be made from
a lighter, weaker material and hence decrease the rotating mass of the
wheel and adding to the overall lightness of the motorcycle. The floating
calipers pivot back and forth as pressure is applied to distribute the
forces evenly over the two pad materials and keep the pads in full contact
with the rotor during the entire braking process. Once the calipers are
free you can slide them off of the brake discs and inspect the amount
of pad material and look for anything out of the ordinary. If there is
less than 1/8 inches of pad thickness left then they should be replaced.
 Internals
of Front Caliper
Internals
of Front Caliper
Once the calipers are free from their mounting locations, it is time to
disassemble them and remove the brake pads. On this particular setup there
is one threaded metal pin that holds one side of the pads in place. The
other side of the pad rests in the casting of the brake caliper. Removing
this pin will free the pads and they should just fall right out. Notice
the metal clips inside the caliper just beneath where the pads sit. These
metal clips provide pressure on the pads to keep them from moving around
inside the caliper. It is a good idea when you are working on your brakes
to replace these clips. It would be foolish if you spent all this time
and effort to have something so simple and cheap screw things up.
 Rear
Caliper Mounting Location
Rear
Caliper Mounting Location
The rear brake assembly is similar to the front brake assembly. However,
on this particular bike the rear disc is solidly mounted to the wheel
and isn't of the "floating" type as the front discs. The caliper,
on the other hand, is of the floating type. Removal of the rear caliper
required me to remove my slip-on muffler and unscrew the two mounting
bolts holding the caliper to its mounting bracket, located over the swing
arm. Notice that the caliper-mounting bracket has room to slide back and
forth as you tighten or loosen the amount of slack in your chain. This
provides the entire brake mechanism to slide with the rear wheel in order
for the pads to stay in full contact with the rotor when the chain is
adjusted.
 Internals
of Rear Caliper
Internals
of Rear Caliper
Once the two mounting bolts have been removed, the caliper should easily
slide off the rotor. Inspection of the pads is the same as the fronts.
Notice that this caliper has only one piston forcing the pads together
as opposed to the two pistons on the front calipers. The rear pads are
smaller because less braking power is required. The rear pads are held
in place by one bolt on one side of the caliper and are held at the other
end inside the casting of the mounting bracket that the caliper is bolted
to. Be very careful to make sure the new pads are firmly mounted in the
caliper and are held securely at both mounting locations. If there is
any doubt, check them again! Otherwise, they could fall out while you
are cruising down the side of your favorite canyon road and ruin a perfect
day, causing you to crash into the guard rail and go flying off the side
of a cliff. Not a pretty site.
Once the new pads have been assembled into the calipers and everything is torqued to spec, it is time to bleed the lines. In order for the hydraulic brake system to function properly the entire system must be fully pressurized without any air or moisture. If air and/or moisture are present in the system, it can cause a "soft" or "spongy" feel to the pedal when applied. Air can really mess things up, as it is compressible and can allow excessive pedal travel and loss of braking pressure. Moisture in the fluid will boil causing the same conditions and will also contribute to corrosion of internal brake components.
There are several different techniques to bleeding brake lines. Some of the more popular ideas are outlined below.
The Old Fashioned Way
This method of bleeding your brake system can work if you absolutely don't
want to spend any money to make things easier on yourself. The basic idea
is to have two people, one puts a light amount of pressure on the brake
lever to introduce pressure into the system while the other opens the
bleeder screw on the caliper and closes it after a couple seconds, thus
purging the system of a little bit of fluid and air. As easy as it sounds,
it is very difficult and time consuming to completely flush out all of
the old fluid and the air bubbles from the system without getting out
of sync with your partner and sucking more air into the system.
The Easy Way
For not a lot of money one can purchase a couple simple devices that will
ease the painful process of brake bleeding. The first (and cheapest) is
a simple little spring operated valve mechanism that attaches to a plastic
hose from the bleeder screw on your calipers. This valve acts as a one-way
bleeder that lets fluid and air out and closes before outside air can
be sucked back into the line.
 Hand
Operated
Hand
Operated
Vacuum Brake Bleeder
The second method is a vacuum bleeder that also attaches to the bleeder
screw on your caliper. However, this has a hand operated pump that sucks
fluid through the system, making the entire process of changing fluid
extremely easy and assuring that very little air is left in the system.
The vacuum bleeder costs anywhere between $28 and $100, depending on how
nice of a vacuum bleeder you want.
Since I like to be as efficient as possible, I opted for the vacuum bleeder method. I purchased the MityVAC Vacuum Brake Bleeder for $28 from my local automotive parts store. It essentially is a hand-operated pump with a small reservoir attached to collect the old fluid. There are more expensive and sturdier units available. But I don't intend to use this often (maybe a couple times a year), so I figured the cheap one would do fine.
 Motul
Racing Brake Fluid
Motul
Racing Brake Fluid
Once you have selected a method that works for you, it's time to go buy the best brake fluid that you can afford. There is no sense in spending all that time and money only to use a bargain brand of brake fluid. There are many good brands of brake fluid. I opted for a bottle of MOTUL "Racing Brake Fluid 600" for $12.00 from my local motorcycle dealer. This is often regarded as the best brake fluid for any application. It is a DOT 3,4, & 5.1 compatible synthetic fluid that has an incredibly high boiling point and excellent thermal stability. Any brake fluid is extremely poisonous and corrosive and will suck the moisture out of your skin, so wear some rubber gloves when working with the stuff. It will also eat right through the paint on your motorcycle, so be careful and use towels around the master cylinder reservoirs. With moisture in mind, you want to minimize the amount of time that the fluid is exposed to air to prevent it from absorbing any moisture that will lead to poor brake performance. My advice is not to open the seal on the bottle until you are ready to use it and keep it closed immediately after you are done with it.
My intent was to completely flush the old fluid out of the system and replace it with the new stuff. I used a turkey baster in order to suck all the old fluid out of the front and rear master cylinders. If you don't own one, then go to your local grocery store and buy one. It sounds stupid, but they work great.
Once you have sucked out all the old fluid, pour your new fluid into the master cylinder and begin to bleed the system. If you choose to use a vacuum brake bleeder as I did, keep in mind to read all of the instructions carefully. I had very little trouble using my vacuum bleeder, in fact the entire process took less than 15 minutes to finish. Life is so much easier when you have the proper tools.
Keep in mind to watch the level of fluid in the master cylinder as to not let it get too low and suck air into the system. It sounds simple enough, but I have seen people have to start completely over because they were in a hurry and didn't remember to refill the reservoir.
There should be a distinct difference in color between the old fluid and the new fluid. Once, you see only fresh fluid emerging from the bleeder screw the system has been completely flushed. As far as getting all of the air bubbles out, gently tap on all of the fittings in your brake lines to free all of the air bubbles that might have gotten stuck there. Then make sure that the master cylinder reservoir is topped off with enough fluid, install the caps, replace the rubber covers over the bleeder screws, and you are finished.
Now, before you run out and test your brakes on the road it is a good idea to pump the brake levers to make sure that there is sufficient pressure in the system. Also, roll the motorcycle slowly and test the front and rear brakes before you hit the road. Double check to make sure that the pads are securely held in place and the calipers have been torqued correctly to there mounting locations.
New pads usually require a certain amount of break-in for them to function correctly. Check with the pad manufacturer for proper break-in times and procedures. If you upgraded pad materials from your previous type, keep in mind that there is probably going to be a noticeable improvement in stopping power and initial bite. Take time to get used to your new setup so you don't hurt yourself or your precious motorcycle.
by Motorcycle Online