Automotive Tech
Ractive Rear Upper Strut Tower Bar Install
 Strut tower bars are intended to stiffen the suspension's chassis mounting points. With flex and/or distortion of the mounts reduced, the suspesion's capabilities are optimized. In other words, less flex in the mounts equals a better performing suspension system.
However, this upgrade takes an otherwise stock vehicle out of the stock classes in Solo II racing (in the series' I run in, anyway. Not sure about SCCA). As I wish to remain in the stock classes for the time being, the bar will be removed during Solo II endeavours. Why did I install it in the first place? Good question. The answer is that I intend to use it in Solo II once I upgrade the rest of my suspension in 2001 (springs/shocks, rear sway, etc.), and for the time being I need a place to lash my Pioneer bass unit. Plus, improving street performance is always a good thing...
This particular unit is from Ractive, and features a polished bar with black painted end pieces.
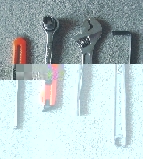 As upgrades go, this ranks as one of those inexpensive and easy-to-do upgrades that pretty much anyone can perform. All that is needed is a sharp box knife, 14mm socket with ratchet, 8mm allen key, and an adjustable wrench.
 The bar mounts across the trunk between the rear upper shock mounting points, circled in red in the photo. The carpet in this area must be trimmed to allow the bar to pass through. On some vehicles, the mounting points are covered by a plastic cap instead of carpet. In these cases, the cap is removed, but it is sometimes still necessary to do a bit of plastic trimming to get things to fit clean. Either way, in the end you will end up with the brace passing through a hole of some sort to get through to the shock mounting points...
 Step one is to disassemble the strut bar so that the black end mounts are free. For this particular bar (and most others, I suspect), the end mounts are installed loosely first, then the bar is mounted to the end mounts.
Trim the carpet over the shock mounting points with the box knife. Cut a small hole at first to figure out exactly where the studs and nuts are located that the bar will be mounting to. Obviously you can make a hole that is too small bigger but you can't make a hole that is too big smaller...
Once you know exactly where the studs are, slowly enlarge the hole and test fit the end mounts.
 The next step is to loosen the two shock mounting nuts on either side. (DO NOT JACK THE CAR UP FOR THIS INSTALL. Otherwise, the shock may come out of the mount. Leave the car as is on the ground, and the install will go smoothly.)
The studs are fairly long, which is good because the installation of the bar will not hinder the number of threads the nuts can grab onto when they are reinstalled over the end mounts (the end mounts are about a quarter inch thick). The length of the stud does make using a socket a bit harder. I used a semi-deep socket, which worked well. A too shallow socket would have been unusable. A overly deep socket would have been hard to get in there because of the carpet, unless you made the hole in the carpet overly big, which would not look very nice once you are finished.
 Remove the nuts and install the end mounts with the bar mounting tabs pointing inward to the middle of the car (they come in the box pointed outward to save packaging space). Reinstall the nuts loosely; these will not be tightened until later on.
 Next, make sure that the two threaded eye bolts on either end of the bar have about the same number of threads showing. The threads on these eye bolts turn opposite of each other, so that when they are clamped by the end mounts and the bar is spun, they both either tighten or loosen in unison, effectively lengthening or shortening the bar. Making sure that they both have the same number of threads showing ensures the bar will be centred between them upon installation.
Also, to make things easier, spin the locknuts on the eye bolts until they are to the outside (towards the eye). This makes adjustment of the bar easier. Remember, one side is a reverse thread, so the locknut will need to be spun in a different direction than would normally be expected.
 Place one end of the bar in its end mount and put the allen bolt and nut on loosely. Place the other end of the bar in its end mount and spin the bar to lengthen or shorten the bar as necessary until the eye bolt on that side lines up with the hole in the end mount. Put the allen bolt and nut on and tighten with the 14mm socket and 8mm allen wrench. Tighten both ends of the bar into the end mounts.
 Once the bar is tightened on the end mounts, spin the bar to lengthen or shorten it as desired until the end mounts sit properly on their respective studs. Once this has been done the shock mounting nuts can be fully tightened.
The final step is to use the adjustable wrench to tighten the locknuts on the either end of the bar itself to prevent it from spinning on its own.
I would recommend carrying along the 14mm socket and 8mm allen wrench in the vehicle and re-tightening the shock mounting nuts and/or the bolts holding the bar to the end mounts after a couple of days.
Now go out and enjoy the benefits of a stiffer chassis!


