
AUTO
what's new
autocross
reviews
tech
mods
why?
links
forum
contact
CYCLE
MOTO
HOME
|
Automotive Tech
Tech: Oil Changes
Oil changes are one of the easiest forms of maintenance you can perform on your vehicle and they provide the best protection for your engine. Oil changes also allow you to get to know your engine and drivetrain better, as well as allowing you to inspect other very important parts of your vehicle.
Oil changes on most Honda Civic and Acura Integra engines are relatively easy. The oil filter is not in the best possible location for ease of removal, but it is reasonalby accessible nonetheless. It is necessary to put the front of the vehicle on jackstands, so a heavy duty jack (ie. not the compact spare tire jack) and jackstands are necessary. These can be found for as little as $40 in a package with the jack and two jackstands at your local auto parts store. Along with the jack and jackstands, you will need a socket set, a flattened cardboard box if you do not have a creeper, and a large disposable container to drain the old oil into. A large shallow pan can work to catch the old oil, which can then be drained into empty windshield washer fluid containers (so save them!). The old engine oil should be recycled at your local garage, Jiffy Lube or waste disposal center. Do not just throw it away!
Obviously, you will need some new oil, as well as a new filter. Synthetic motor oils, although more expensive than conventional petroleum based motor oils, provide the best protection and performance for your engine (click here for more info). I prefer Mobil 1 synthetic. The cost of doing your own oil changes with synthetic oil is less than getting an oil change at a dealer or Jiffy Lube with conventional oil, anyway. For oil filters, the Genuine Honda filter found at your local Honda dealer's parts counter works best (it is the blue one). One oft overlooked part to replace is the oilpan drain bolt washer, which should be replaced every oil change to prevent leakage, especially since they only cost about fifty cents each. These, too, can be found at your local Honda parts counter.
There is a bit of a debate among car owners as to how often a vehicle's oil should be changed. The most important thing to keep in mind is that, all other things being equal, an engine will last the longest it possibly can without wearing out if it were to use brand new oil and a brand new filter every day (or better yet, be constantly ingesting brand new oil). This is obviously cost and time prohibitive, but it illustrates the idea that the more frequent you change your oil, the better protected from wear and tear your engine will be. Every single cycle that an engine runs produces microscopic (and not so microscopic) debris from rings, bearings, and incoming air and fuel. The less debris there is, the less wear and tear the engine goes through, and the newer the filter, the better it can...filter. That said, many performance and maintenance minded drivers change their oil every three months or 6000kms. This is the schedule that I stick to.
The basic procedure for changing your motor oil is as follows: Note: The usual disclaimers about safety and responsibility apply here. Never work under a vehicle supported only by a jack (always use jackstands) and never work alone. It is reccommended that a Haynes or factory Honda manual be followed for this procedure, especially if one has not performed his/her own oil changes before. Also, watch out for the old 'hot oil on the forehead' trick...
- The old motor oil will drain better if the engine slightly warmed up. The task will be more difficult, however, if the engine and oil are too hot, so the best is to start with the vehicle cold (sitting off for more than three hours), and then idle it for a few minutes before jacking it up.
- Park the vehicle on a level surface with the parking brake on and the vehicle in reverse gear (for manual transmissions) or park (for automatics).
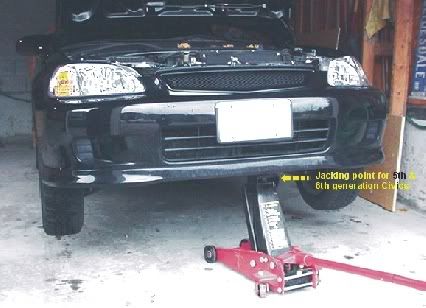
- Jack up the front of the vehicle using the center front jacking point. This point (on fifth or similar generation Civics and Integras) is located slightly off center to the driver's side under the front lower lip, and looks like a plate with two bumps. Once the vehicle has been jacked up, place the two jackstands on either side of the vehicle behind the front wheels on the appropriate jacking points. These points are defined by a plate with a single ridge running front to back, just behind the front wheels on either side. The Honda owner's manual will illustrate these points as jacking points for use with the compact spare tire jack. The higher (within reason) you can set the jackstands up, the better.
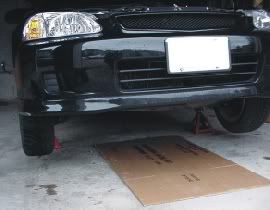
- I use a large flattened cardboard box placed on the floor below the engine to give a little padding, allow me to slide around under there without a creeper and without getting dirty from the bare ground, and to protect the ground (driveway, garage floor) from oil stains from the inevitable spilled oil from this procedure.
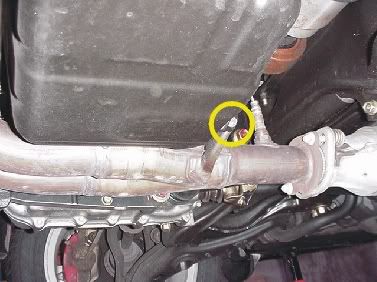
- Place your catch container below the oilpan drain bolt (the oilpan is slightly offset to the driver's side on the bottom of the engine, and the drain bolt is the large bolt on the rear of the oilpan. If you are not sure which bolt to loosen, either get the Haynes or Honda shop manual, or have someone else perform the oil change). Make sure the drain bolt and the surrounding area is not unreasonably dirty. Loosen the drain bolt with your socket wrench until you can turn it by hand, then carefully loosen and remove it with your fingers, being careful of the warm oil that is about to come splashing out into your well placed catch pan.
- Removing the oil filler cap on the top of the engine will allow the oil to drain faster. As the oil begins to drain further, the catch pan may need to be repositioned.
- At some point during the draining, run some of the oil between your fingers (make sure it is not too hot) and rub the oil between them, feeling for any grit or debris. A large amount of debris may signal a problem within your engine.
- While the oil is draining, it is a good time to check your CV boots for cracking or damage. The CV boots are the circular black accordian shaped boots that live on the inner and outer ends of the driveaxles running from the transaxle to the front wheels (on front wheel drive cars). If a CV boot is left cracked or damaged, the CV joint will prematurely wear out, resulting in a hefty repair bill. Cracked or damaged CV boots should be replaced and the CV joint re-packed as soon as possible to avoid damage. CV boots should also be checked whenever purchasing a used front wheel or all wheel drive automobile.
- Once the oil has ceased to flow out of the drain and has reduced to a drip every five to ten seconds, the drain bolt can be replaced. Always make sure the area around the drain bolt and the drain bolt itself is clean (any debris or dirt on it will go directly into the new oil), and always use a new drain bolt washer. DO NOT OVERTIGHTEN THE DRAIN BOLT! It is easy to strip the threads on the oilpan, which will be a headache and expensive to replace. Tighten the bolt reasonably snug, then check for leaks once the new oil is in and the engine has been run, and in the days following the oil change (I carry the appropriate socket wrench in the vehicle for a few days after each oil change). A drain bolt that is not tight enough can easily be tightened a little further, whereas if you overtighen the bolt and strip the threads, expect headaches and expense...
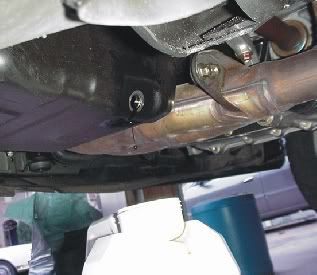
- Next is the filter removal. The filter is on the back of the engine, offset to the driver's side, sticking rearward. If it has not been overtightened, it can usually be removed by hand, reaching up from under the vehicle (this is where setting the jackstands higher can help). If it is too tight, the appropriate sized filter wrench may need to be used (available at any auto parts store). A small amount of oil will drain out of the filter as it is removed from the block, so the catch pan must be placed below this area to prevent a mess. The best method is to reach directly up (past the exhaust, carful - it may be hot!) to loosen the filter a bit, then place the catch pan under the filter area. The next step is to reach up and over from slightly to the driver's side (still under the car) to remove it all the way, allowing the oil to drop directly into the pan. The filter itself may be hot, and the oil usually is, so some rubber gloves and an old long sleeve shirt can be used in case some oil gets on you.
- Some oil from the old filter will undoubtedly spill onto parts of the engine block and exhaust. This oil should be wiped off to prevent smoking once the engine is turned on. Also, make sure there is no dirt, debris or old gasket on the oil filter gasket mating surface of the block. This is the shiny circular area about the same diameter as the filter that the filter snugs up against. The threaded rod that sticks out is what the filter threads onto.
- Next is the installation of a new filter. A little oil can be poured into the new filter (about the same amount that spilled out of the old filter, or not so much that the oil spills out when the new filter is placed horizontally for installation). Using clean fingers, put a little oil on the new oil filter gasket (rubber ring) to help it seal. Failure to do this usually results in a leaky filter. When threading the new filter on, make sure it threads on easy. It should spin several revolutions very easily before tightening up. If you feel even a little resistance before it has spun several revolutions, back it off and try again to prevent cross threading. Once the filter begins to snug up, it only takes about three-quarters of a revolution befor the filter is properly snug. Overtigtening will mean a filter wrench will be needed to remove it next oil change, or worse, the filter body will need to be cut off the block.
- Once the drain bolt and new oil filter are in place and snug, remove everything from under the vehicle, jack the vehicle up, remove the jackstands, and slowly drop the vehicle to the floor.
- Pour the appropriate amount of new oil into the engine through the oil fill hole on top of the engine (see your Haynes or Honda service manual for oil capacity; fifth generation Civic 1.6l VTEC D16Z6 engines use about four liters). Replace the oil filler cap and let the oil settle for a few minutes. During this period, check for initial leaks from the filter and drain bolt areas (only a very loose drain bolt or oil filter will leak at this time). Check the oil level using the dipstick. The oil level should be between the two holes found near the bottom of the dipstick (and should always be kept in this range). Both too little and too much oil can cause damage to the engine, so it is imperative that the oil level be between the two holes on the dipstick.
- Run the engine for a few minutes, checking immediately for leaks in the filter and drain bolt area.
- Shut the engine off and let the oil settle for a while, then re-check the oil level.
- For the next day or so after an oil change, periodically check the oil level and the drain bolt and filter area for low levels or oil leaks.

|


