Essentially mounting gears is very similar to romoving them and many of the tools are the same, but with slightly different functions. The keyword here is _ALIGNMENT_. Any variations from true, can and will show up in final performance as erratic. Correct initial insertion is the key to success.
The proper chamfering of newly cut shaft ends is very important since gear materials are much softer. Sharp ends may act as chisels, cutting away the walls, thus destroying the bore. Excepting worms, most gears are relatively thin, increasing the probability of misalignment wobble upon mounting. Here proper chamfering , including bore rim is more important. NWSL's catalogue and some tool instructions cover this very thoroughly. Breaking the gear bore rim as shown permits much easier insertion.
Check both sides of a gear for insertion ease, often one is much better. Start a gear with finger pressure as far as possible, check alignment with the handle of a small machinist's square or better with a snug fit hole, if the shaft end is free. Place the gear on a hard surface and tap lightly on the opposite shaft end, not the driver, with a drift pin to avoid upsetting the driver.
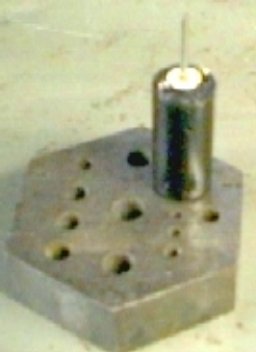
Excellent tools for these steps are solid blocks with holes like NWSL Aligners or jewelers bench blocks or anvils with about 15 graduated holes bored through, available at better hobby shops from Maxon or Vigour. Place the bore over a larger hole and continue tapping lightly and checking until the shaft emerges. Enter the shaft into the snuggest but not tight fitting hole to assure excellent alignment and continue by pressing or tapping.
Some axles have a number of splines or knurls spaced around the circumference to prevent slipping. Since these must cut matching splines in the gear bore, extreme care is necessary in starting them, best accomplished by tapping with the shaft in a snug fit hole. Just before emergence of the splines, the shaft must be moved to a larger hole to avoid jamming in the anvil bore.
Check and continue tapping until the final gear location is approached. Continue with very light tapping, checking position more frequently. Overshooting can be corrected, but in some cases, access is difficult due to driver to gear spacing.
 CAVEAT: All force at the
stop end should be applied directly to the shaft or axle and not to wheels,
bearings, motor housings or other surfaces. Particular care should be taken
with motors, since everything is mounted on the shaft. The windings can be
squashed, thereby increasing end play, which is probably too much
already.
CAVEAT: All force at the
stop end should be applied directly to the shaft or axle and not to wheels,
bearings, motor housings or other surfaces. Particular care should be taken
with motors, since everything is mounted on the shaft. The windings can be
squashed, thereby increasing end play, which is probably too much
already.
>

Hammering a worm directly on motor shaft, with #11 knife blades wedged between shaft end and magnet to prevent squashing windings.
Some cases may require specially shaped stop pins, dies or drift pins.

Rounding off the bore rim will prevent jamming on tapered axle ends. For mounting wheels on extended axles, the bore should just clear the axle diameter and extension length .
Due to difficulties in supporting shafts, simple hammer tapping methods are not as readily available as with removing gears. Double shafted can motors are particularly difficult with their long slender shafts. They may be supported in the bench anvils, but in many cases short lengths of scrap shaft are placed in the holes to provide housing clearance. Tapping should be very light at all times.
PRESSING
Very precise alignment is
absolutely necessary, since skewed forces can produce irreparable
damage.
Various types of presses can be used for different applications.

Mounting worm on end magnet, open frame motor with adjustable frame press.

Mounting worm on end magnet, open frame motor with adjustable bar press.

Mounting gear on shaft with bar press and aligner. Notice pivot adapter on screw.
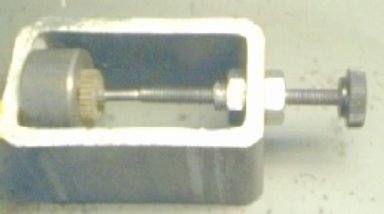
Mounting gear on shaft with rectangular tubing press and aligner.
Since they must be gauged or quartered, mounting wheels and drivers with crank pins and cams require special treatment,
BACK TO MANTUA PLASTIC CAMELBACK
BACK TO METHODS
BACK TO MOTOR TUNING
