Before deciding on a plan to modify a level, consider some of the characteristics that might make using it simpler. Although the examples use inches and ASME screws, metric possibilities can be derived. First grades are measured in percent. Thus a 1% grade equals a 1 inch rise in a 100 inch run. Look at a 36" level, a 1% grade would yield a .36" rise end to end. Determining the rise for 1.25% requires a calculator. 24" and 48" levels fair no better. But if they are extended to 25" and 50" respectively, the 1% rises are .25" and .50". Now its easy to divide by 4 or 2 to get the rises of .3125" and .625". In the 50" case, if the lower end is raised .625" and placed on the roadbed and it is adjusted for a level bubble reading; the grade will be 1.25%.
The level end can be extended to the correct length with a block or angle screwed to it and suitable blocks placed under this to raise the end. But this is awkward unless you have a few extra hands and a good selection of blocks. A more convenient method is to extend the end enough to accommodate a raising screw. Adjusting the screw can yield any desired grade from zero to a maximum determined by the length of the screw.
Note: Adjust brightness and contrast for optimum viewing.
Not to scale.
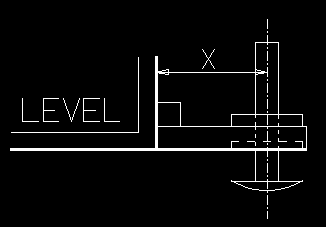
LEVEL EXTENSION MODIFICATION FOR SETTING GRADES.
The drawing shows the basic concept for adding an extension to a level. Since angles are not readily available in the sizes sometimes required and many are not truly square, a square bar is used to support the extension plate. Brass or aluminum stock is easier to work. Screws for mounting square bar to level and plate are not shown. Dimensions are not critical, except for the distance X which should be accurately located to the addendum required. The square bar can be 1/4" for the 25" and 3/8" for the 50". Its length should be slightly less than the width of the level.
As shown the bottom of the plate is counter-bored to recess the screw head to permit level and low grade use. The thickness above this should be at least ten threads to stabilize the screw. The length should permit at least 1/16" beyond the counter-bore . Width should allow for 2 screws to mount to the square bar.
Select riser screw threads per inch for convenient setting. With a 50" level and 20 tpi, one full turn equals .05" or .1% in grade change. Starting from a flush position, for a 1.25% grade, the screw is extended about 12.5 turns. Using a 40 tpi screw with a 25" level yields the same results. Both tpi's are common: 1/4-20 or 4-40. Select a round or oval head, since this will provide the large resting foot. Screw length may be a problem, since each percent of grade requires an extension of .5" for the 50" or .25" for the 25. A 5% grade needs 2.5" or 1.25" respectively . To this the thickness of the mount must be added plus a few more threads, if a jam nut is desired. A wing nut makes a very convenient jam nut at final setting. A length of all-thread may be substituted. A suitable nut, affixed to the foot end, may replace the head.
First decide the maximum grade desired. Make some rough calculations and drawings of your plan to get an idea of what to search for. Look around to find out what is available. Better hobby shops stock 4-40 all-thread in the plane area along with screws and nuts. Hardware suppliers usually stock 1/4-20, aluminum bars and possibly brass. Replan as required. The critical alignment areas are the heavy lines in the drawing.
 Caution: Be absolutely certain to
remove all burs after drilling, tapping and cutting throughout the
process.
Caution: Be absolutely certain to
remove all burs after drilling, tapping and cutting throughout the
process.
Cut the bar and plate to length and remove any burs. True up square one end of the plate. Carefully locate the and center punch the riser screw center on the longitudinal center line of the plate. Drill with tap bit, then tap. Since many taps produce sloppy threads, to help eliminate backlash, stop tapping before the taper is clear through. Remove tap and try screw for easy finger turning. Repeat with 1/4 turns until achieved and stop. The extra effort is well worthwhile.
Next consider counter-boring to recess screw head. Special bits are available, but expensive. Using a standard bit will produce a conical bottom, eating some thread length and thus increasing plate thickness requirements. Hole should just clear head. Omitting this step will require screw removal to use level in the normal manner. It will also prevent setting very low grades. The threaded end of the screw could be rounded and used as a foot, at an increased risk of digging into softer material or falling into any indentation in the surface.
Center the bar on the plate with the edges flush, clamp and drill clear through with the tap drill for the two (6-32) screws. Unclamp and enlarge the bar holes with a bit a little larger than the clearance drill size to permit adjustment. If you do not have a bit long enough to drill through the bar into the level's end with the plate clamped in place, drill two holes in the side face opposite the one used for alignment. These should be closer to the ends than the plate mounting ones and clear of any web at the level's end.
Next tap the two mounting holes in the plate. Then screw the bar to the plate, making sure screws do not protrude at the bottom. Before tightening hard, carefully align the flush edges by placing on a hard even surface and tapping each piece lightly with a soft hammer. Again on a hard even surface align the extension with the level on the bottom side and clamp the together. With a tap bit drill the two side hole as suggested above. If you pre-drilled the holes, transfer the hole centers to the level's end by inserting the bit used to drill them and twist by finger to create a small dimple to locate center punching. Unclamp.
Depending on the course followed, either tap the level's end holes; or drill and tap the holes and enlarge the bar holes from the short side. Clean up, align and assemble. You are ready to go.

Note: Adjust brightness and contrast for optimum viewing.
Not to scale.
LEVEL EXTENSION MODIFICATION IN USE.
Once you decide the grade desired or required, turn the screw out the calculated number of turns and your in the ballpark. Using the depth gauge on a bar caliper, set the rise required and tighten the jam nut. Check again to be sure. Place on roadbed with the riser screw down-hill and adjust until bubble is centered. Long runs can be walked up in sections, but be sure to check in-between for possible sags or humps. An assistant to raise or lower cleats is helpful here, since the level can bounce off during changes. Grades do not necessarily have to maintain the same slope throughout, but the selected maximum should not be exceeded.
BACK TO GRADES
BACK TO LINES, PLUMBS AND LEVELS
BACK TO SQUARES, BEVELS & MITERS
BACK TO MEASURING INDEX
BACK TO TOOLS INDEX
