To avoid unexpected misalignments and unwanted grades, benchwork and sub-roadbed must be carefully laid out both horizontally and vertically. Many construction trade tools can prove useful, some with modifications. Even the ancient Egyptians used some of the simpler ones to layout the pyramids.
Probably the simplest is a line or string stretched tautly between two established reference points. This is often used by bricklayers to keep courses of bricks both straight and level. These may be used to establish long even grades between two levels. For cases where the line may be in the way, a chalk line is usually coated by rubbing against a light blue chalk and stretched across a surface. Then the line is plucked or snapped to deposit the chalk on the surface. For distances less than 4 feet, a straight edge scale may be used to mark a line.
To establish verticals, a plumb line is commonly used. Deriving its name from its use by plumbers (Latin: Plumbus = Lead, the element), it is simply a line with a weight suspended from the lower end. Pointed weights are commonly suspended from surveyor's tripods to accurately position transits over benchmarks on the ground. Since it is essentially a pendulum, take care that the weight is not swinging by dampening it with your fingers until stopped.
Used for general alignment work spirit or bubble levels come in a variety of sizes and styles. All have one or more arc vials, partially liquid filled to leave a gas bubble and centering lines for each bubble end. More accurate types have extra lines to establish slight grades. Frequently, experienced craftsmen estimate slopes by 1/4 or 1/2 bubble settings.
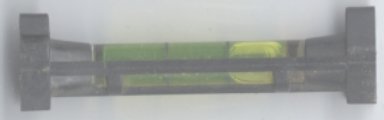
About 3" long, the bullet or torpedo level is designed with two hooks to hang from and to level a line. The one shown has a pocket clip and feet for surface leveling.
Note:Note: Adjust brightness and contrast for optimum viewing.
BULLET OR TORPEDO LEVEL
Other short styles are useful for none critical jobs such as leveling short lengths of track or structures. It is surprising how many layouts have tilted structures. The following, aluminum beam level has the usual full compliment of vials and is tapered inward toward the ends to fit in tight places. The ends are rounded for work in corners.

Note:Note: Adjust brightness and contrast for optimum viewing.
SHORT 9" BEAM LEVEL
Longer beam types are more useful for most benchwork applications. Lengths may range from 2 to 12 feet. Common are three vial, with horizontal, vertical (plumb) and 45°. More expensive versions have dual vials to avoid flipping sides. Some may have vial adjustments and half bubble or other markings. Materials may be steel, aluminum or plastic. Better quality levels specify bubble accuracy tolerance in degrees or height per unit length.

Note: Adjust brightness and contrast for optimum viewing.
24" PLASTIC BEAM LEVEL
Mounting shelf or other support brackets on a wall is a lot of fun, trying to balance a level, while drawing lines then drawing cross lines or arcs for distance or vice versa. Then after holes are drilled, all those lines, including the mistakes, have to be removed. With this device, three sliders can be set to distances. then one hole is located and a screw is placed through an end guide hole. snug enough to center it. The free end is swung to level and the guide holes in the slides mark the next holes. Also it can be used vertically to space shelves.

Note: Adjust brightness and contrast for optimum viewing.
24" MARK-IT LEVEL
Although useful elsewhere for setting odd slopes and in spite of hype, dial type angle gauges are not precise enough to establish GRADES .__ As an example, take a 4.125" OD dial graduated in one degree increments. At the perimeter, the spacing between 1 ° ticks is:
or a little over 1/32" and a little under 1 mm.
An angle of 1° equals about a 1.7% grade, while 2 ° is about 3.5% and 3 ° is about 5.24%. A reasonable maximum grade for long trains is 1.25% or .716 °. The difference between 1.5% and 1.0% is less than 0.3 degrees. How do you eyeball quarters or tenths of a degree and replicate them over the layout?
Assuming a base of 4.125", a 1 ° tilt raises one end about .072" above the other, while a 1.25% grade rises only about .052 in the same distance. A small .010" irregularity at one end would produce a 1/4% grade error. It should be obvious that the base is too short.
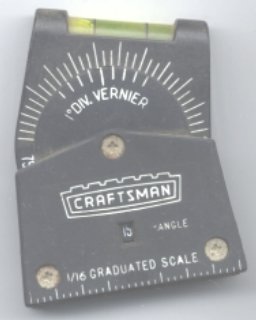
A vernier my help in setting finer angles.
Note:Note: Adjust brightness and contrast for optimum viewing.
VERNIER DIAL LEVEL
Using the vernier, the one shown can be set to 1°, with a window showing 5° increments to avoid counting graduations. The bottom edge is marked in 1/16" graduations over a distance of 2". But this device it still not precise enough for establishing grades. Mounting on a long piece of straight, steel bar stock, using the base magnet can overcome the length problem; but the angle problem remains.
Grade percentages or angles are best measured with a MODIFIED, SENSITIVE BUBBLE LEVEL of sufficient length to span longer runs on curves. For accurate GRADES, even with a 50" leveling distance, measurements will be in the order of .01". It may be noted that actual runs on curves are longer than the straight span of the level, resulting in lower slopes. You may compute the correction factor or if tolerable, consider this as a compensation for the increased friction drag on curves.
The Egyptians used long ditches filled with water to level the pyramids very accurately, but this is not really practical on our layouts. An inexpensive and easy to make LEVELER can do the same over any layout distance.
Just a few years ago lasers cost thousands of dollars. Today a laser level can be purchased for $10 at outlets like Odd Jobs, With a lens the one shown can produce a horizontal or vertical line or a dot without. The horizontal accuracy is stated as 0.029 ° = 0.50mm/m.* or .05%. This yields 0.15" at 25' across a cellar. Although this appears to be excellent, there is no statement about the height of the laser centerline above the reference base. This could be determined with a little experimentation. Preliminary measurements indicate the distance to be about 27 mm or 1.06". The layout zero reference target would be raised by this distance. There is a tapped hole in the base center which accepts a standard camera tripod screw. Once leveled at right angles, height could be set, then beam could be panned around to set heights in various directions.

Note: Adjust brightness and contrast for optimum viewing.
LASER LEVEL
Each type has its advantages and disadvantages in a particular job, but variety is the spice of life.
BACK TO GRADES
BACK TO LAYOUT LEVELS
BACK TO MEASURING
BACK TO TOOLS INDEX
