Module 7: Setting up a Network Printer
Introduction to Windows NT Printing
Windows NT Printing Requires:
|
Users can print from computers in NT network that are running the following operating systems:
- Windows NT
- Windows 95
- Windows for Workgroups
- Windows 3.1
- MS DOS
- LAN Manager 2.x
- OS/2
- Netware
- Unix
- Macintosh
| There are four levels of printer permissions: |
These are the capabilities of the four levels of permissions:
| Capabilities | No Access | Print (Default) | Manage Documents | Full Control |
| Print documents | ||||
| Pause, resume, restart and cancel the user's own document | ||||
| Connect to a printer | ||||
| Control job settings for ALL documents | ||||
| Pause, restart and delete (purge) all documents | ||||
| Share a printer | ||||
| Change printer properties | ||||
| Delete Printers | ||||
| Change printer permissions |
| Setting up a network printer |
| A member of this group | Can administer a printer |
| Administrators | On any computer in domain running Windows NT |
| Print Operators | On any domain controller |
| Server Operators | On any domain controller |
| Power Users | On any local computer in the domain on which the group exists |
Add a printer -- this installs the printer driver on the print server
- Share a printer
By default the permission assigned is EVERYONE
PRINT
| Adding and Sharing a New Printer: |
Options which must be defined during setup:
My computer The computer designated as the print server Available ports specify the local part attached to the print device Manufacturers/Printers install correct print drivers Printer name name printer Default printer designate default so user doesn't have to. This is automatic if it is the first printer on the print server Shared makes it possible to connect over the network Share name name users see in nethood Operating Systems identify types of clients that will use printer; then appropriate print devices will be installed on print server Test page prints test page
- General
- Ports
- Scheduling (Permissions, Auditing, Ownership)
- Sharing
- Security
- Device settings
Again, by default the group Everyone is assigned the Print permission.
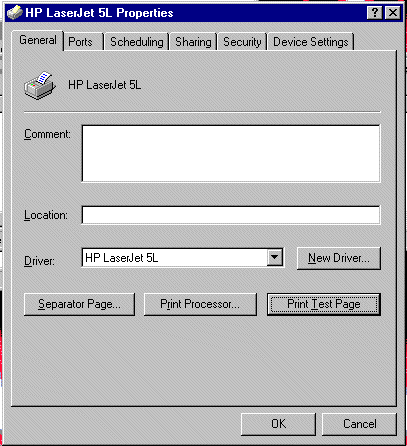
| Here's the General Tab |
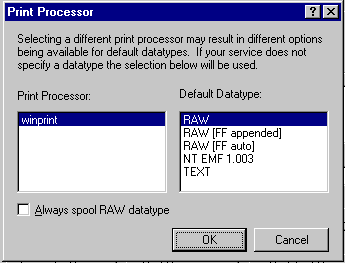
This is the dialog box seen by default when you click the Print Processor
button:
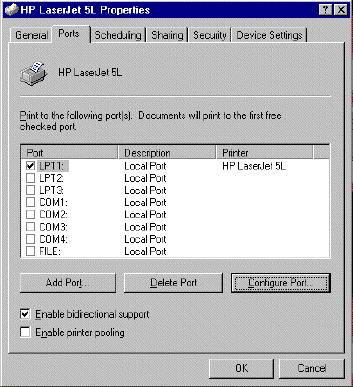
| Here's the Ports Tab |
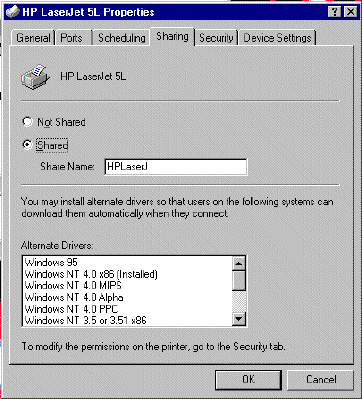
| Here's the Sharing Tab |
| Here's the Security Tab |

This is the dialog box seen by default when you click the Permissions
button: 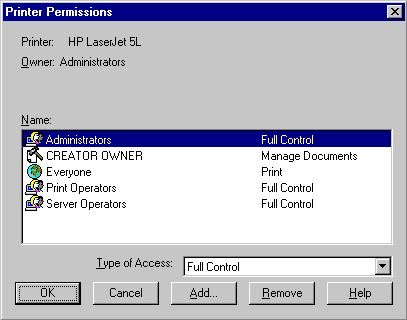
| Setting up a Network Client: |
There are 3 classes of network clients:
- MS-DOS
- OS/2 (with LAN Manager Client 2.2 c installed)
- LAN Manager 2.x
- Windows 3.1
- Windows for Workgroups
- Non Microsoft-based clients
You have to you 2 things:
- Install a service
- Install the printer driver on the client computer
- The print server must have a service installed on it:
| UNIX | TCP/IP Line Printer Daemon (LPD) Service |
| NetWare | File and Print Services for Netware (FPNW) |
| Macintosh | Services for Macintosh |
- Then a printer driver must be locally installed on the client computer
| Accessing a Network Printer |
Clients running Windows NT and Windows 95
Other Clients
To connect to a printer use commands specific to the client
| The Client... | The Command to use... |
| LAN Manager clients running MS-DOS or OS/2 use the Net use command | net use lptx \\server_name\sharename |
| NetWare clients configured with a Monolithic IPX and NetWare VLM use the NetWare Capture command | capture queuename |
| UNIX clients running TCP/IP, use the LPR utility | lpr -Sserver-name -Psharename filename |
| Apple MacIntosh | Chooser |
| Creating a printer pool: |
- A printer pool is one printer connected to multiple print devices through multiple ports of the print server.
- A printer pool decreases the time that documents wait in the print queue. They are also easier to manage because there is one printer, not multiple printers for multiple print devices
- The user prints a document without having to find out which print device is available because the printer checks for an available port.
NOTE
|
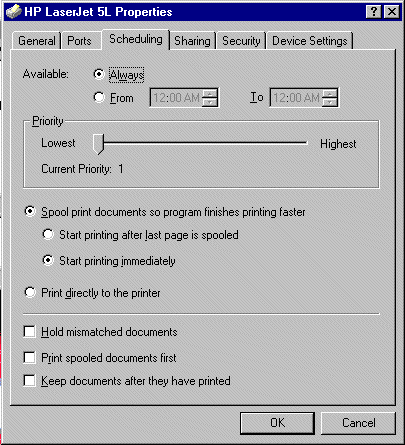
| Scheduling tab includes three areas |
- Set available printing times. -- Large documents print after hours
- Set priorities between printers.-- Critical documents print first
- Change how the printer processes documents -- Larger documents start printing before print process is completely finished
| Setting priorities between printers: |
Lowest Priority - 1....................................Highest Priority - 99
This makes it possible for you to set priorities between groups of documents. This requires that you do the following:
- Connect two or more printers to the same print device. These printers must:
- Be on the same printer.
- Use the same port to connect to the print device (port can be either a physical port on the print server or the UNC name of a network printer)
Set a different priority for each printer connected to the print device. Then, for example, executives can print to the higher priority printer.
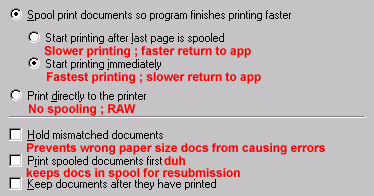
| Options | Description |
| Spool print documents so program finishes printing faster | Either this option OR the Print directly to the printer option
is selected. If you choose this option, the documents will spool.
This option has two choices |
| Start printing after last page is spooled | document won't print until completely spooled - the application that is printing is unavailable during the spooling |
| Start printing immediately | document starts to print before it spools completely, which means it prints
sooner the application that is printing is available sooner |
| Print directly to the printer | document doesn't spool - decreases printing time select this option only for a NON shared printer |
| Hold mismatched documents | documents that don't match the configuration of the printer will not print |
| Print spooled documents first | a spooled document prints before a partially spooled document |
| Keep documents after they have printed | documents remain in the print spooler after printing and can be quickly resubmitted for printing |
NOTE: in Windows NT printing, there is a SPOOLER on the print server. The
spooler processes and schedules documents. Spooling is the process of storing
documents on the hard disk, and then sending them to the printer.
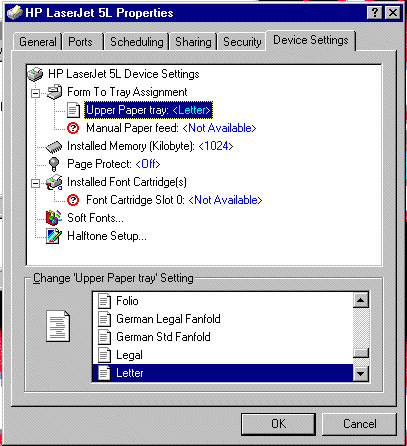
| Device Settings tab: |
- If a print device has multiple trays that hold different types of forms, you can assign a form to a paper tray.
- "Form" refers to the paper size and type
- the default form setting for a paper tray is NOT AVAILABLE
| Setting a separator page has two functions: |
Windows NT includes three separator page files (LOCATED IN: Winnt\System32):
- Sysprint.sep: prints a page before each document. Compatible with PostScript printing devices.
- Pcl.sep: Switches the printing mode to PCL for HP-series printing devices and prints a page before each document.
- Pscript.sep: Switches the printing mode to PostScript for HP-series printing devices, but doesn't print a page before each document.
I'm sorry, but I can't answer specific network-related, or exam-related questions. |
|
| Last Updated: August 6, 2001 | Grant Wilson, Edmonton, AB Canada |