STEP TWO: EYES
|
|
The eye is an element of many details. Here I will show you my technique
for constructing realistic character eyes. First, we will construct
the eye as an entity separate from the face. Then, we will place it in
the socket where it belongs.
New Layer-->Eyeballs Organize each eyeball in its separate respective
sublayer. We will start with her right eye so make a sublayer called Right
or Righteye or whatever.
|
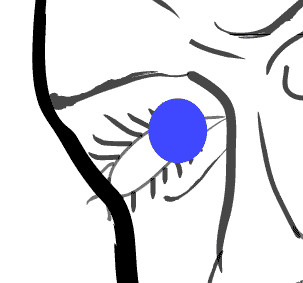
Draw the bulk of the iris
|
|
| Use the ellipse tool to make a good sized circle
with no stroke and the color of your choice. Where exactly to place the
iris you might wonder? First off, imagine a crosshair that is pointed
in the center of the eye socket. We want her to look straight at us. Since
her head is tilted stage left and slightly down, we will position the iris
to the right and slightly above that imaginary crosshair. If you
stare at yourself in the mirror, and it doesn't break, you can move your
head around and see how your eyes shift relative to the eye sockets. Ok
shifty eyes what next? |
 |
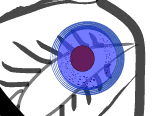
Pupil
Same thing as the iris only smaller of course and black. Actually pupils
arent exactly black. So for details sake i am gonna give it a slightly
purpulish tint on the fill.
|
 |
Outer Ring and Speckle
|
 Look at your eye and notice the dark rings around them. And I don't mean
those lazy bags underneath. I'm talking about the stroke around the iris.
Here is an important element many people omit. Again with the ellipse tool.
Turn off the fill and select a shade of blue that is darker than the iris.
This time I want you to use a brush stroke. I used the 'scroll pen' at .25px.
I like it since it gives a very crisp, round look.
Look at your eye and notice the dark rings around them. And I don't mean
those lazy bags underneath. I'm talking about the stroke around the iris.
Here is an important element many people omit. Again with the ellipse tool.
Turn off the fill and select a shade of blue that is darker than the iris.
This time I want you to use a brush stroke. I used the 'scroll pen' at .25px.
I like it since it gives a very crisp, round look. |
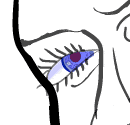
| The eye seems very loud now so we shall turn it
down a few notches. Select the iris and outer ring and lower their transparency
levels. I bring them down to around 70%. This will give it a nice effect. |
| |
Now if you look at your pretty little eyes again,
in between the pupil and outer ring you will notice that the iris has
a grainy texture about it. Take out the .25px Fire Ash brush and give
those beauties some texture. Cool? Cool. |
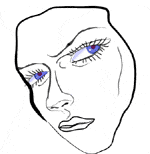
 Now she
looks like she's had too many cups of coffee. Let's put the eye where it belongs, on the inside. Now she
looks like she's had too many cups of coffee. Let's put the eye where it belongs, on the inside. |
Create Clipping Path
|
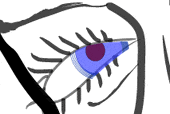 We
already have the path of the eye socket that we drew earlier, while making
the face(The lines that the eyelashes are connected to...). We will
use that path to clip the area of the eye that we want to be seen. Select
the path of the eyesocket(found in the layer Facial Lines). CTRL_C to copy
it. Now paste it on your layer with the eyeball. Put it on top of the iris,
pupil,outer ring and grain. Now for some magic! Select all of the elements
that will be involved. This includes the eyesocket path you just copied
and pasted, the iris, the pupil,outer ring, and grainy texture. Once they
are all simultaneously selected, choose OBJECT-->CLIPPING MASK-->MAKE. We
already have the path of the eye socket that we drew earlier, while making
the face(The lines that the eyelashes are connected to...). We will
use that path to clip the area of the eye that we want to be seen. Select
the path of the eyesocket(found in the layer Facial Lines). CTRL_C to copy
it. Now paste it on your layer with the eyeball. Put it on top of the iris,
pupil,outer ring and grain. Now for some magic! Select all of the elements
that will be involved. This includes the eyesocket path you just copied
and pasted, the iris, the pupil,outer ring, and grainy texture. Once they
are all simultaneously selected, choose OBJECT-->CLIPPING MASK-->MAKE. |
|
We are almost finished, just a few finishing touches.
|
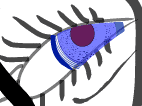
Reflective Glare
|
| The eye has more definition with a subtle outer
stroke. I used a very dark blue .25px stroke with the 'Tapered-Round Brush'. |
 |
|
| |
Possibly the most important of the subtle
details is the glare. This is the reflection of light off the lens
of the eye. Every open eye has one! |
 |
|
| |
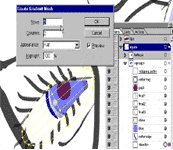
Make
sure nothing is selected. Open the gradient window. It should default
to black and white linear. Choose radial from the drop down menu.
Now draw the ellipse on the edge of the iris. 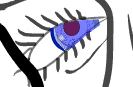
It
probably won't look right at first. You will have to adjust the
gradient so that their is not so much black around the edges. Pick
up the gradient tool. Click on the center of the glare and drag
outside of the ellipse untill you get the sphere mostly white with
a touch of gray around the edges. You can lower the transparency
to around 70% if you wish
|
.
|
|
Final Gradient
|
|
Last but not least, we will give the white part of the eye a gradient.
Draw an ellipse with a white fill and no stroke so that it is a little
larger than the eye socket. You will have to use the transform tool to
position it correctly.
|
 |
Make sure that you position it in the bottom most sublayer
in the clipping path so that it it at the very back and masked out of the
face. |
 |
OBJECT-->CREATE GRADIENT MESH.
Give it 5 rows and 2 columns. Set highlight to flat.
With the Direct Selection tool, select the upper left mesh patch
and apply a light blue color. I used the Faded Pale Blue from the
swatches pallette.
|
 |
|
VOILA!
|
| This is what I came up with: |
 |
Repeat Process for Other Eye
|
| Tip: Make her left eye a little larger
since it is slightly closer. |
 |
|
This is my final product for this stage:
|
|
| |


