MAIN MENU
Introduction
Cast / Credits
Resource LInks
Contact / About
TIME MACHINES
Full Size 1960
Full Size 2002
Time After Time
Model 1960
Model Kits
TECHNICAL
The Barber Chair
The Restoration
CREATIVE
Scratch Built Model
GALLERY'S
Lobby Cards 1960
Publicity Pics 1960
Pictures 2002
DOWNLOADS
Wallpapers
|
|
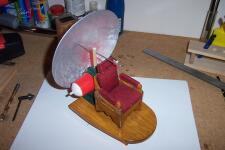
Constructing The Barber Chair |
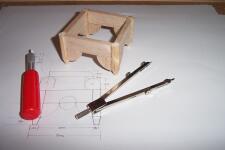

Above left is the very beginning of the chair, the legs were made from 10mm
doweling and the points on the ends of each leg was made with a simple
pencil sharpener. The rest of the chair is cut from 7 & 5mm sheets of balsa
wood which was very easily cut using a sharp craft knife.. The brass colored
beads were held in place with bamboo skewers and the whole chair was held
together using a hot glue gun, so no need to wait for it to dry.
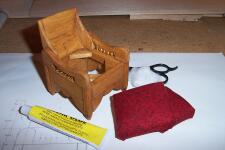
The chair was stained with two coats of oak colored wood stain, then the first
coat of clear polyurethane was brushed on using an artists brush and left to
dry overnight. Then it was sanded lightly with 200grit sandpaper and another
two coats was applied with drying in between each. Two small cushions were
made with bases of 7mm balsa padded with a polyester wool, the type used with
some pillows. A square of red felt went on top of that and then a fine red cloth
with black decorative scrolling's was stretched about the wood base and glued
in place using the hot glue.


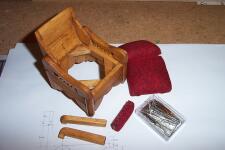
To finish off the decorations and to add the arms of the chair i cut sewing pins
down to size using some wire cutters to simulate tiny tacks, these were pushed
through the cloth and into the balsa base with the help of some pliers. The
head rest was made the same way as the cushions and joined to the back cushion
with gold painted bamboo skewers and held in place with a clear sticky glue.
|
|
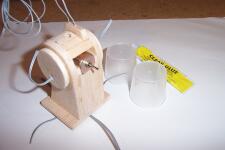
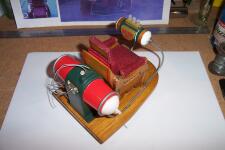
Building the Engine Housing |


Next i began the engine housing, i had the chair finished so i could get the
scale of the engine base correct. The engine housing would hold a small electric
motor i salvaged from a cheap toy car, the drive shaft for the motor protruded
through the back end as well as the front. I then took advantage of this by
attaching a counter weight flywheel to the opposite end. The flywheel was
made from a thick washer that i filled completely with hot glue, when the glue
had cooled i drill a small hole through the center and pushed it firmly onto
the motor's drive shaft. The motor was supported by pieces of balsa and the
wires were pre soldered into position before attaching it to the housing.


Then holes for the pod wires and lamp light were inserted as there would
be no way to do this later on, the top of the housing was filled with short
strips of balsa and then trimmed flush to create the round top section.
The wood is easily shaped with light sandpaper so only a small amount
of pressure is applied when sanding to take away only a little at a time..

A small gap was left at the top of the motor to allow air to circulate and help
prevent over heating, a hole was then drilled in the top of the housing and this
would later be used to support the dish and lamp cage. The housing was then
painted with a dark forest green paint, sanded and then painted again, this was
repeated until 4 or 5 coats was added to seal the balsa grain and create the
desired look.. The paint was water based and applied with an artist brush.
The pods were made from two small clear plastic cough medicine cups, they
were sprayed red on the inside leaving the outside clean and clear.
|
|
Making the Base, Pods & Console |

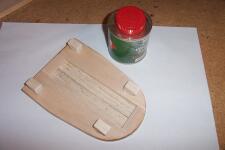
Now that i had the chair and motor housing finished i could get the scaled
measurements for the time machine's base, the base was made from two wide
sheets of balsa glued together to make a thicker base and leaving a channel
underneath that would later be used to hide the wiring. Some small balsa feet
were cut and glued into place and a number of holes were drilled for wires to
pass through into the hollow beneath, then the entire base was prepared in the
same manner as the surface of the chair. Two coats of oak stain and three coats
of clear polyurethane.


Two ping pong balls were cut into halves and used as the domed ends for the
pods, the domes had a hole drilled through the center and a nylon tap washer
with a protruding tip was glued into the holes of the dome. The protruding
end would be used to support the outer rails later on. Next i bought a short
length of PVC plumbing tube that was going to be the console, two end caps
and two outer dashboards were shaped from balsa and then glued to the PVC.

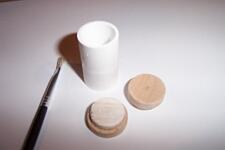
Another two ping pong balls were cut to make domes for the console caps and
then a narrow slit was cut on the right hand side of the console for the lever
control to pass through. Then the white area of the PVC was painted forest green
with the outer rims of the caps coated with clear polyurethane.
|
|
Shaping and aligning the Dish |
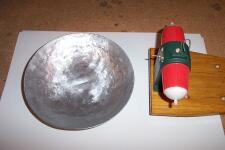
The Dish was made from an aluminum plate, it was beaten with a small hammer
until the correct shape was attained, the aluminum was thin and easily melded
with very little effort. Then it was sanded with 200grit and washed thoroughly
to remove the oxide coating, a small hole was drilled center and a test run
was performed with the motor housing already firmly attached to the finished
base, from here i could see how wobbly the dish might be when it was turning.
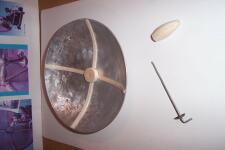

Thin strips of balsa was glued to the inside of the dish including a thick center
piece which would help support the dish on its narrow drive shaft, a tapered
piece was carved from a larger chunk of balsa and this would serve as a spacer
between the dish and its support and also as a pulley wheel that the motor would
later be attached too. The dish was then ready to be sprayed gold with additional
coats added and with light sanding between coats, this was done until the surface
was filled and the balsa grain was no longer visible.
|
|
Shaping and preparing the Rails |

The Rails were made from old coat hangers, the wire needed to be as thick as
possible but still soft enough to bend into the correct shape, three different
rails were required. Firstly the pod to console rails were shaped, this was quite
tedious as the wire would have to bend in allot of places and fit snuggly onto the
machines base. Small pegs were soldered onto the bottoms of the rails and these
would slot into the base and help keep them in place. Once both left and right
rails were completed i could add the decorations, these included two curly end
pieces near the engine housing and one large curly part to be added to the front
section of the machine beneath the console. This would also be used to stop the
console from turning about on its connecting rails.

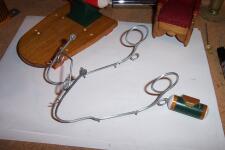
All the rails had to made in such a way that i could remove them and attach them
again without any permanent connections, they would be painted separately
and adjustments could be made as i fitted them to the base. I had the side rails
finished and so I started the outer rail and this was made in two sections soldered
onto rounded nuts that attached to the nylon ends protruding from the pods.


The wires that ran from the top of the motor housing was twisted around a length
of brass wire to make them curly like a telephone cord, the wires were passed
through the top of the dowel that supported the dish. At the top of the support
a reed bulb was soldered to the wires and fixed into place with hot glue..The final
coat was added to the dish and also to the rails, they were then left to dry overnight.
|
|
Time Machine Electrics, Bulbs and Motor |
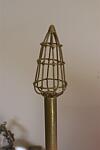

The lamp cage was made from brass wire and soldered together while it was
attached temporarily to a short length of dowel, the cage could then be painted
gold and would simply slip firmly over the lamp base later on. The lamp base
and the curly wires were painted with a red enamel, then a reed bulb was
soldered to both sides of the motor housing to light up the pods.


All the wires that passed through the base were soldered onto connection
bars which were fashioned from short lengths of coat hanger wire, they had
tiny holes drilled through them for the wires to solder too. Then the bars and
any loose wires were attached to the underside of the base with hot glue.
A battery pack would be concealed underneath and recessed into the lid that
covered the wiring, the battery compartment held four (AA) size batteries..
|
|
My Time Machine - The Finished Shots |
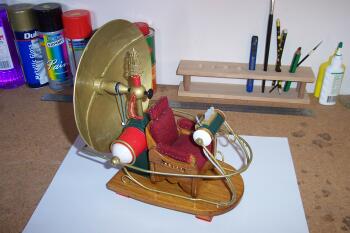
The Time Machine completely assembled ( Click To Enlarge )

Front View

Opposite side

From the Back
|
|
My Time Machine - Close ups |

Here you can see the rubber drive belt connecting the dish to the motor

The console has three small semi transparent hollow tubes that are inserted
down into the PVC tubing, inside the console is another reed bulb that lights up
the hollow tubing as if they were separate bulbs.

From the side you can see how the rails are attached, the outer rail is supported
by the domes and two curved hooks soldered to the front end of the side rails.
The lever is a fashioned to control the flow of electricity to the lights and motor,
pulling the lever down switches on the console and activates the machine..
|
|
My Time Machine - Video Clip - ( "Real Player" Required to watch ) |
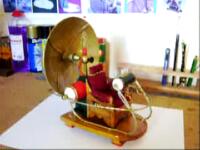
Here is a Short video clip that shows the Time Machine model being
activated and the dish turning... ( Click Image To Watch ) ...
|
|
AFFILIATE SITES


|