Mitzrah's Get IT Right Column!!
Making Navbar Menu - Section 1
Updated : Saturday, August 08, 1998
|
 |
Today I begin a whole new chapter in trying to explain how to make
these navbar plates. Bear in mind that the program I will be using is Paint Shop Pro by
JASC if you don't have that, please download it from www.jasc.com
it will be under evaluation for a period of 30 days, but if you like the program, please
purchase it.
To make life easier for you, these are the currently available FTP
sites for PSP 5.0
Be forewarned that I assume you know the basics of
using certain tools with Paint Shop Pro, however if you are truly a newbie to all this, I
can suggest that you follow through the plate making process to
gain some familiarity with the program. If you are lost as to what is what and what is
where please refer to the Paint Shop Pro Elements page
which I have set up.
However, if you have used PSP 5.0 before and feel
confident enough, let's begin with the tutorial:
- Open up Paint Shop Pro 5.0 if you haven't done so.
- I want you to create a new image (press CTRL + N) details
are as follows:
- Width = 100 pixels
- Height = 20 pixels
- Background Colour = Transparency
- Image type : 16.7 m colours (24 bit)
- Now, I want you to use the FILL function on
the toolbar to the left, use any two colours you want, I have an obsession with gold so I
will use dark brown (foreground colour) and light yellow (background colour).
- Next using the Controls Box, please change
the fill style to LINEAR GRADIENT.
- Click on the image and sure enough you would get an image
which looks somewhat like this :
- Next we are going to use the Buttonise
function to give it a more 3 dimensional look. Access this tool by clicking on the menu
Image -- Effects -- Buttonise OR you can use the short cut ALT + I, T, B. Set it up as
follows :
- Now we are going to make a nice arrow to put on the new
button we have, so open another new image (CTRL + N) image properties are as follows :
- Width = 50 pixels
- Height = 50 pixels
- Background Colour = Transparency
- Image type : 16.7 m colours (24 bit)
- Change the FOREGROUND colour to something
which will stand out on the 3D button we just made. Any colour which looks good will do.
- Then we use the ZOOM function on the tool
bar and click on the image 4 times so that it becomes large enough for us to accurately
draw lines.
- Then we select the LINE function on the
tool bar, set the parameters as shown with Line Type = Normal and Width = 1
pixel, and begin to draw lines from co-ordinates (0,0) to (50,25) and from (50,25) to
(0,49) here's an example of what I mean.
- Now, we use the FILL function again on the
tool bar and now we change the fill style to Solid Colour. Then
we click the cursor on the inner perimeter of the arrow and voila, we get a triangular
shaped arrow, like so :
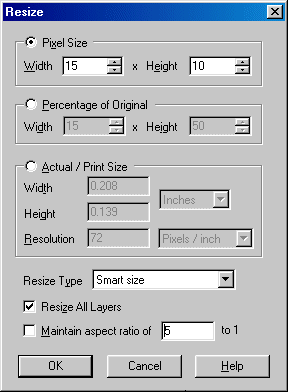
- After this, we need to RESIZE the image so
it becomes a suitable size for our usage. We can access the RESIZE
function through the menu by typing ALT + I, E or we can just use the shortcut SHIFT + C.
Enter the parameters as shown in the image below. If you find that you cannot alter either
the height or the width parameters because the program auto adjusts it for you, make sure
you have unchecked the "MAINTAIN ASPECT RATIO" option below near the OK button.
Next click ok!
- Your image will then turn to something like so :
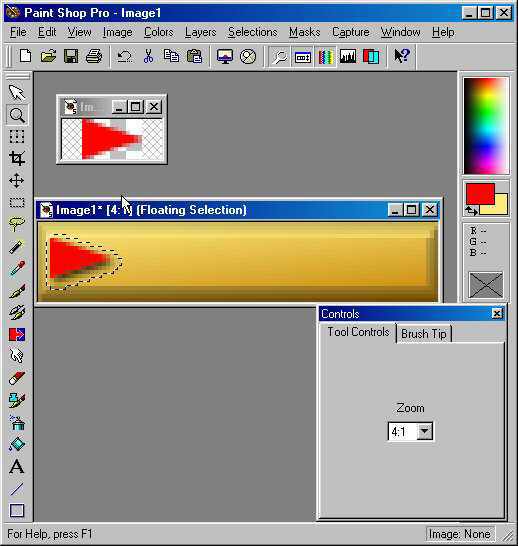
- Next I want you to press CTRL + C to copy the triangular
image. Then I want you to click on the bar which has your plate in it, to make it the
active image. Then press CTRL + E to paste the image there, you would notice that the
center of the image sticks to your cursor, I want you to position the arrow to where you
think is suitable for your needs. I mean I think it is pretty neat where it is at the
moment, but you may have other ideas.
- Then use the ADD DROP SHADOW function, ALT
+ I, T, D and drop us a nice shadow to make it look good.
- Now to get rid of the circling rings, all you do is use your
cursor position it anywhere on the active image and RIGHT click on it. The circles will
vanish.
- You now have one nice plate, save this image as type .psp,
next I want you to CLONE this image. How? Easy, just press CTRL + C to copy the image and
then press CTRL + V to paste the image. You would get to spawn the image as follow. Then
close the original plate, which is the .psp one and you can work with the others, like
adding text and all.
You will also have to generate 3 other plates something of
the same theme but this one you have here now, is type unselected, uncascaded. You need to
make 3 other plates which are somewhat like so :
| Not selected, not cascaded |
 |
| Not selected, but cascaded |
 |
| Not selected, cascaded |
 |
| Selected and cascaded |
 |
I am quite confident that by showing you a sample you would
be able to manipulate the stages and come up with the 3 other plates, hopefully. My
friend, Sara (Mululuna) will test this out and we shall see if it works for her, if not
then perhaps I need to guide just a bit more.:
Me tired.. have to rest for a bit, will continue tomorrow! The
merging of the plates to make the menu - Section 2 - don't miss it!
Notes from Alex:
If you found my guidance helpful, please drop
a note by my guestbook! So I know that you have dropped by and benefitted from my efforts,
it took me quite sometime to get these tutorial up! Click on home and then SIGN GUESTBOOK! I will also visit
your homepage and will sign your guestbook too.