Making Link Plates - Section 2
Updated : Friday, August 07, 1998

| Mitzrah's Get IT Right Column!! Making Link Plates - Section 2 Updated : Friday, August 07, 1998 |
|
Dear budding web masters!
In section 1 we learnt about how to open a new image for editing, now pay attention we are going to change the active foreground and background colours to make our plate.
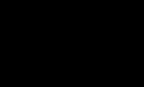
- What you do now is take your mouse and hover it over the colour palette on the right hand side of the program screen as shown below, the top browny patch is the foreground colour while the cyan coloured one is the background colour.
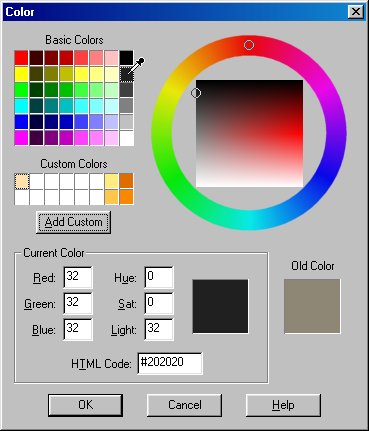
- Then click on the foreground colour patch. You will then encounter this dialogue box:.
- Select the colour as shown above and then click on the OK button. Later on you can use the dropper to choose whatever colour you wish on the circular ring, the palette on the left and then select the hue and saturation using the square box in the middle of the circular ring.
- Do the same for the background colour, this time, change it to white if it is not already white.
- Now we are going to use the "Flood Fill" tool, this function is accessible through the tool bar on the left hand side, please click it. You notice that the "Controls Box" on the lower right hand corner will now change.
- Following the diagram, I want you to select the "Fill Style" to "linear gradient" as shown above.
- The "match mode" is actually some kind of colour isolation tool which can be used if you are wanting to do different things to certain colours only while using the fill tool.
- Now I want you to click on "Options" on the Controls Box.
- You will now be greeted with this dialogue box.
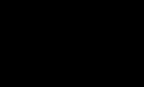
- Now, I want you to enter 150 in the degree field as shown above. When done click on the OK button.
- What you do next is then bring your mouse pointer, hold it over the open image and click on the image. Your image will now turn into something like this :
From this To this! - So we have an inkling of a good plate here, but it isn't enough! We need to use more tools to give it finesse!
Now we plod onto Section 3 : Buttonising and adding text.
Notes from Alex:
If you found my guidance helpful, please drop a note by my guestbook! So I know that you have dropped by and benefitted from my efforts, it took me quite sometime to get these tutorial up! Click on home and then SIGN GUESTBOOK! I will also visit your homepage and will sign your guestbook too.
|
||
[ Emiri Nakayama | Sailor Mars, Rei | About Me | Photo Gallery ] |
 |
|
| LinkExchange Member | Free Home Pages at GeoCities |