Frame/Wheels/Brakes
REAR TIRE REMOVAL
Here's the EASY way to get the rear wheel off of a 1500. It takes about 10
minutes (15 if you're not a mechanic). And you can do it on the side of the road
if you need to. You don't have to remove trunks or lights. No electrical
connectors to take loose. You can even leave your hitch on! Put the bike on the center stand. You don't need any jacks or blocks. Empty the trunks if you've got much weight in them. Remove the seat (two
allen-head bolts on each side in the handles). Remove the shields at the fronts of the mufflers (two bolts on each side).
Loosen (do not remove) the exhaust pipe/muffler clamps (total of four bolts,
two at the front of each muffler). Remove the muffler bolts under the trunks (one each side), and rotate the mufflers down. Support the rear assembly with a jack or block (taking precautions to protect the rear body work). Open the side trunks. On the inside wall of each trunk, near the front, is a rubber plug (on the
SE/Aspencade, the air hose passes through this plug in the right trunk). Remove the plugs and REMOVE the bolt behind each plug (one each side). Where the seat was, near the back, and just behind the shock mounts, are two bolts, one on each side of the frame, holding the rear frame to the main frame. Loosen (do not remove) these two bolts. Step around to the back of the bike, take hold of the trunks underneath, and lift. The whole rear end (trunks, lights, hitch and all) will lift up and pivot on the two upper frame bolts, exposing the rear wheel and axle! Raise it up until the antennas touch the handlebars, and secure it in place. I looped a rope around the handlebars and tied it to the trunk rack to hold it up. Loosen the bottom left shock bolt. Pull the axle and the brake caliper (lay the caliper on the crash bar). Slide the wheel left and it's out! The reason for the change in step 6 above is that when you lower the rear end back into position for reassembly, the two lower bolts will prevent you from putting it back down if they are not completely removed. Reassembly is in reverse order of assembly. YOU MAY NEED A SECOND PERSON to help you lower the trunk pack back into position. This is because it may be necessary to pull out on the fronts of the side trunks while lowering them, so they will pass over the top mounts of the rear crash bars. With support under the back end of the trunk pack, use a small mirror to look through the access holes in the side trunks. Line up the bolt holes in the rear crash bars with the holes in the frame. Start the bolts, then lower the trunk pack into position and tighten the bolts. The whole rear assembly is held on by the two top bolts, the bolts at the tops of the rear crash bars (the ones behind the rubber plugs) and the muffler bolts. The frame pieces behind the trunks do not have holes for the bolts, just slots. When you reassemble the trunk pack to the frame, you can support the back of the trunk pack so the slots are just above the bolts. Start the bolts through the crash bars into the frame, then when you lower the pack into
position, the slots will engage the bolts. Then you can tighten them down. If you're on the side of the road, you can lower the rear assembly back down, put the seat back on, and lock your parts in the trunk while you get your tire repaired. This gives you access to the swing arm and shocks, too. You can service the whole rear end, replace shocks, etc., without disassembling the trunks.
Dave "Renegade" Haggard
Chaplain, God's Road Warriors
Christian Motorcyclists Association
'96 Aspencade -- Blue Beauty
http://www.newcovenant.com

 top
top
Electrical
GL1500 Headlights
The U.S. version of the GL1500 dual headlight system is equipped with dual
element H4 Halogen bulbs rated at 45/45 watts (high/low beam) in each of the
dual headlight reflectors. The European version of the GL1500 dual headlight
system is equipped with dual element H4 Halogen bulbs rated at 60/55 watts
(high/low beam). in each of the headlight reflectors (As shipped from the factory). These H4 bulbs are classified as vibration resistant and made
specifically for motorcycles. By simply changing the two bulbs in your headlight
assembly you can achieve a much better light pattern and brightness for night
time driving. The difference on low beams is really noticeable, the higher
power high beams (+15 watts over the standard 45 watt bulb) really lights up the
road. This inexpensive change should minimize the requirement for expensive after market
driving lights unless you just want to spent the dollars for some extra chrome. The neat thing about this is that the Wing was designed
for these two bulbs, the wiring and fuse is sized for the extra current and all
you have to do is to buy two bulbs and install them. With these bulbs there
is no need to change the headlight fuse size.
A Power
Panel by David Sawyer a site you must check
out for full details. He has some great tips
!!!!!!!!!!!!!!Site URL
http://davesgoldwing.com
|
Power Distribution Panel |
|
By David Sawyer |
| URL
http://davesgoldwing.com
|
|

|
top
Storage
EXTENDED PERIOD OF TIME
(Winter)
Before you even begin the process of storing
your bike, insure you make all those necessary repairs that you've been
putting off. Surely next riding season you will have forgotten
them. There are as many ideas on how to store a
Gold Wing
as there are
riders. As a minimum be sure to follow the instructions listed in your
owners manual. You know that nice leather book you received with your Gold
Wing. You will be thankful you did and have many pleasurable riding
miles.
top
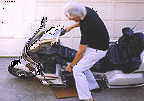
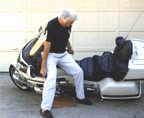
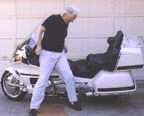
Pick
it Up
A real concern for the Gold Wing
Rider is: 'How in the WORLD
do I get this MONSTER
back up if it happens to end up on its side.? It is a major concern. We never
want to see a Wing on its side but - eventually - it will happen. The
system demonstrate here makes it possible for one person to get the bike
back up. Presently the Gold Wing is the heaviest production bike on the market
tipping the scales at 870 + lbs. <Harley riders like to say
theirs is !!!RIGHT!!!> Many a few more with the extras we add.