SS Equip
SS Links
SS Racing
SS Photos
SS Epics
SS Events
Contact
Home

SSA Member
Single Speeds Anonymous

Specializing in SS, Trials, Dual-Slalom, & Dirt Jumping equipment
|
Create Your Own Custom Chain Tensioner
Choose your poison: Pushing Down Design -- Pushing Up Design
DIY Tensioner Reviews
There are some distinct advantages to using a tensioner that pushes up on the chain. The pushing up designs wrap more of the chain around the rear cog and drastically cut down on the possibility of chain skip under heavy loads. Both designs will work equally well ... its just that some combinations of gears and a pulling down design will produce chain skip.
Got a review to add on either tensioner? Got another DIY tensioner design? Send it to the Dragon Tongue Webhead and he'll post it here.
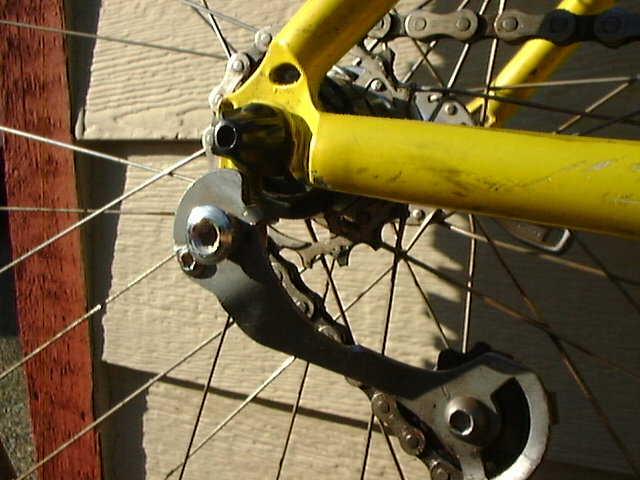
Pushing Down Design
Photos and instructions are courtsey of Bigmoose from the Gearhead website. He's been using this setup on his personal singlespeed and says its been working without a glitch for some time now.
Bigmoose took the cage plates off a broken long-cage derailleur and one pulley. It was a low-end ESP derailleur, which might be better because the cage plate is pretty big where it connects to the derailleur.
Step 1: Drill out the bolt hole where the outside cage plate was attached to the derailleur until you can fit a derailleur bolt through the hole to bolt the plate to the frame.
Step 2: Put a bend in each end of the outside cage plate until the pulley is lined up right with your cog (if you're still using a whole cassette, ditch it and go with spacers and one cog).
Step 3: Cut off just enough of the inner cage plate to be able to bolt on the pulley. Just use the bottom part of the inner cage plate.
The next part can be a bit tricky ...
Step 4: Shorten your chain as much as you possibly can and still be able to connect the chain. Get everything bolted on, with the chain on the pulley. Use spacers over the derailleur bolt so it holds the plate firmly against the frame. Basically, you want the pulley to pull down on the chain just in front of the cog to take out the slack.
Step 5: Make a mark on the bent derailleur cage, right where the little tab on your derailleur hanger is ... that b-tension screw tab on the end of the frame. Drill a hole at the mark and put a bolt through. Be sure to leave enough room so that when you use a bottle-cage bolt and a small nut, the nut will rest against the frame tab, keeping the whole assembly from pivoting upward. Alternately, if you have the right tap, you could thread the hole and just use the bolt.
Throughout this process, depending on the exact cage you use, you'll notice little places that need bending or sawing so everything runs smooth. Just be sure to keep all your bends rather sharp, not big curves. It takes a small amount of adjustment bending and your tensioner should end up working great.
You should have your chain tight so there's a little slack but it's hard to get the chain to derail even when you force it. As your chain stretches, you can adjust the size of the nut on that little bolt to take up any excess slack.
Hopefully the following pictures will help to clarify things. Click on the images to see a larger version.

Side view |
Rear view |
Top
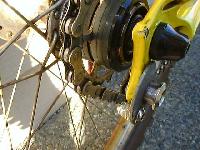
Pushing Up Design
Design and graphics courtsey of Matt Bailey.
The tools & items you'll need are:
- piece of steel 30mm wide X 75mm long X 1.5mm - 2mm thick
approx. [1 1/4" wide X 3" long X 1/16" - 1/8" thick]
- derailleur pulley
- bolt, washers, & nut (the bolt needs to be long enough to go through the pulley)
- hacksaw
- file
- drill
- vise

Side view |

Fabrication Dimensions |
According to Matt, it's really easy to fab this up. The hardest part is getting the bends right. Make your bends as sharp as you can. You just have to do it roughly the first time and mount it up to see how you need to tweak it. Size the big hole to fit over your axle and the small one to fit the size of your pulley bolt. If you use several washers, you'll have some side-to-side adjustment on the pulley.
You'll probably have to adjust your rear brakes a bit since the tensioner pushes the tire over just a bit.
"Pushing Up" Tensioner Review:
- Kevin (5/9/01) - Got the tensioner to working last night. Finally figured out why it wouldn't tighten up the last time I tried it (BTW - anybody know how to move the axle over in an old Bullseye rear hub?). Made a couple of adjustment bends over lunch and hit the trails after work. It worked okay while making the small road climb up to the trailhead but when I started to put pressure out on the trails, I threw the chain. Set things up again and made some more on-bike adjustments. The tensioner would work okay for awhile but I was having trouble with the chain jumping. Made a couple other stops to do some more adjustments (pulley wasn't in a completely straight line and needed to be inboard a bit more). After that I had the chain jump off only once during one rough section.
Bottom Line: I like the design and am happy with it. It takes a bit of getting used to in order to get the chain tension correct (too tight and the drivetrail binds up) and to hook it all up. I still need to make another bend or two to get the pulley completely vertical. Acid test this weekend on a rooty, technical section of trail (Skookum Flats in Washington State). I'm going to chicken out and bring along my derailleur just in case I start to throw the chain too much. I think a small loop that goes over the chain, similar to a Singleator pulley, might make a good addition.
- Kevin (5/15/01) - 12 miles of Skookum Flats/White River trail gave a pretty good workout to the tensioner. Threw the chain twice. If you start to hear grumbling noises from your drivetrain, you better stop and readjust the tension cause you're just about ready to throw the chain. What happens is the tensioner rotates slightly under the load from the chain. On my system, my chain is sized to work with a derailleur so I could probably stand to lose a link. The chain would jump off the tensioner pulley and eventually get thrown totally. Three ideas to explore to fix the problem: #1) put a very thin split ring lockwasher or rubber "puck" (made out of old innertube) between the tensioner and inside of the dropout, #2) fab a chain keeper loop for the pulley, #3) bolt the tensioner to the inside of the derailleur hanger. [Note: #3 would require a longer tenioner arm]
Top
|