PowerPoint97 Module 2
Creating a Presentation
Start or launch PowerPoint 97 :
Point
and click <Start>,
<Programs>,
<Microsoft PowerPoint>
Create a New Presentation Using a Design Template
A design template is a presentation with a professionally designed format and color scheme to which you need only add text.
Select <Design Template>

Click <Design Templates>
Select Dad's Tie

Click <OK>
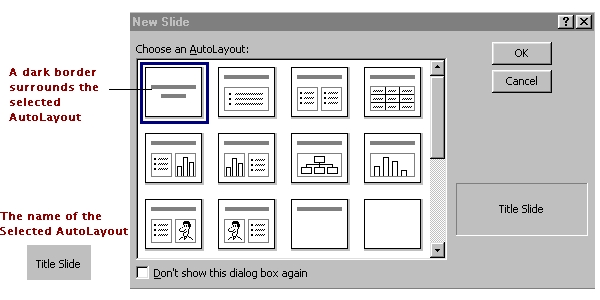
Click <Title Slide AutoLayout> <OK>
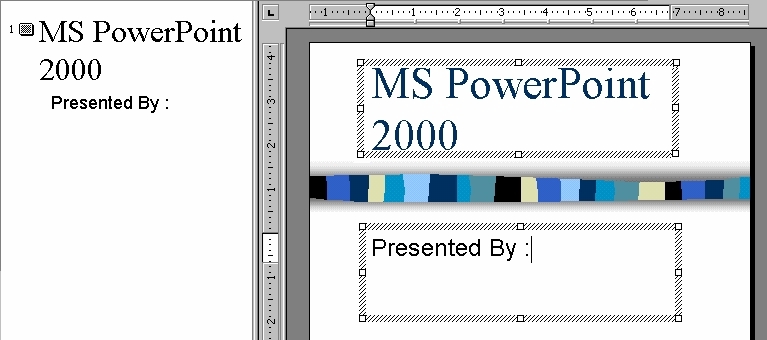
Enter the Text in the Slide Pane
You can enter the text into either the Slide or the Outline pane in Normal, Slide or Outline view. The Slide pane in the new presentation window includes two text boxes - text placeholders. The upper box is a placeholder for the slide's title text, while the lower box is a placeholder for the slide's subtitle text. After which, the text in the placehoder becomes a text object.
Type MS PowerPoint 97
Type Presented By :


Select and Deselect Objects
An object is anything that you can manipulate. Examples are the title object, the text in the title, all of which is treated as one unit or object.

Click the edge of the text box and select it with the dotted selection box.
You can Resize, Move and Delete.
Click directly to the top of the title object (Selection Pointer) and Resize
Click into the text box with the I-beam Pointer.
You can Delete, Backspace, Insert, Copy, Cut.
Click directly into the title object
(I-beam Pointer) and Insert Text "Your Name" after ":"
Click any blank area to deselect the text object

Modify Text
You can change the text appearance by applying formatting, such as the font and font size, for example, formatting the text.
Click directly to the top of the title object (Selection Pointer) and Resize
Click <Increase Font> button to 24 points
Click <Font Color> button to Red
Click any blank area to deselect the text object
Add Text to Slides
Slides contain text boxes for title and bulleted text into which you enter your main ideas. You can also place other text objects on a slide by using the Text Box tool from the Drawing toolbar.
Drawing Tools :
Menu, Point and click <View><Toolbars> : click Drawing

You can create two
types of text objects
; a text
label
(text
that does not word wrap within a defined box), and word processing box (text which
wraps inside the boundaries of an object).
Click <Text Box> button at the Drawing
toolbar
Click
directly
to the space at the left bottom corner of the slide (text label)
Type
Insert
text and pictures

You
can change the text appearance
Click the edge of the text box and select
it with the dotted selection box
Click
<Increase
Font> button to
16
points
Click
<Font
Color> button to Orange
Click
any
blank area to deselect the text object
Adjust the Position of Text Objects
You can adjust the position of the text in the object. You can adjust the text object to fit the amount of text or the text to fit inside the text object.
Click the edge of the text box and select it with the dotted selection box
Click <Format> <Text Box>

Click <Word wrap text in Autoshape>
Click <Resize Autoshape to fit text>
Click <OK>
Move a Text Object
You can move a text object by dragging the edge of the text box to any place on the slide to improve the appearance of a presentation.
However, to copy a text object, hold down <Ctrl> key, and then drag the selection box of a text object to a now location on the slide.
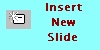
Create a New Slide
Click <Insert> <New Slide>
Slide 2 Title box :
Type Our Tour to the Caribbeans <Enter>
Enter the Text in the Outline Pane
The Outline pane allows you to enter and organize slide and paragraph text for each slide in a presentation.


Outlining view :
Click
Outline
view
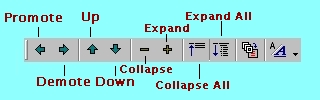
Paragraph <Tab>
indents (level 1, 2,
3...)
<Shift>+<Tab>
indents (...level 3, 2,
1)
Demote
<Tab> and Promote
<Shift>+<Tab>
For
example :
Outline the text as {title} and the {bullet}
Click
Slide
2
Click
directly
to the space at the right of the slide (text label) Our Tour
to the Caribbeans
and Press <Enter>
Type Puerto
Rico
<Enter>
You have created a new slide {title}
However, if you want to outline the text as a {bullet}
Click <Demote> or Press
<Tab>
key
Click
directly
to the space at the right of the bullet (text label) "Puerto
Rico" and Press <Enter>
You have created a new bullet {bullet}
Type Jamaica <Enter>
Type Thank
You
<Enter>
However, if you want to outline the text as a {title}
Click
directly
to the space at the left of the bullet (text label) "Thank You"
Click <Promote> or Press
<Shift>+<Tab>
key
Edit the Text in Normal View
Once you have created slides and entered the text, you can easily modify the text in a presentation by inserting new text in the Outline and slide panes.
Enter the Text in the Notes Pane
As you create each slide in a presentation, you can also enter speaker notes that relate to the content on the slide and you can use while you give the presentation.
At Slide 1, type the text at the Notes pane

Type : Being persistent without being annoying is a skill you will need to perfect.
Enter Speaker Notes in Notes Page View
If you want to read all the speaker notes, it is easier if you switch to Notes Page view.
At Slide 2 : Click <View> <Notes Page>
Increase the view scale to 75%
Select the Notes placeholder

Type : Make sure you insert text and picture in this presentation.
Rearrange Slides in Slide Sorter View
At the Slide Sorter view, you can drag one or more slides from one location to another.
Click <Insert> <New Slide>
Click <Slide Sorter View> button
Click last slide ("empty slide"), drag it to the empty space before slide 3.
Save the presentation as
ex2 in the
<My Documents> folder.
Show Slides in Slide Show View
You can review the slides for accuracy and flow in the Slide Show view, displays the slides in order by slide number, using the entire screen on your computer.
Click Slide 1 icon, click <Slide Show> button
Click onto every slide
Format Bullets
PowerPoint allows you to customise the bullets in a presentation for individual paragraphs or entire objects, with different bullet of different font, colour, picture or number.
Click <Format> <Bullets And Numbering>
Click <Character>

Select <Diamond> bullet
Select Purple Colour
Click Size 85% of text
Click <OK>
Click second line at <Click to edit Master text styles>
Right-click, Click <Bullets And Numbering>
Click <Picture>

Select <light blue diamond> picture clip
Click <Insert Clip> button
Click <OK>
The new bullets appear on all other slides.
Other formats : Bulleted list

Other formats : Numbered list

Understand PowerPoint Master
When you want to maintain a uniform design, PowerPoint uses masters that control the look of the individual parts of the presentation, including formatting, colour, graphics, and text placement. Every presentation has a set of masters, one for each view.
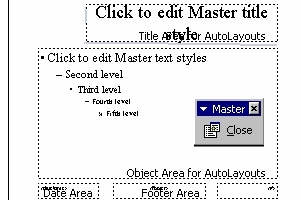
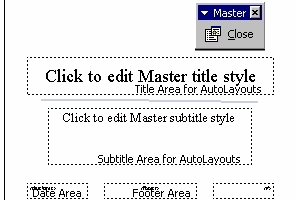
PowerPoint comes with two special slides called masters. The Slide Master controls the properties of every slide in the presentation, that is, the Master layout of a presentation's overall format and design. The title slide has its own master - Title Master - changes you make to the Title Master affect only the title slide of the presentation.
When you view a master, the Master toolbar appears - the Slide Miniature button and the Close button.
The Slide Master contains master placeholder for title text, paragraph text, date and time, footer information, and slide numbers. The master title and text placeholders control the text format for every slide in a presentation.


Menu, Point
and click <View>,
<Master>
Click Slide
Master
Click
<Close>
button at the Master toolbar
Once you apply a different template, you can continue to make
changes to the Slide Master.
The Title Master contains placeholder for Master title and Master
subtitle text. Changes you make
to the Title Master affect
only the title slide
of the presentation.
Menu, Point
and click <View>,
<Master>
Click Title Master
Click
<Close>
button at the Master toolbar
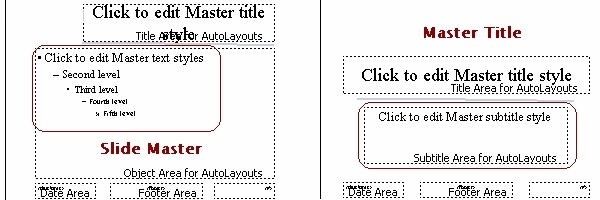
The
main difference between the Slide Master and the Title master
is the Title
Master's use of a Master subtitle style instead of the master
text style.
Change the Display Using the Master
Each master contains placeholders where you can add backgound objects, such as text and graphics, that will appear on every page. Examples of objects you may want to include are your company name, logo or product name.
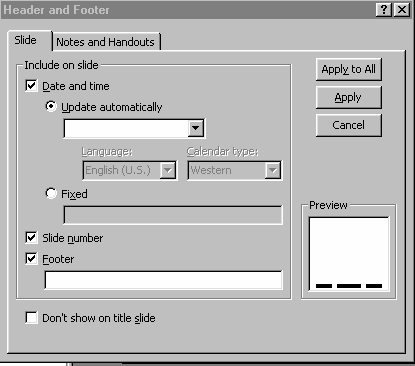
click <View> <Header And Footer>
Select <Don't Show On Title Slide> box

Click <Apply To All>
The slide footer information disappers from the title slide.
Select Slide 2
The slide footer information remains on the rest of the slides in the presentation.
Formattng Master Text and Placeholders
The master placeholders for the title, bulleted text, date and time, slide number, and footer determine the style and position of those objects. To format master text, you select the text placeholder and alter the format to look the way you want.
Select Slide 2
Press <Shift> key and Click <Slide view> button
The Slide Master view appears.
Press <Shift> key Click <Footer Area> and <Number Area> placeholders
Select Font Size of 20
Click <Number Area> Placeholder
Click <Bold> button
Position the I-bean cursor at the Second level text and Click
Click <Italic> button
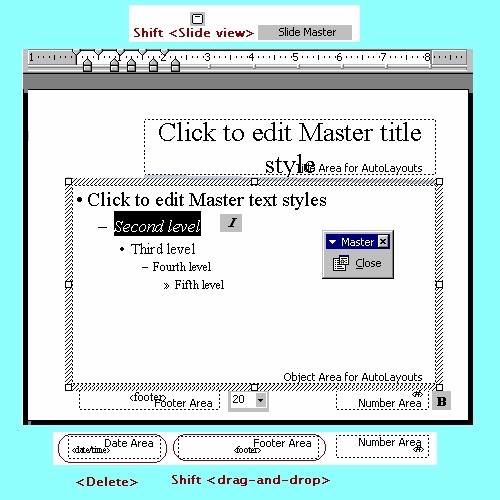
Click <Date Area> placeholder
Press <Delete> key
Click <Footer Area> placeholder
Press <Shift> key Drag <Footer Area> placeholder to the left bottom corner.
Note : The action constrains the movement of the object horizontally or vertically, the object stays in the same plane.
Adjust Master Text Indents
PowerPoint uses indent markers to control the distance between bullets and text. Adjusting indents in PowerPoint works the same way as it does in Word.
To change the distance between a bullet and its corresponding text, you first display the ruler, which shows the current bullet and text placement.
Click <View>, <Ruler>

Each indent level consists of two triangles - indent markers, and a small box - margin marker. The upper indent marker controls the first line of the paragraph; the lower indent marker controls the left edge of the paragraph. Hanging indent is when an indent level is set such that the paragraph appears to be "hanging" below.
Press <Shift> key and Click <Slide view> button
The Slide Master view appears.
Click <View> <Ruler>
Drag the Upper Indent Marker
Drag the Lower Indent Marker
Drag the Margin Marker
Click <Slide view> button
Add Header and Footer
You may consider adding a header or a footer which will appear on every page.
Click <View> <Header And Footer>
Click Date and time, Slide number
Click <File> <Save As>
Type Project 1


Preparation Exercise
Save the presentation As Project 1 in the <My Documents> folder.
To continue for the My PowerPoint Project presentation, let's tour the Caribbeans to collect pictures from www.cheapcaribbean.com
Internet Explorer Interface :
Menu, Point and click <View><Toolbars> : click Web
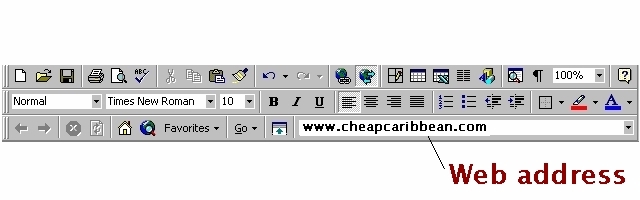
Point to each picture in the web page
(i)
right-click to display
the short-cut menu;
(ii) left-click to <Save
Picture As>;
(iii) change the name of the file (optional)
and left-click to <Save>
at <My Documents>, <My Pictures> folder.
Insert any Picture(s) from <My Documents>, <My Pictures> folder to the slide(s).
Your
presentation slide title order :
MS
PowerPoint 2000 Project 1 (Slide Title)
Our
Tour to the Caribbeans
Slide
2 :
Puerto Rico
Slide
3 :
Jamaica
Slide
4 :
Thank You
Save the presentation Project
1 in
the
<My
Documents>
folder.
 Edwin
Koh : We
completed on the
Edwin
Koh : We
completed on the
New
Knowledge and Skills in
MS
PowerPoint97 Module 2.