 PowerPoint Topic 1
PowerPoint Background Information
Mouse Clicks, Typing on the Keyboard, Editing Skills, Desktop Windows
(1) Use the Mouse to click :
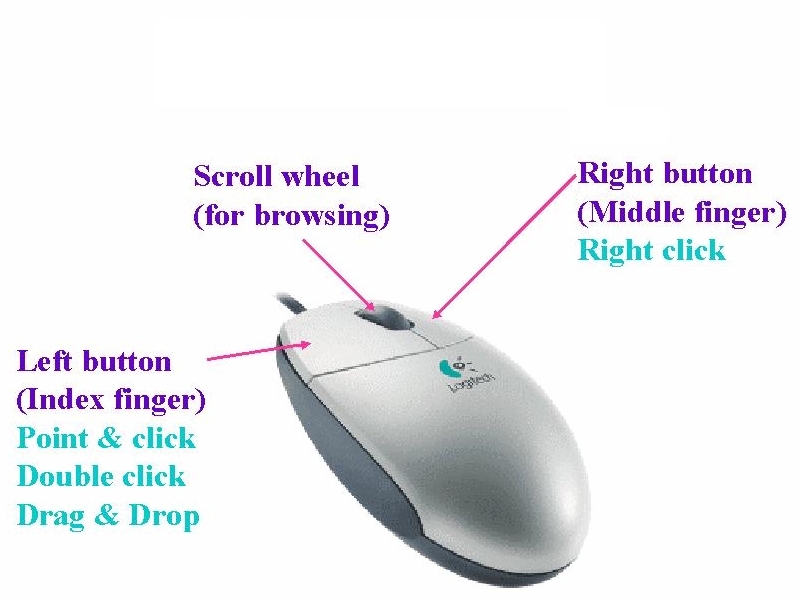
(2) Short-cut Menu:
Mouse right-click (Select Short-cut Menu)
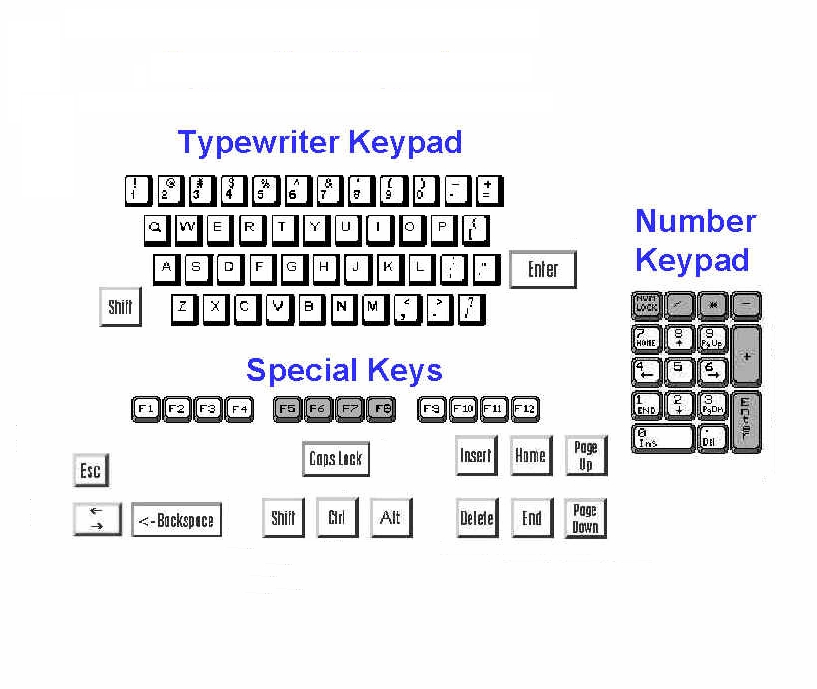
(3) Typing on the Keyboard :
The
proper typing skills -
2-hand
fingers layout on the Keyboard
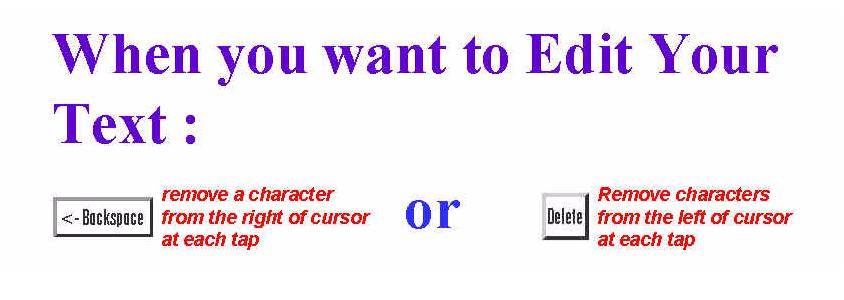
(4) Editing Skills : The proper correcting skills - <Backspace> or <Delete>

(5) The proper inserting and typeover skills -
<Insert>
(default)
The existing text moves to the right.
<Insert> (overtype)
The existing text is deleted and replaced by the next text you
type, including spaces.
Majority prefers Insert mode.
(6) Desktop Windows :
The Start button <Start> from which you display the Windows 2000 Start Menu (you can start any Windows program).
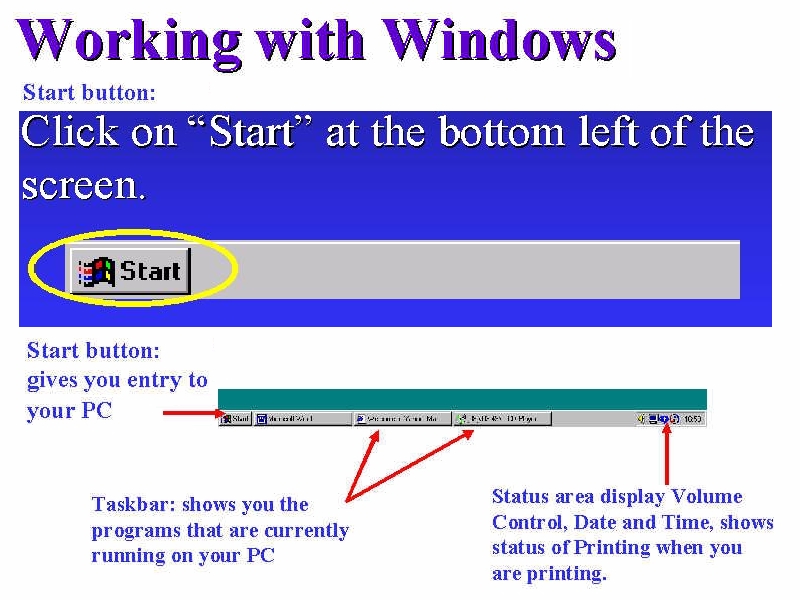
The
Taskbar is the
Windows bar at the bottom
of your screen
that displays all programs currently running.
Start Microsoft PowerPoint
(7) How to start or launch PowerPoint 2000 :
Point
and click <Start>,
<Programs>,
<Microsoft Office>,
<Microsoft PowerPoint>

Point
and click <Start>,
<Programs>,
<Microsoft Office Tools>  to create a Microsoft Office Shortcut
Bar.
to create a Microsoft Office Shortcut
Bar.
Point
and click (Select)

<Microsoft
PowerPoint> icon to
start quickly.
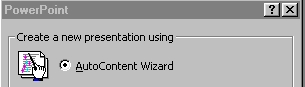
(8) Creating PowerPoint pre-defined sample presentation - a set of slides or screens that you'll show to a group of people.
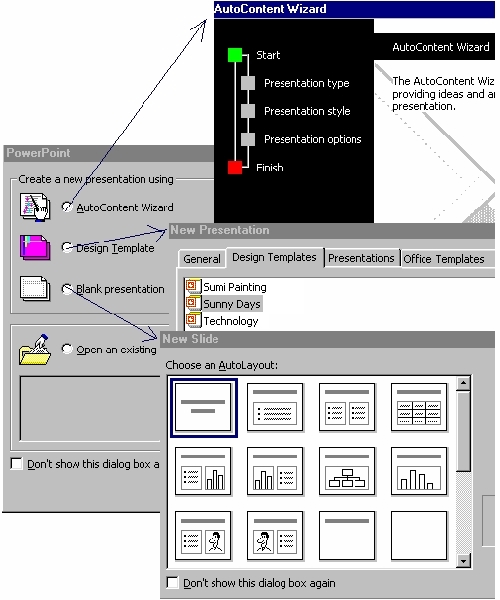
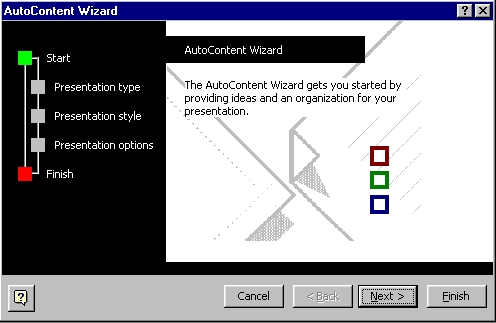
(a) AutoContent wizard : a presentation design wizard with a step-by-step set of dialog box that guide you through the creation of a customised presentation.
By answering a few simple questions, sample text and formatting are generated simply by changing the text and the slide’s design elements.
(b) Template : is a preset document layout, so that you can modify to create a particular kind of presentation.
Menu, Point and click <File>: click New <New Presentation> when you need to create a new slide, you can select the list of design templates.
(c) Blank
presentation : You can create a blank presentation
from scratch (Blank template from the
New Slide dialog box selection).
(d)
Open
Document : You
can transfer a presentation files from disk into memory.
Presentations and Shows files (.ppt and .pps filename extension)
Presentations Templates files (.pot filename extension)
Menu, Point and click <File>: click Open
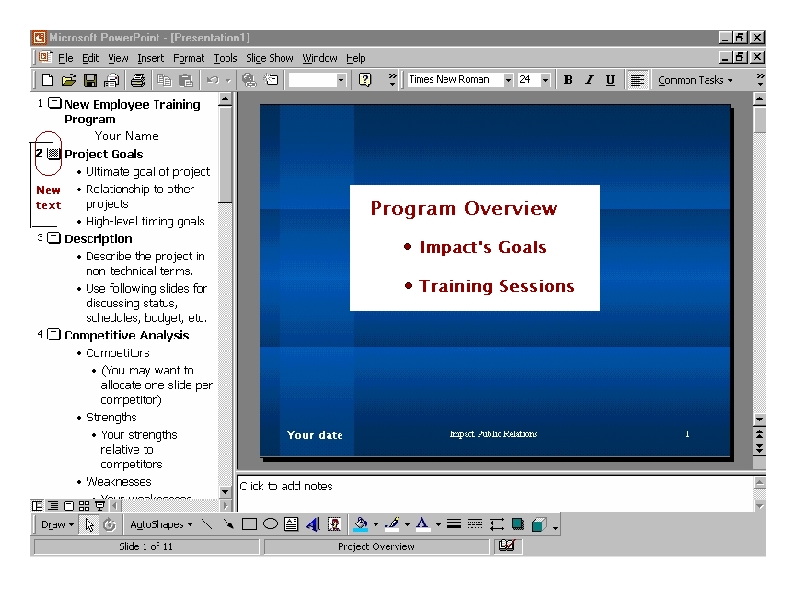
Create a Presentation using a Wizard
Creating a presentation with the Autocontent Wizard can save you time.
Click <AutoContent
Wizard>
Click
<OK>
Click
<Next>
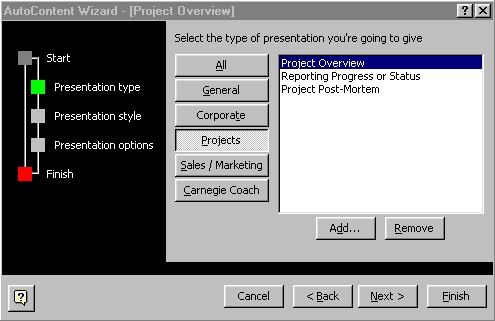
Click
<Projects>
Select <Project
Overview>
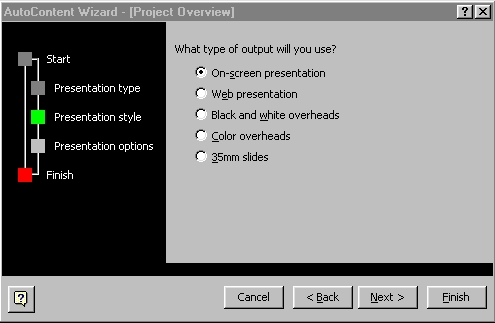
Click
<On-screen
presentation> <Next>
Type
New
Trainee Teacher Training Program
(Presentation title)
Type
My
Name (Footer)

Select
Date
last updated
Select
Slide
number
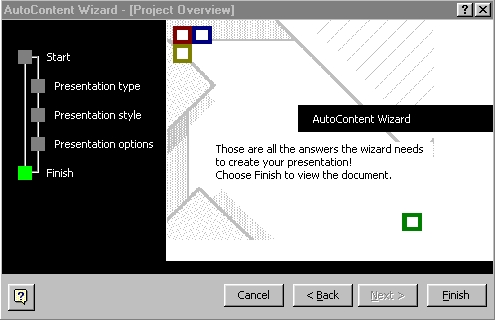
Click
<Next>
Click
<Finish>
Explore the PowerPoint Window
A window is an area of the screen that is used to display a PowerPoint program or presentation window : type text, draw shapes, create graphs, add color, insert objects.
The default view, Normal view, is made up of: Outline (left) pane, Slide (center) pane, and Notes (below slide) pane.


(9) Menu bar Commands and Toolbars :
Menu with corresponding toolbars icons
Point and click <View><Toolbars> :
click Standard, Formatting
Standard, Formatting Toolbars
(10) Drawing Tools :
Menu, Point and click <View><Toolbars> : click Drawing

(11) Internet Explorer Interface :
Menu, Point and click <View><Toolbars> : click Web

(12) Microsoft Outlook Interface :
Menu, Point
and click <View><Toolbars>
:
click
Reviewing

Send e-mail with attached file
Move Around in a Presentation
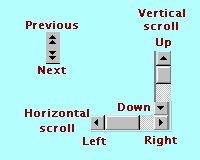
(13) Click the scroll arrows at the scroll box to scroll window by window :
(14) Basic Mouse Skills :
Point
and click (type
the text, insert objects)
Drag-and-drop
(highlight,
move, resizing)
Shift+click
(select
till the end and click)
(15) Copying, Cutting, Pasting:
When you change your mind about the placement of the contents of a cell, row or column, or simply a mistake, you can change the way you've placed data in your presentation.
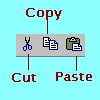
Copy is to make a copy of selected range of cells and send a copy of that selected cell(s) to the Windows clipboard (which is an area of memory reserved for data, text, graphics, and others).
Paste is to send the Windows clipboard contents to a location inside your workbook.
Cut is to delete or erase the selected range of cells and send that data to the Windows clipboard for later pasting elsewhere. Cutting and Pasting means moving the range of cells.
Change text in the Outline pane
When you are working with the text of a presentation, the Outline pane (left) is the most useful pane in which to work. The Outline pane allows you to enter text using a content method.
Type the changed text in the Outline pane
Reverse One or More Actions
Whenever you perform an action that is not what you intended, you can reverse the action with the Undo command or if you want to Redo command on the Standard Toolbar :
However, if you save a presentation, you can no longer Undo or Redo changes. If you think you might want to Undo or Redo a particular action, don't save changes to the presentation until you are satisfied with the results.
Change and Adding Text in the Slide Pane
The Slide pane allows you to enter text on a slide using the visual method. In the Slide pane (center), you work with one slide at a time. An object containing slide text is text object. A typical slide contains a title - title text, and the major points beneath the title - paragraph text or bullet text. Just place the insertion point when you type the text in the Selection box.
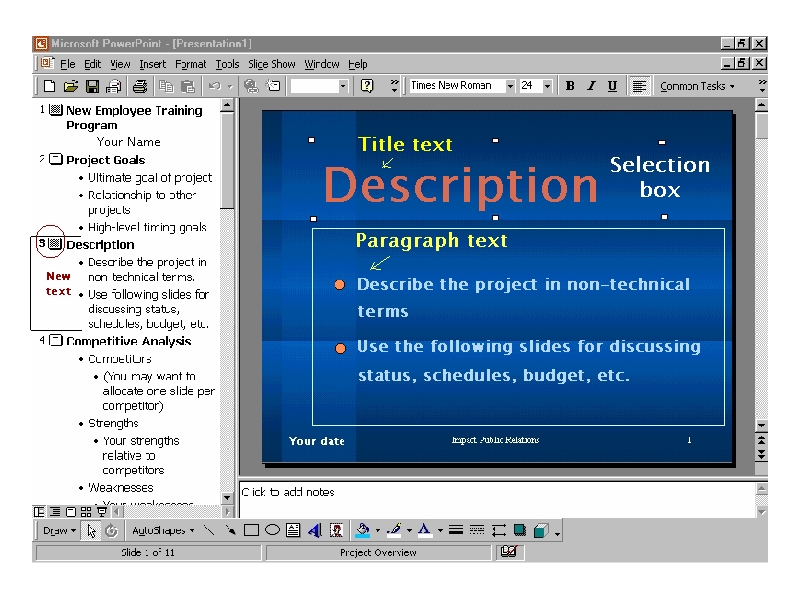
Type the changed text in the Slide pane
Change Presentation Views


(16) Working
with PowerPoint presentation development - Views. The views
 give
you different perspective of the presentation. One view is for
the audience, the other different view is for the speaker. The
views let you keep your slides, outline, and speaker’s notes
separated but connected.
give
you different perspective of the presentation. One view is for
the audience, the other different view is for the speaker. The
views let you keep your slides, outline, and speaker’s notes
separated but connected.
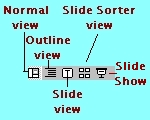
(a) Outline view : the view that holds all of your presentation's text.
Lets you edit and display all your presentation text in one location instead of one slide at a time...preview of miniature slide(s) with miniature view of a thumbnail object(s).
(b) Slide view :
displays each of the presentation's slides one at a time for
editing and formatting. Lets you see each slide, one at a
time, modify each slide's format, colour, graphics, style, text...
displays
the same miniature slide in a full screen view.
(c) Slide Sorter view : displays your slides as though they are in a projector. Lets you review your presentation and use the Slide Sorter like a preview tool and as an engine that presents your slides at a preset timing and a specific transitional effect when one slide changes to another. A transition is the dissolving, or wiping effect that PowerPoint uses one slide replaces the previous one during a slide show.

(d) Notes Pages
view
: creates and keep the notes for the presentation's speaker.
A
small version of the slide and a location for the text description
of the that slide below. The Notes Pages are designed to be printed
for the speaker.
Menu, Point
and click <View><Notes
Page>
Preview Slides in Slide Sorter View
Another way to view a presentation is to use Slide sorter view. Slide Sorter view allows you to preview an entire presentation as slide miniatures like photographic slides on a light board.
Save a Presentation
The work you have completed is stored in your computer's temporary memory. To save your work for further use, you must give the presentation a name and store it on your computer's hard disk drive.
Click <File> <Save As>
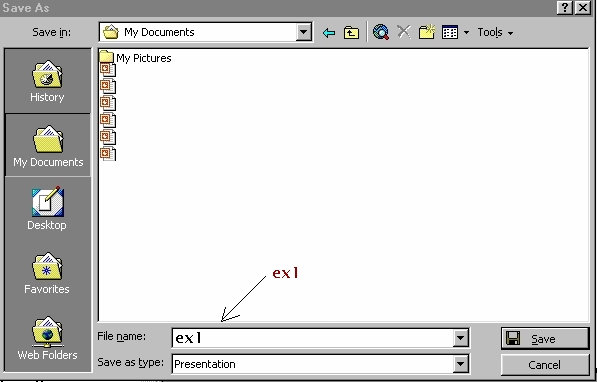
Type ex1
Note : When you save a file, you cannot include any of the following characters in the file name :
* \ / < > ? : ; "

Presentations and Shows files (.ppt and .pps filename extension)
Presentations Templates files (.pot filename extension)
Closing a Presentation and Quitting PowerPoint
After a file is stored on your hard disk, you can clear it from the screen by closing the document window or quitting PowerPoint. If the presentation has not been saved, Word prompts you to save the file before closing the window.
Click <File> <Close>
Click <File> <Exit>
 Edwin
Koh : We
completed on the
Edwin
Koh : We
completed on the
New
Knowledge and Skills in
MS
PowerPoint 2000 Topics 1.