PowerPoint Topic 2
PowerPoint Basics
Create a New Presentation Using a Design Template
A design template is a presentation with a professionally designed format and color scheme to which you need only add text.
Select <Design Template>
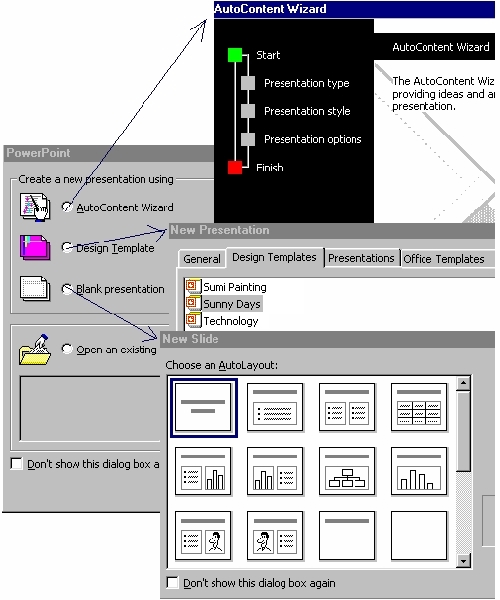
Click <Design Templates>
Select Dad's Tie
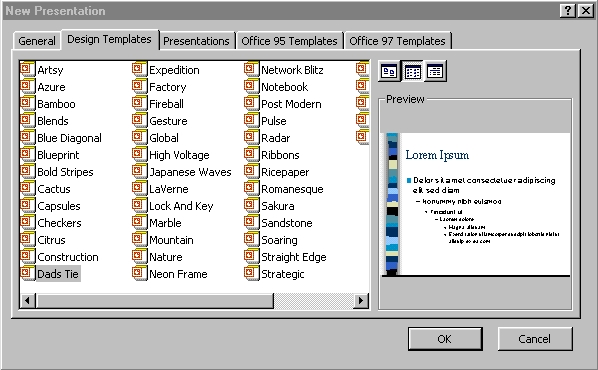
Click <OK>
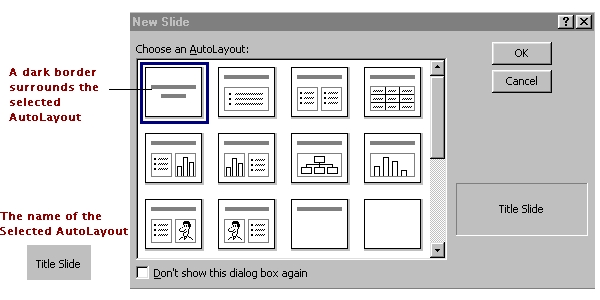
Click <Title Slide AutoLayout> <OK>
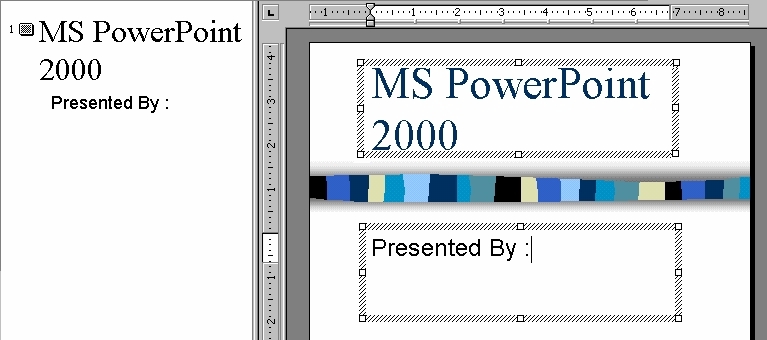
Enter the Text in the Slide Pane
You can enter the text into either the Slide or the Outline pane in Normal, Slide or Outline view. The Slide pane in the new presentation window includes two text boxes - text placeholders. The upper box is a placeholder for the slide's title text, while the lower box is a placeholder for the slide's subtitle text. After which, the text in the placehoder becomes a text object.
Type MS PowerPoint 2000
Type Presented By :


Select and Deselect Objects
An object is anything that you can manipulate. Examples are the title object, the text in the title, all of which is treated as one unit or object.

Click the edge of the text box and select it with the dotted selection box.
You can Resize, Move and Delete.
Click directly to the top of the title object (Selection Pointer) and Resize
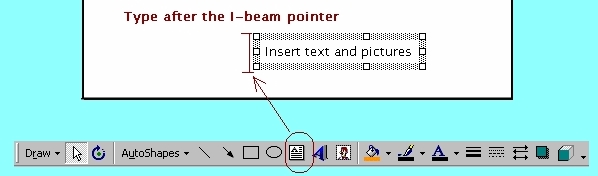
Click into the text box with the I-beam Pointer.
You can Delete, Backspace, Insert, Copy, Cut.
Click directly into the title object
(I-beam Pointer) and Insert Text "Your Name" after ":"
Click any blank area to deselect the text object

Modify Text
You can change the text appearance by applying formatting, such as the font and font size, for example, formatting the text.
Click directly to the top of the title object (Selection Pointer) and Resize
Click <Increase Font> button to 24 points
Click <Font Color> button to Red
Click any blank area to deselect the text object
Add Text to Slides
Slides contain text boxes for title and bulleted text into which you enter your main ideas. You can also place other text objects on a slide by using the Text Box tool from the Drawing toolbar.
Drawing Tools :
Menu, Point and click <View><Toolbars> : click Drawing

You can create two
types of text objects
; a text
label
(text
that does not word wrap within a defined box), and word processing box (text which
wraps inside the boundaries of an object).
Click <Text Box> button at the Drawing
toolbar
Click
directly
to the space at the left bottom corner of the slide (text label)
Type
Insert
text and pictures
You
can change the text appearance
Click the edge of the text box and select
it with the dotted selection box
Click
<Increase
Font> button to
16
points
Click
<Font
Color> button to Orange
Click
any
blank area to deselect the text object
Adjust the Position of Text Objects
You can adjust the position of the text in the object. You can adjust the text object to fit the amount of text or the text to fit inside the text object.
Click the edge of the text box and select it with the dotted selection box
Click <Format> <Text Box>

Click <Word wrap text in Autoshape>
Click <Resize Autoshape to fit text>
Click <OK>
Move a Text Object
You can move a text object by dragging the edge of the text box to any place on the slide to improve the appearance of a presentation.
However, to copy a text object, hold down <Ctrl> key, and then drag the selection box of a text object to a now location on the slide.
Create a New Slide
Click <Insert> <New Slide>
Slide 2 Title box :
Type Our Tour to the Caribbeans <Enter>
Enter the Text in the Outline Pane
The Outline pane allows you to enter and organize slide and paragraph text for each slide in a presentation.


Outlining Tools :
Menu, Point
and Click <View><Toolbars>
: Click
Outlining
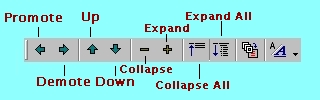
Paragraph <Tab>
indents (level 1, 2,
3...)
<Shift>+<Tab>
indents (...level 3, 2,
1)
Demote
<Tab> and Promote
<Shift>+<Tab>
For
example :
Outline the text as {title} and the {bullet}
Click
Slide
2
Click
directly
to the space at the right of the slide (text label) Our Tour
to the Caribbeans
and Press <Enter>
Type Puerto
Rico
<Enter>
You have created a new slide {title}
However, if you want to outline the text as a {bullet}
Click <Demote> or Press
<Tab>
key
Click
directly
to the space at the right of the bullet (text label) "Puerto
Rico" and Press <Enter>
You have created a new bullet {bullet}
Type Jamaica <Enter>
Type Thank
You
<Enter>
However, if you want to outline the text as a {title}
Click
directly
to the space at the left of the bullet (text label) "Thank You"
Click <Promote> or Press
<Shift>+<Tab>
key
Edit the Text in Normal View
Once you have created slides and entered the text, you can easily modify the text in a presentation by inserting new text in the Outline and slide panes.
Enter the Text in the Notes Pane
As you create each slide in a presentation, you can also enter speaker notes that relate to the content on the slide and you can use while you give the presentation.
At Slide 1, type the text at the Notes pane

Type : Being persistent without being annoying is a skill you will need to perfect.
Enter Speaker Notes in Notes Page View
If you want to read all the speaker notes, it is easier if you switch to Notes Page view.
At Slide 2 : Click <View> <Notes Page>
Increase the view scale to 75%
Select the Notes placeholder

Type : Make sure you insert text and picture in this presentation.
Rearrange Slides, Paragraphs, and Text
You can rearrange slides and paragraphs in Outline view by using the Move Up and Move down button on the Outline toolbar or by dragging selected slides and paragraphs to the desired location

Select Bullet text
Demote or Move to the next level

Format Bullets
PowerPoint allows you to customise the bullets in a presentation for individual paragraphs or entire objects, with different bullet of different font, colour, picture or number.
Click <Format> <Bullets And Numbering>
Click <Character>

Select <Diamond> bullet
Select Purple Colour
Click Size 85% of text
Click <OK>
Right-click, Click <Bullets And Numbering>
Click <Picture>

Select <light blue diamond> picture clip
Click <Insert Clip> button
Click <OK>
The new bullets appear on all other slides.
Other formats : Bulleted list

Other formats : Numbered list

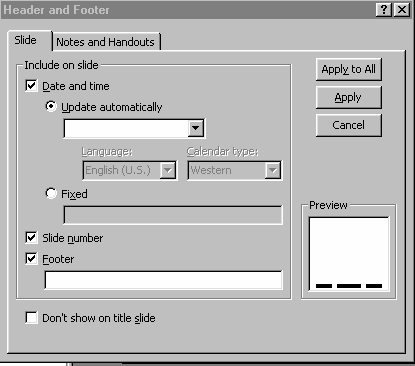
Add Header and Footer
You may consider adding a header or a footer which will appear on every page.
Click <View> <Header And Footer>
Click Date and time, Slide number


Click <File>
<Save As>
Type
Project
1
Page Setup
Before you print a presentation, use the Page setup dialog box to set the proportions and orientation of your slides, notes pages, handouts, and outlines on the printed page.
Click <File> <Page Setup>

On-Screen Show
Letter Paper (8.5 x 11 in)
A4 Paper (210 x 297 mm)
35mm slides, Overhead
Banner, Custom

Preview Slides in Black and White
You are using a black and white printer to print a colour presentation, you ay need to verify that the printed presentation. Grayscale Preview
Printing Options
PowerPoint prints presentation on your default printer.
Click <File> <Print>
Select Printer Name, Set Properties

Print Slides, Audience Handouts, and
Speaker Notes

PowerPoint prints your presentation in a black-and-white format unless you print on a colour printer.
Print from a drop-down list box in any of these styles :
(a) Slides only.
(b) Handouts (which can hold from two to six slides per page) so you can give comprehensive notes to the audience.
(c) Notes for the speaker.
(d) Outline for proofreading
purposes.
Click <File>
<Print>

Print
Slides, Notes page, Handout, Outline
page
Click to choose
the number of output types per page
Preparation : Project Exercise
Save the presentation As Project 1 in the <My Documents> folder.
To continue for the My PowerPoint Project presentation, let's tour the Caribbeans to collect pictures from www.cheapcaribbean.com
Internet Explorer Interface :
Menu, Point and click <View><Toolbars> : click Web
Point to each picture in the web page
(i)
right-click to display
the short-cut menu;
(ii) left-click to <Save
Picture As>;
(iii) change the name of the file (optional)
and left-click to <Save>
at <My Documents>, <My Pictures> folder.
Insert any Picture(s) from <My Documents>, <My Pictures> folder to the slide(s).
Your
presentation slide title order :
MS
PowerPoint 2000 Project 1 (Slide Title)
Our
Tour to the Caribbeans
Slide
2 :
Puerto Rico
Slide
3 :
Jamaica
Slide
4 :
Thank You
Save the presentation Project
1 in
the
<My
Documents>
folder.
Review Exercise :

 Edwin
Koh : We
completed on the
Edwin
Koh : We
completed on the
New
Knowledge and Skills in
MS
PowerPoint 2000 Topic 2.