PowerPoint Topic 5
Customising
PowerPoint
Show Slides in Slide Show View
You can review the slides for accuracy and flow in the Slide Show view, displays the slides in order by slide number, using the entire screen on your computer.
Click Slide 1 icon, click <Slide Show> button
Click onto every slide
Rearrange Slides in Slide Sorter View
At the Slide Sorter view, you can drag one or more slides from one location to another.
Hide a Slide During a Slide Show
You might wnat to exclude slides for different audience by using the Hide Slide command.
Click <Slide Sorter View> button
Click any Slide
Click <Slide Sorter> toolbar
Click <Hide Slide> button
A Hide Symbol appears
Understand PowerPoint Master
When you want to maintain a uniform design, PowerPoint uses masters that control the look of the individual parts of the presentation, including formatting, colour, graphics, and text placement. Every presentation has a set of masters, one for each view.
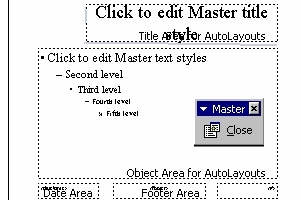
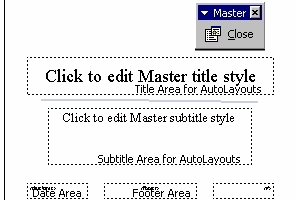
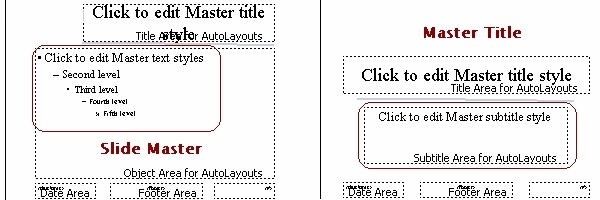
PowerPoint comes with two special slides called masters. The Slide Master controls the properties of every slide in the presentation, that is, the Master layout of a presentation's overall format and design. The title slide has its own master - Title Master - changes you make to the Title Master affect only the title slide of the presentation.
When you view a master, the Master toolbar appears - the Slide Miniature button and the Close button.
The Slide Master contains master placeholder for title text, paragraph text, date and time, footer information, and slide numbers. The master title and text placeholders control the text format for every slide in a presentation.
Menu, Point
and click <View>,
<Master>
Click Slide
Master
Click
<Close>
button at the Master toolbar
Once you apply a different template, you can continue to make
changes to the Slide Master.
The Title Master contains placeholder for Master title and Master
subtitle text. Changes you make
to the Title Master affect
only the title slide
of the presentation.
Menu, Point
and click <View>,
<Master>
Click Title Master
Click
<Close>
button at the Master toolbar
The
main difference between the Slide Master and the Title master
is the Title
Master's use of a Master subtitle style instead of the master
text style.
Change the Display Using the Master
Each master contains placeholders where you can add backgound objects, such as text and graphics, that will appear on every page. Examples of objects you may want to include are your company name, logo or product name.
click <View> <Header And Footer>
Select <Don't Show On Title Slide> box

Click <Apply To All>
The slide footer information disappers from the title slide.
Select Slide 2
The slide footer information remains on the rest of the slides in the presentation.
Format Master Bullets
PowerPoint allows you to customise the bullets in a presentation for individual paragraphs or entire objects, with different bullet of different font, colour, picture or number.
The Slide Master view.
Click first line at <Click to edit Master text styles>
Click <Format> <Bullets And Numbering>
Click <Character>

Select <Diamond> bullet
Select Purple Colour
Click Size 85% of text
Click <OK>
Click second line at <Click to edit Master text styles>
Right-click, Click <Bullets And Numbering>
Click <Picture>

Select <light blue diamond> picture clip
Click <Insert Clip> button
Click <OK>
The new bullets appear on all other slides.
Other formats : Bulleted list

Other formats : Numbered list

Formatting Master Text and Placeholders
The master placeholders for the title, bulleted text, date and time, slide number, and footer determine the style and position of those objects. To format master text, you select the text placeholder and alter the format to look the way you want.
Select Slide 2
Press <Shift> key and Click <Slide view> button
The Slide Master view appears.
Press <Shift> key Click <Footer Area> and <Number Area> placeholders
Select Font Size of 20
Click <Number Area> Placeholder
Click <Bold> button
Position the I-bean cursor at the Second level text and Click
Click <Italic> button
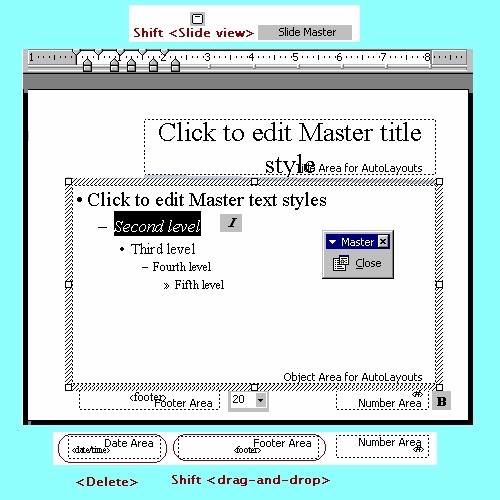
Click <Date Area> placeholder
Press <Delete> key
Click <Footer Area> placeholder
Press <Shift> key Drag <Footer Area> placeholder to the left bottom corner.
Note : The action constrains the movement of the object horizontally or vertically, the object stays in the same plane.
Adjust Master Text Indents
PowerPoint uses indent markers to control the distance between bullets and text. Adjusting indents in PowerPoint works the same way as it does in Word.
To change the distance between a bullet and its corresponding text, you first display the ruler, which shows the current bullet and text placement.

Each indent level consists of two triangles - indent markers, and a small box - margin marker. The upper indent marker controls the first line of the paragraph; the lower indent marker controls the left edge of the paragraph. Hanging indent is when an indent level is set such that the paragraph appears to be "hanging" below.
Press <Shift> key and Click <Slide view> button
The Slide Master view appears.
Click <View> <Ruler>
Drag the Upper Indent Marker
Drag the Lower Indent Marker
Drag the Margin Marker
Click <Slide view> button
Customizing Slides Background
You can create a special background by adding a shade, a texture, a pattern, or even a picture to slides.
Click <Format> <Background>

Click Background Fill down area
Select <More Colors>


Creating a textured background
Select <Fill Effects>

<Texture> tab
Others : Gradient, Pattern,
Picture (select image as the Background)
Click <OK> <Apply>
Customizing Design Templates
When you apply a template to a presentation, PowerPoint copies the information from each master in the template to the corresponding masters in the presentation. All slides in a presentation will then acquire the look of the template.
Click <Common Tasks> menu
Click <Apply Design Template>
Select Sunny Days

Click <OK>
Set Rehearsed Slide Timings
You can set slide timings by using the Reherse timings button. You can rehearse a slide show and adjust the timings appropraitely for each slide during the rehearsal.
Click <Slide Sorter View> button
Click <Slide Show>
Select <Rehearse Timings>
The slide time begins running as soon as the first slide appears. Click the mouse in the next button or right arrow to the next slide. If the time is inadequate, click the Repeat button or reverse arrow.
At the end of the slide rehearsal, a confirmation dialog box appears with the total time for the slide show.

Click <Yes>
Save the new slide timings
Record a Narration in a Slide Show
You can add vioce narration or sound in a slide show (you need a sound card and a microphone).
Select Slide 1 at <Slide view>
Click <Insert> <Movies and sounds>
Click <Record Sound>

Type Slide 1 Welcome at the Name box
Click <Record> button
Record "Welcome to Impact Public Relations, your experienced complete PR firm!"
Cilck <Stop> button
Cilck <play> button
Click <OK> a sound icon appears
Click <Slide Show>
Select <Record Narration>

Click <OK>
Right Click anywhere on the screen
Click <Pause Narration>
Click <Resume Narration>
<Esc> Stop


Multimedia Creation : Capturing Images, Sounds and Movies
You
can make a multimedia presentaton by adding images, sounds, and
video clips from the Web (remember to check the copyright status).
What is Multimedia Presentation (process)?
Multimedia Creation
What
are the Multimedia Resources?
Working with Multimedia File Formats
Insert Sounds in a Presentation
You can make a presentaton more interesting by adding sounds to accompany slide transitions, by inserting sounds as objects which you can then change and edit. You can insert sounds from the Microsoft Clip Gallery or from a file by double-clicking a media placeholder or by clicking the Sound Command on the Insert menu.
Click <Slide Show> <Slide Transition>
Click <Sound> down arrow
Click Applause
Alternatively More Sound from Sound Files
Click <Sound> down arrow
Click <Other Sound>
Select Sound Files from folders
Click <Apply> Click <Slide Show> button
Alternatively Sound from Microsoft Sound Clip Gallery
Click <Insert> <Movies And Sounds>
Select <Sound From Gallery>
Select <Sound> tab in Insert Music dialog box for Music Sound Category
Alternatively
Select <Sound From File>
Select Sound Files from folders

Insert Movies in a Presentation
You can play movies during a presentation, which operate the same way as sounds with the insertion of movie from the Microsoft Clip Gallery or from a file by double-clicking a media placeholder or by clicking the Movie Command on the Insert menu.
Click <Insert> <Movies And Sounds>
Select <Movie From Gallery>
Select <Motion Clips> tab in Insert Movie dialog box for Business Category
Click Arrowhit Click <Play Clip> button
Alternatively
Select <Movie From File>
Select Movie Files from folders


Use the Macros
If you perform a task repeatedly, you can record a macro that automates the task (series of commands and functions that is stored in a Visual Basic for Applications module that is attached to the open presentation).
Record a macro :
Click <Tools> <Macro>
Click <Record New Macro>
Enter a name for the macro, edit the <Description:> box
Click <OK>
Click <Stop Recording>
Run a macro :
Open the presenation that contains the macro.
Click <Tools> <Macro>
Click <Macros>
Enter
the name for the macro at the <macro name:> box
Click <Run>
Press <Ctrl>+<Break> to interrupt a macro
Quit PowerPoint2000
Click
<File>
<Close>
Click
<File>
<Exit>
Preparation : Final Project Exercise
For Final PowerPoint Project presentation, let's tour Australia to collect pictures from www.australia.com
Internet Explorer Interface :
Menu, Point and click <View><Toolbars> : click Web
Point to each picture in the web page
(i)
right-click to display
the short-cut menu;
(ii) left-click to <Save
Picture As>;
(iii) change the name of the file (optional)
and left-click to <Save>
at <My Documents>, <My Pictures> folder.
Insert any Picture(s) from <My Documents>, <My Pictures> folder to the slide(s).
Your
presentation slide title order :
MS
PowerPoint 2000 Final Project (Slide Title)
Our
Tour to Australia
Slide
2 :
City of ??
Slide
3 :
City of ??
Slide
4 :
Thank You
Save the presentation
in the
<My
Documents>
folder.
Review Exercise :

 Edwin
Koh : We
completed on the
Edwin
Koh : We
completed on the
New
Knowledge and Skills in
MS
PowerPoint 2000 Topic 5.