
| Home | Instructions | Treasure | Payment | Scheduling | Testimonials | FAQ |
Instructions Page
This area details all the general instructions on how our team completes the BCNM40 "Steamed Sprouts" successfully. Individual roles are explained in more detail at the end when you pick a job that you'd like to participate with.
Generally the party make up consists of six members each with their own role:
Bard, Red Mage, White Mage, Paladin, and two damage dealers.
There are three main parts to the quest, 1) Preparation, 2) Flood Watch, 3) Onion Genocide
Each of these are detailed below.
Preparation

In order to do a BCNM40 with us, you must first obtain 40 beastman seals. These items are dropped by most experience giving monsters up to level 40 or so. These include any monster that /check's Easy Prey or higher. They are exclusive (Ex) so cannot be traded or sold. You need 40 of them to obtain a Star Orb - a critical item to start a BCNM40 anywhere.
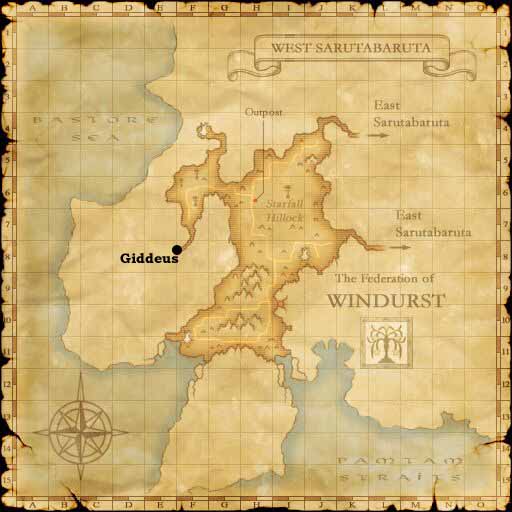
Once you have 40 beastman seals, head to Port Jeuno and speak with Shami. Trade him 40 beastman seals to obtain the Star Orb. The map below is provided by http://ffxi.allakhazam.com/, but modified to show where Shami can be found.

Once you have a Star Orb you will be able to do any BCNM40. Set up an appointment with us, MANGLED mandragora, to do BCNM40 "Steamed Sprouts". At an appointed time that will be negotiated with you, you and the MANDLED mandragora team members meet in Balga's Dais in Giddeus. Giddeus is located west of West Sarutabaruta near Windurst. Once in Giddeus, take the right split and continue to head south to Balga's Dais. Maps are provided below care of http://ffxi.allakhazam.com/.

Be sure you do not bring any gear that is above level 40 or else it will not be admitted into the battle once entered. Once in Balga's Dais, meet everyone at the burning circle. Payment arrangements with our service will be made at this time. No one will bother buffing up as they don't stick once entering the burning circle, but everyone will use their food before going in. Once everyone has eaten, you will be asked to trade your Star Orb to the burning circle. Upon trading it you will be given a few options as to which BCNM40 you wish to participate in. Choose "Steamed Sprouts" and you will enter the burning circle. Doing this will allow everyone else in your party to enter the burning circle as well. Note that if you enter it and a party member is not in Balga's Dais, he will not be able to enter the burning circle despite him being in the party.
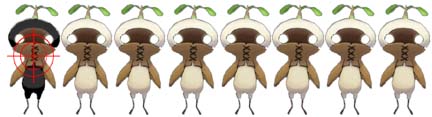
Once everyone is inside, the buffing will commence. Once everyone is properly buffed, everyone will move into the first position near the head of the circle as shown below. (NOTE: This is a very basic guide to how we do BCNM40. For more extensive information in job specific roles, please see the bottom of the page.) The mandragoras will be positioned in a tight circle near the center of the burning circle in the large room. None of them will attack until someone either pulls them or steps within the circle.

The Bard will put some final buffs on himself, the Paladin, and White Mage and then give the Paladin the ok to pull. The Paladin will pull the mandragoras by running toward them as they all link and will continue to run until he reaches the back of the burning circle where he will stop. In the meantime the Bard will cast a Foe Lullaby on the Dvorovoi putting it alone to sleep leaving the rest of the Domovois to follow after the Paladin to the back of the room.

After the Dvorovoi is asleep, the two damage dealers move into position to attack the Dvorovoi but do not attack yet. The Red Mage then moves up and casts Silence on it while it sleeps. In the meantime, the Bard will move toward the back of the circle where the Paladin is getting surrounded by the Domovois and will use Horde Lullaby on the Domovois to put the whole lot of them to sleep. The setup should look at follows:

Once the Domovois are asleep the Paladin moves to engage the Dvorovoi. He will attack then provoke the Dvorovoi and pull it back to the head of the circle keeping his back facing the entrance. The other damage dealers will engage likewise and the battle will begin. The setup at the end of stage 1: Preparation will appear as such and should remain relatively constant throughout the rest of the battle:

Flood Watch
Now begins the most critical stage in the whole battle. Most BCNM40 "Steamed Sprouts" are won or lost right here. It's all about "Flood Control". During this part of the battle the Bard and White Mage will be focused on keeping the Domovoi's busy sleeping and the Bard healed respectively, but the most important tasks belong to the Red Mage, Paladin, and two damage dealers. They must not only work to prevent the Dvorovoi from casting an ancient spell called, "Flood," which can cause up to 700 points of water damage on a single target, but also work to keep themselves awake, unparalyzed and alive while fighting this most sinister of all onions. One thing you have as an advantage to you is that Flood takes a long time to cast. The advantages of this will be discussed later.
A few basic things will be going on - the Bard will be repeatedly rebuffing himself with Minne (added Defense) and Ballad (MP Regen) between casting Horde Lullaby on the Domovois when they wake up. The White Mage will be continuously curing the Bard as he takes damage from waking Domovois and /healing between sleeps if he can. If the White Mage is not quick in curing the Bard, the Bard can fall very quickly to repeated critical hits. On the other end of the battle the damage dealers and Paladin will be engaging the Dvorovoi trying to kill it as quickly as possible while the Red Mage keeps the Dvorovoi silenced and cures the second group from afar to try to stay out of the range of the Dvorovoi AOE (area of effect) sleep ability "Dream Flower". While this is going on however there are a few very important things to watch out for.
Flood
The first is watching for Flood. Each member of the team will have a Flood macro. This is a pre-made macro declaring if Flood is being cast. It is used the moment anyone sees Flood being cast and has a <call> with it producing a piercing sound to let everyone know to take evasive action. Specifically if Flood is being cast, the Red Mage will attempt to silence the Dvorovoi, the Paladin, or whoever the target of the spell is, will unlock his target and turn to run away down the hallway toward the entrance while the remaining people use whatever abilities they have to interrupt the spell. Since Flood can happen at any time while the Dvorovoi is alive, the best defense is retreat. If Flood is cast on any member, that player is to run as far away as possible to attempt to get out of range of the spell effect. Most likely the target of the spell will be the Paladin who should be holding hate, but if not, the other damage dealers and even the Bard need to be wary of being targeted. Stopping this spell from going off will be of the utmost importance to the success of BCNM40 "Steamed Sprouts".
Paralyzga
The second is removing Paralysis. Though the Red Mage will be doing his best to keep the Dvorovoi silenced, sometimes the little onion gets off a spell called, "Paralyzga." It's particularly annoying though not extremely dangerous except in one situation. Paralyzga is an area of effect (AOE) spell and it paralyzes all within a certain range. This is the primary reason the Dvorovoi must be kept away from the Bard at all costs. If the Bard gets paralyzed, there is a good chance he will not be able to perform Horde Lullaby and will die. It should be noted that if the Bard ever dies before stage 3, Onion Genocide, everyone should retreat - as winning BCNM40 "Steamed Sprouts" will be practically impossible. But back to Paralyzga - certain precautions are taken to remove it. Everyone will have a pre-made macro if they get paralyzed. Those macros /tell a party member who has the White Mage subjob or White Mage to cast Paralyna on the him so as to not spam the party chat channel. The only exception is the Bard who, if paralyzed will begin to spam his Paralyna macro which also calls out on the party chat channel that he's paralyzed. All individuals who can cast Paralyna will at that point stop what they are doing and cast Paralyna on the Bard until he stops spamming the channel. In closing on Paralyna, this spell is most dangerous in the opening moments of battle when the Dvorovoi is first pulled as sometimes he will cast Paralyzga before even moving.
Dream Flower
The last of the major things to watch out for during this stage of the battle is a spell-like ability called, "Dream Flower," which everyone who has ever fought a mandragora should be familiar with. Dream Flower is another area of effect spell that puts everyone to sleep, and every mandragora in Vana'diel has access to it, Domovoi, or Dvorovoi. It's nearly impossible to resist completely even with a high Mind stat and Barsleep. It's not extremely dangerous of an ability excepting the case where the current target of the Dvorovoi is put to sleep and then it begins to cast Flood. A sleeping target is an easy target for Flood. So precautions are taken to minimize its effect. Everyone has a Sleep macro created to /tell another player when they fall asleep. Since all it takes it a Cure spell to awaken someone, it's not extremely difficult to remove with so many people who have access to cure in the party. The order goes like this:
| Damage Dealer 1 => | ||||
| Paladin => | Red Mage => | White Mage => | Bard | |
| Damage Dealer 2 => |
The => shows who the player /tells when they go to sleep. The player pointed to will be responsible for waking up the player whose arrow points at him. Simply put, the Paladin is responsible for waking up the two damage dealers. The Red Mage is responsible for waking up the Paladin and so on. Even if everyone goes to sleep including the Bard, the Bard is most likely the target of at least one mandragora and will wake up shortly. The Bard will then wake up the White Mage who will continue the chain all the way down to the damage dealers. The trick to minimizing this spell effect is for the Red Mage to stay out of the way of the Sleep area of effect by the Dvorovoi allowing him to awaken the other party members easily.
If the party effectively deals with these three things, Flood, Paralyzga, and Dream Flower, the Dvorovoi will die rather quickly and once he is dead, the party can breathe a sigh of relief before exacting destruction upon the rest of the Domovois.
Onion Genocide

Once the Dvorovoi is dead, we move on to stage 3 of the battle. This stage is probably the easiest of the three and its mostly a matter of how quickly the Domovois are killed. The Paladin will be leading the attack team as to which Domovoi to engage. Once he has chosen a target, the other damager dealers will engage his target. The only difficult thing about this part of the battle is pulling the targeted Domovoi off the Bard who will have built up quite a bit of hate by this point. Actually by the time there are 2 or 3 left, the Domovoi might never leave the Bard dependant upon how long it took to kill the rest of the mandragoras.
During this portion of the battle as with the previous stages, the Bard is keeping the non-engaged mandragoras asleep while the White Mage cures him. Since the Dvorovoi is dead, there will be no more need to worry about attacks like Flood or Paralyzga so that will ease the battle up quite a bit as the remaining Domovoi's do not hit all that hard nor have any especially debilitating attacks unless they attack you en masse. The only thing to watch out for is Dream Flower - which can be quite annoying - however, the party will continue to use the waking up hierarchy discussed in 'Flood Control' minimizing the effects of the area of effect sleep.
In time, all the Domovoi's will be killed and all that will remain is to open the chest that appears in the middle of the battlefield. Once done, the party will be transported back out to the other side of Balga's Dais and will be given their drops. You will then lot on all your drops and may be reimbursed some of the fee based upon the value of the drops, but the fee will never be increased based on the drops value. Once all items are lotted upon and received, the party will disband and leave Balga's Dais.
In order for us to succeed with our service, the team needs to act in unison, and you as our potential client needs to also be aware of how and what to do to be a functioning member of our team. Listed below are the various jobs you can participate as in the BCNM40 "Steamed Sprouts". Each section details specific information for each job's role in the BCNM40 setup shown above. Realizing that we cannot possibly account for every job/subjob combo, we will suggest in each section general ideas for subjobs for each job type if that subjob in someway changes the main function of the job guidelines - such as subbing White Mage as a melee job.
Pick the job for which you'd like to see instructions:
| Beastmaster | Black Mage | Dark Knight | Dragoon | |
| Monk | Ninja | Paladin | Ranger | Red Mage |
| Samurai | Summoner | Thief | Warrior | White Mage |