|
Home |
|
Rockets
|
|
|
|
Launchers
|
|
|
| Spout |
| Reduced Nozzle diameter (11.8mm) |
|
|
|
|
Launch sequence pics
|
|
|
|
|
| Virtual |
| Computer graphics and animation |
|
|
Stuff
|
|
|
|
Events
|
|
|
|
|
|
Calibrated Pictures Height Measurement |
| |
The criteria for measuring height I am trying to meet are: |
| 1. |
Tangible, lasting proof that can be validated (pictures, data records etc.)
|
| | |
| 2. |
Use of equipment an average person would own anyway (digital camera and/or video, PC).
|
| | |
| 3. |
No need to measure distance on location.
|
| | |
| 4. |
No expensive items required on the rocket = No recovery system required.
|
| | |
| 5. |
Short setup time on location.
|
| | |
| 6. |
Reliability, get results for every launch.
|
| | |

|
|
| |
|
| |
Description of measurement method: |
| 1. |
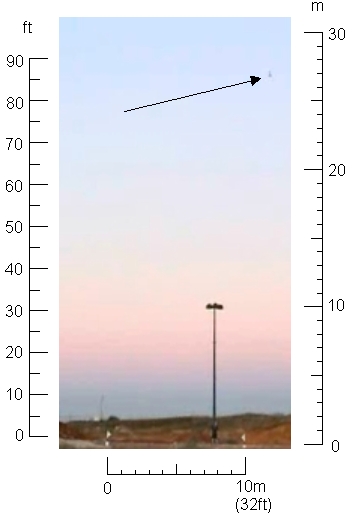
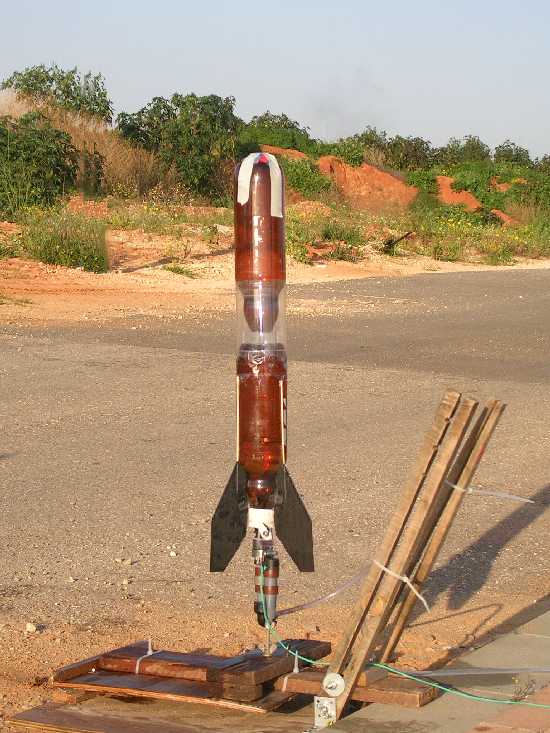
Place 2 large objects at an exact distance on the ground at each side of the rocket. In the picture bellow,
the white triangles are exactly 10 meters (32 ft) apart.
|
| | |
| |

|
| |
Launch site with 10 meter (32 ft) marks |
| | |
| 2. |
Launch while video is recording (or digital camera in continuous mode).
|
| | |
| 3. |
Use video editor to copy the frame with rocket at apogee or select the picture at apogee from the continuous sequence of the digital camera.
|
| | |
| 4. |
Draw a horizontal scale bar between the known objects, rotate 90 degrees and copy as required. Assuming the horizontal distance in the picture is equal to the vertical distance, measure height on vertical scale bar.
|
| | |
|
|
|
| |
Lessons learned: |
| 1. |
Take pictures with sun in back.
|
| | |
| 2. |
Captured video frames don't have the required resolution (home equipment - 2006). Digital cameras can do the job if you follow the guidelines in 3 and 4 bellow. The first camera that was used is a Nikon 3200 (a 2004 model), and the last attempt was with a Canon PowerShot S3 (a 2007 model). Each camera has a different "continuous" behavior that should be taken into account.
|
| | |
| 3. |
The rocket in flight is not visible through the viewfinder or the monitor of the digital camera. The camera must be placed on a tripod such that it will cover the required region (as determined by the 10 m distanced objects) and operated by a person watching the launch directly. Start taking pictures when rocket starts approaching apogee (Nikon 3200) or just before launch (Canon PowerShot S3).
|
| | |
| 4. |
The Canon PowerShot S3 has an unlimited "Continuous" mode, so this section is no longer relevant. If you happen to use an older camera, the following may apply:
"Continuous" mode in digital cameras is limited by a buffer size. When this buffer is full, the camera stops taking pictures until all the pictures are written to the memory. This takes time, for water rockets the camera resumes taking pictures long after the rocket is back on the ground so for all practical purposes "Continuous" has a very low limit. Reducing the picture size mode increases the number of frames taken before the camera needs to download. Reduce picture size until at least 4 frames are taken before writing to memory is required. This should cover the time when the rocket is passing through apogee.
My Nikon 3200 takes 4 frames (!) in 3MB mode and 8 frames in 2MB mode, barely enough for decent pictures.
Other cameras "loop" inside the buffer while the button is pressed and download the last pictures once it is released, for example the Fujifilm S5000.
|
|
|
|
| |
The following attempts are presented in chronological order: |
|
|
|
| |
Attempt 1 data:
Date: Oct 21, 2005
SkewerDesign rocket made from an American 2 liter Pepsi bottle.
Dry weight: 60 gr
additional weight at tip of rocket (modeling clay): 25 gr
total volume: 2 liter
water volume: .575 liter
Launcher: CorkLauncher - basic
Launch pressure: ~2 atm
pictures: Nikon 3200 video mode (Launch 1 to 3), SONY DCR-TRV-30E (Launch 4)
|
|
|
|

|
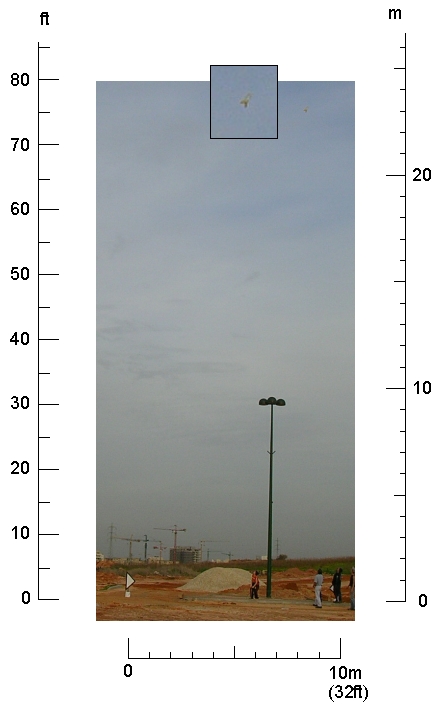
| Launch 1: Rocket at apogee (~24 meter/80ft) |

|
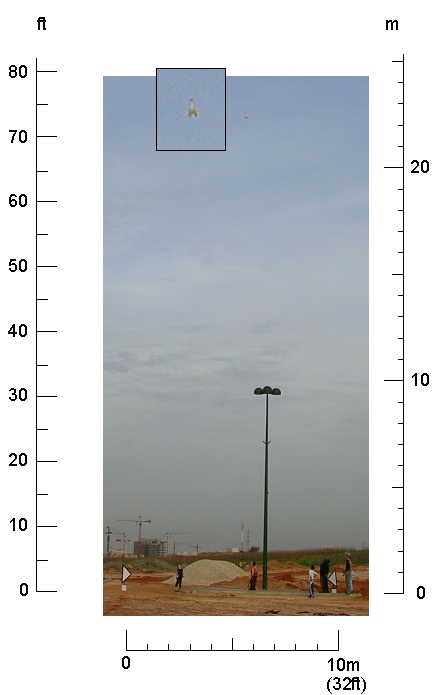
| Launch 2: Rocket at apogee (~23 meter) |
|
| Launch 3: Clay replaced by tennis ball. This proved to much for the CorkLauncher and the rocket only got to about 18 meters |
| |
Conclusions for attempt 1:
1. The examples demonstrate the feasibility of the method, the equipment used provides acceptable results for flights up to 30 meters.
2. The white triangles must be larger and have a black background for more contrast and visibility.
3. Use dark bottle and black fins, the rocket used was made of a transparent bottles and had white fins (!!!).
4. Since the rocket is quite slow at apogee, it may be possible to catch it with a digital camera in "continuous" mode.
|
|
|
|
| |
Attempt 2 data:
Date: Dec 10, 2005
SkewerDesign rocket made from an American 2 liter Pepsi bottle.
Dry weight: 60 gr
additional weight at tip of rocket (modeling clay): 35 gr
total volume: 2 liter
water volume: .725 liter
Launcher: CorkLauncher - basic
Launch pressure: ~2 atm
pictures: Nikon 3200 continuous mode frames
Also, double size triangles (white on black background).
|
|
|
|
|
| going up |

|
| and up . . . . |
|
| that's about it |
| |
Conclusions for attempt 2:
1. Much better pictures, but changing the rocket data (water volume and additional weight) resulted in a lower flight.
2. The Nikon 3200 manual states the 3 frames are shot every 2 seconds in continuous mode. This maybe true, but there is few seconds delay after each 4 frames. By that time the rocket is long gone, and this means that the picture is probably not at apogee.
|
|
|
|
| |
Attempt 3 data:
Date: Dec 30, 2005
SkewerDesign rocket made from an american 2 liter Pepsi bottle.
Dry weight: 60 gr
additional weight at tip of rocket (modeling clay): 35 gr
total volume: 2 liter
water volume: .5 liter
Launcher: CorkLauncher - basic
Launch pressure: ~2 atm
pictures: Nikon 3200 continuous mode frames
Changing the picture quality affects the number of pictures that can be taken before the pictures are saved to the memory.
Nikon 3200 continuous mode before it needs to download:
high 2048x1536 - 3 frames
normal 2048x1536 - 5 frames
normal 1600x1200 -7 frames
pc 1024x768 - 14 frames
tv 640x480 - 29 frames
|
|
|
|

|
| mode: TV screen, 640x480, scale of picture is 100% |

|
| mode: PC screen, 1024x768, scale of picture is 65%, insert scale 100% |
|
| mode: normal, 1600x1200, scale of picture is 44%, insert scale 100% |
|
| mode: normal, 2048x1536, scale of picture is 37%, insert scale 100% |
| |
Conclusions for attempt 3:
Normal (2048x1536) looks promising for higher flying rockets.
|
|
|
|
| |
Attempt 4 data:
Date: May 6, 2006
SkewerDesign rocket made from a 1.5 liter Cola bottle.
Dry weight: 60 gr
additional weight at tip of rocket (modeling clay): 35 gr
total volume: 1.65 liter
water volume: .5 liter
Launcher: O-ring with Clark cable tie release
Launch pressure: 6 atm
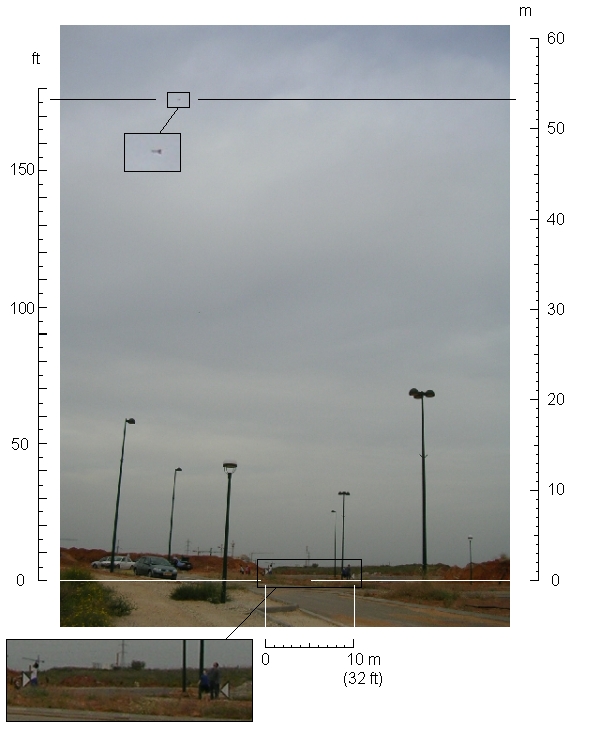
pictures: Nikon 3200 continuous mode frames - normal 2048x1536 mode - 5 frames before buffer fills
Distance from rocket launch position - 90m (300 ft)
|
|
|
|
|
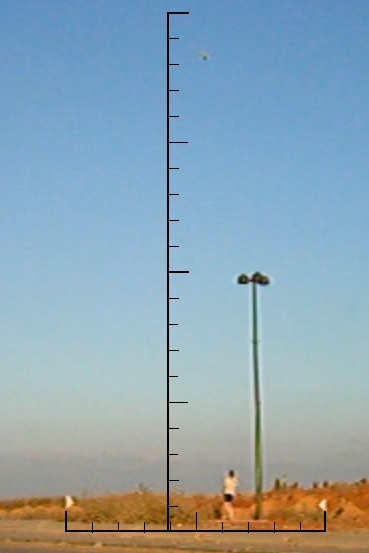
| 53 meters - scale of picture is 40%, insert scale 100% |
|
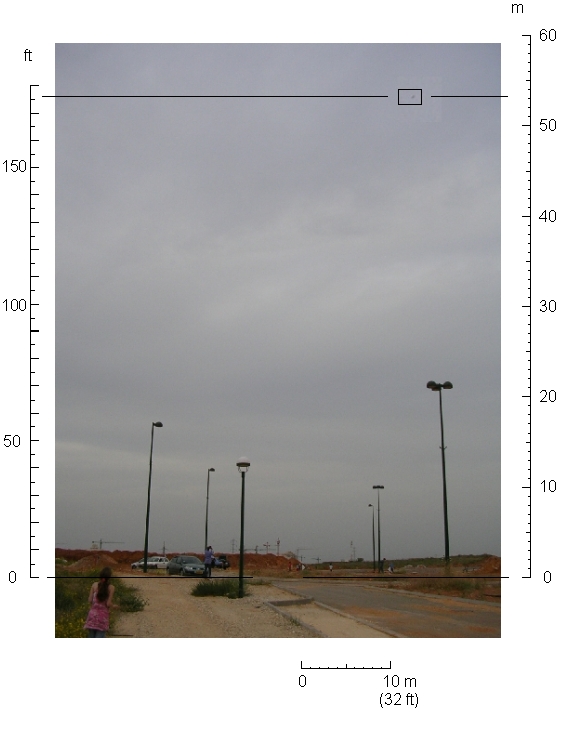
| 53 meters - scale of picture is 40% |

|
| 48 meters (but already going down) scale of picture is 40% |
| |
Attempt 5 data:
Date: Feb 17, 2007
SkewerDesign rocket:
Pressurized section is made from a 1.5 liter root beer bottle.
A second bottle was added without pressure
Dry weight: 120 gr
additional weight at tip of rocket (modeling clay): 60 gr
total volume of pressurized bottle: 1.65 liter
water volume: 0.6 liter
Launcher: O-ring with Clark cable tie release
Launch pressure: 6 atm
pictures: Canon PowerShot S3, continuous mode, 6MP (possibly not at best set up regarding sensitivity and focus
Photo editor used to superimpose pictures: Paint.Net
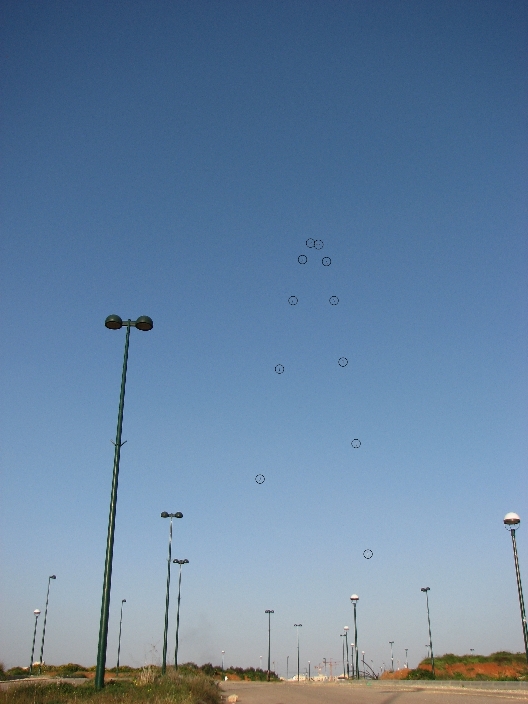
Launch 1: Distance from rocket launch position ~ 70m (240 ft)
|
|
|
|
|
| set up |

|
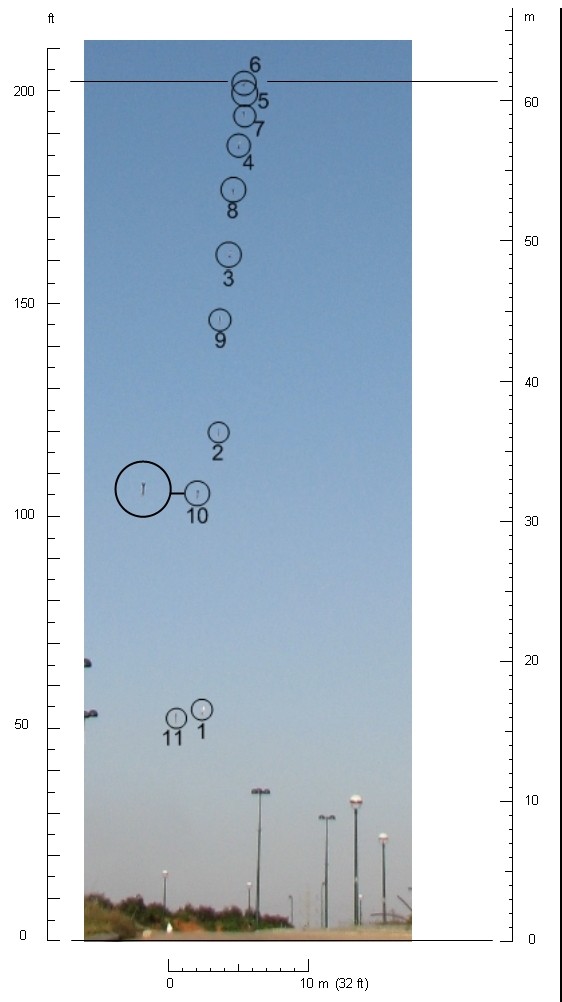
63 meters (207 ft) !!!
scale of picture is 50%, scale of rocket in thick circle is 100%
11 rocket images are superimposed on the background view.
|
|
Full view of original pictures: scale is 25%
|
| |
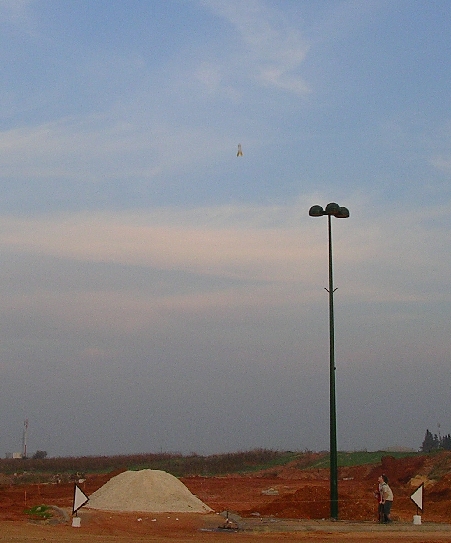
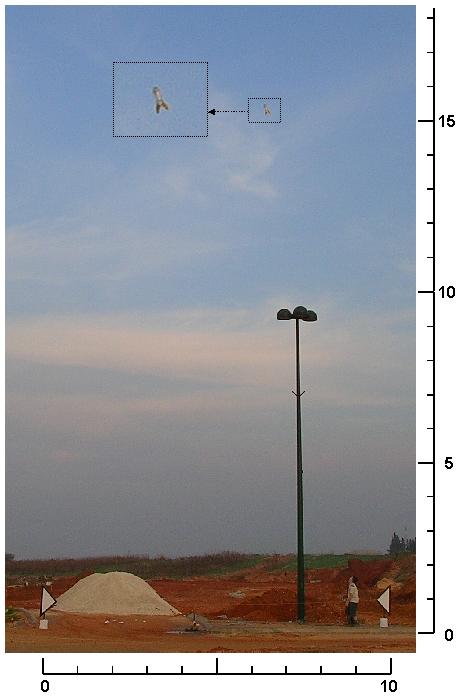
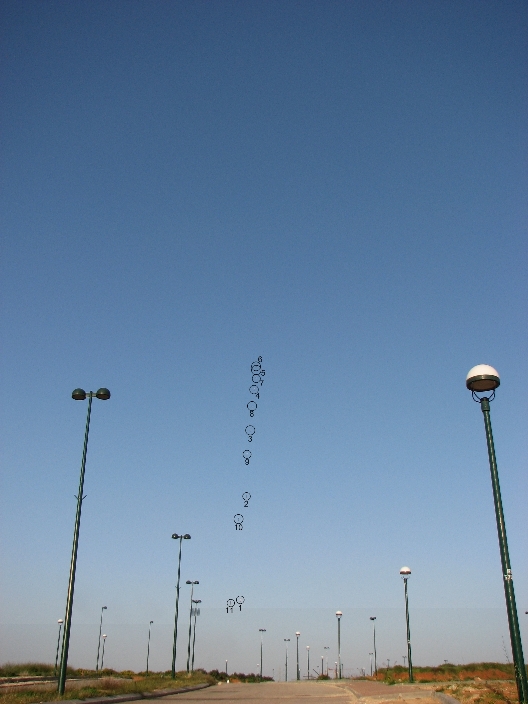
Launch 2: Distance from rocket launch position ~ 90m (300 ft)
|
|
|
|
|
61 meters (204 ft)
scale of picture is 50%, scale of rocket in thick circle is 100%
11 rocket images are superimposed on the background view.
|
|
Full view of original pictures: scale is 25%
|
| |
Conclusions for attempt 5:
1. The camera used can measure height at least up to 100m, as seen in the full view images.
2. There is no known reason why the first launch was a nice curve and the second moved along a diagonal line both going up and coming down.
3. Not done this time, but: time values can be measured by measuring how many frames a second the camera does. Do not use the numbers in the manual, take about 20 pictures and see how long it takes.
4. Results agree with computer simulation
|
|
|
|
| |
Attempt 6 data:
Date: Aug 10, 2007
(Just a quick test for the new Nikon D40)
|
|
|
|
|
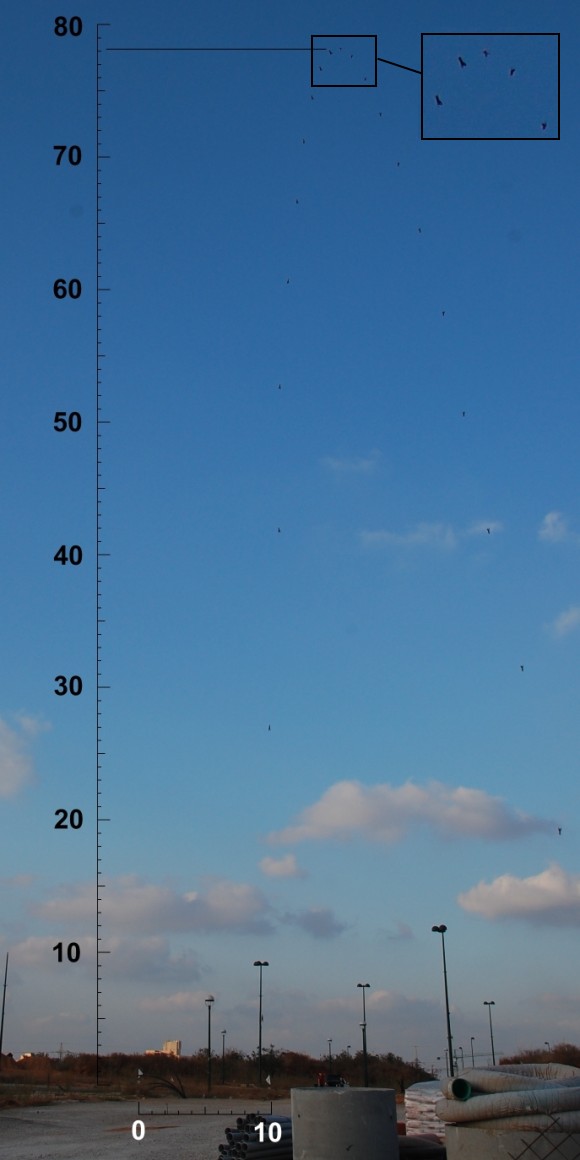
78 meters (256 ft) !!!
scale of picture is 50%, scale of insert is 100%
11 rocket images are superimposed on the background view.
|
|
|