|
Home |
|
Rockets
|
|
|
|
Launchers
|
|
|
| Spout |
| Reduced Nozzle diameter (11.8mm) |
|
|
|
|
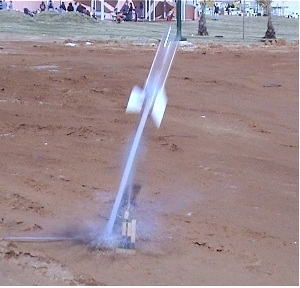
Launch sequence pics
|
|
|
|
|
| Virtual |
| Computer graphics and animation |
|
|
Stuff
|
|
|
|
Events
|
|
|
|
|
|
1. |
Introduction |
| |
The launcher holds the rocket with the friction that is created between the cork and the inner side of the bottle opening. When air is pumped into the bottle the pressure rises up to a point when the friction cannot hold the rocket and it is launched. Typically launch pressure is around 2 atm. (30 psi).
A Skewer Design launched on this launcher can reach a height of 25 m (85 ft).
|

|
|
2. |
Materials and equipment (see Pic 1) |
| 1 |
A cork that fits your bottle:
The requirement is that the cork can be forced
into the opening of the bottle. There is a trade-off here: A very tight fit
will require a larger force and increase the launch pressure (good) but there
is a point where the force may be too large and damage the rocket.
|
| | |
| 2 |
Copper tube: 6 mm (1/4 inch) diameter ,10 cm (4 inch) length.
|
| | |
| 3 |
Two identical pieces of wood, Exact size not important (see pic 1 for proportions).
|
| | |
| 4 |
Piece of wood, Exact size not important (see pic 1 for proportions).
|
| | |
| 5 |
Piece of wood, Exact size not important (see pic 1 for proportions).
|
| | |
| 6 |
Flexible tube with 6 mm inner diameter, about 3 meters is good.
|
| | |
| 7 |
A tire valve, stripped from the surrounding rubber (I use a blow torch).
Extract the one-way valve from it leaving just the outer piece. This is for
safety, in case you need to abort the launch disconnecting the air supply will
allow the water to exit.
|
| | |
| 8 |
Eight wood screws with length that will pass through one piece of wood but not two.
|
| | |
| |
A 5.5 and a 7 mm diameter drill.
|
| | |
| |
A vise.
|
| | |
| |
Pliers.
|
| | |
| |
A decent bicycle pump.
|
|
|
|
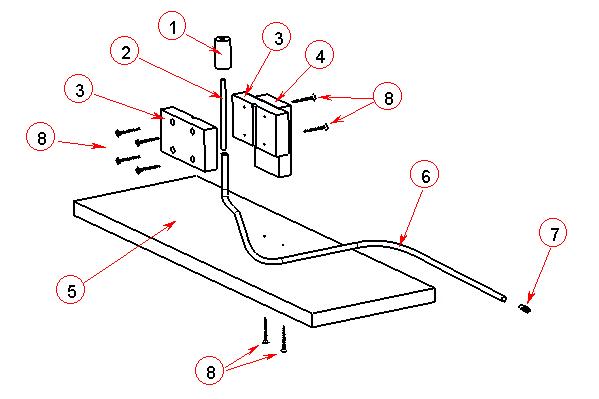 |
| Pic 1: Exploded view with part numbers |
| |
Construction |
| » |
Drill 5.5 mm hole in cork:
Quick method - clamp the drill in the vise in horizontal position and rotate the
cork by hand on the drill. Try to keep the cork aligned with the drill but don't
worry if the hole is not exactly in the center of the cork. A large nail can be
forced through the cork prior to drilling to create a guide through the cork's granularity.
Exact method - use an electric drill with guide. Make sure not to squeeze the
cork out of it's roundness
|
| | |
| » |
Force the flexible tube (6) on one side of the Copper tube (2), use soap and water
if required or dip the flexible tube shortly in hot water. Leave enough of the Copper
tube exposed and force the cork (1) on the other side.
|
| | |
| » |
Clamp together the identical wood pieces (3) and drill a 7 mm hole centered at the
plane they meet. Separate, half of the hole will be on each piece.
|
| | |
| » |
Clamp together the identical wood pieces (3) and drill a 7 mm hole centered at the
plane they meet. Separate, half of the hole will be on each piece.
|
| | |
| » |
Place the section of the copper tube that is covered by the flexible tube
in the hole between the two pieces and use 4 wood screws to hold all the
parts together. The cork should touch the wood when done.
|
| | |
| » |
Use the remaining wood screws to connect wood pieces 4 (wall) and 5 (base) to
the assembly from the previous step.
|
| | |
| » |
Insert the tire valve (7) at the free end of the flexible tube. If required,
fasten with clamp.
|
| | |
|
|
|
 |
| Pic 2: Assembled view |
| |
 |
| Pic 3: Assembled Launcher |
| |
 |
| Pic 4: Assembled Launcher with rocket |
| |
Launching |
| » |
Connect bicycle pump to tire valve.
|
| | |
| » |
Fill 1/3 of the rocket with water while the rocket is pointing down.
|
| | |
| » |
Hold the launcher upside down and force the cork into the bottle opening.
|
| | |
| » |
Place rocket in launch position. Extend tube to maximum length and pump
(Launch will occur at about 2 atm.).
|
| | |
|
|
|
|
|