|
Home |
|
Rockets
|
|
|
|
Launchers
|
|
|
| Spout |
| Reduced Nozzle diameter (11.8mm) |
|
|
|
|
Launch sequence pics
|
|
|
|
|
| Virtual |
| Computer graphics and animation |
|
|
Stuff
|
|
|
|
Events
|
|
|
|
|
|
Water Rocket - Skewer Design |
1. |
Introduction |
| |
The design's basic principle is the ability to force a skewer
into a fin so that it creates a "stabilizer set", which in turn
can be easily connected to a bottle. The specific design described
in this page is optimized for minimal required materials and minimum
construction time. Typically a class of up to 20 students (ages 8-15)
can each finish a rocket within one class period and, since the design
is very tolerant to "not-so-exact-work", everyone has a shot at launching.
The design is also surprisingly robust and will require only minor
adjustments after hitting the ground straight on. |

|
|
2. |
Materials and equipment |
| |
Note: some materials have different names in different countries.
If you recognize a material from its description and it has a
commercial/other name in your country let me know, I will add
it to the description. |
| | |
| 2.1 |
Plastic bottle that fits your launcher:
Best results are obtained with bottles
that have a straight contour line both at the center section and the neck section.
|
| | |
| 2.2 |
3 Wood (bamboo) skewers:
Normally used for roasting marshmallows or barbeque.
These are wood (bamboo) sticks about 30 cm (12 inch)
long with a 3.2 mm (1/8 inch) diameter and one sharp end. The sharp
end is originally used to slide the meat/marshmallows on the skewer.
|
| |

|
| |
Fig 1: Skewer |
| | |
|
|
Note: If such skewers cannot be found in the stores near you any round wooden stick
will do, you can make the sharp end with a knife or a pencil sharpener.
Just make sure it can be connected to the fin as described in section 3.3.
|
| | |
| 2.3 |
Polycarbonate Structured Sheets (Polygal):
Ploygal is a commercial name for Polycarbonate Structured Sheets that are
hollowed out in one direction. Typical "normal" applications are
large notebook covers, portfolios, boxes for office use, etc. Here it is
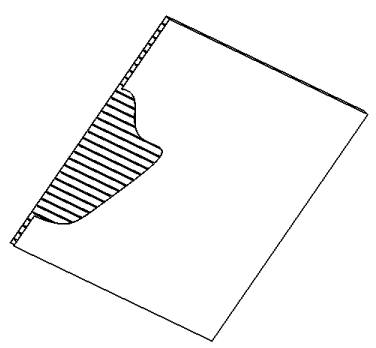
used for making the stabilizer fin; I usually use a sheet with a 2.2 mm thickness.
All that is required is that the skewer can be forced into the holes as described
in section 3.3.
Commercial polygal site.
Other sites that use this material:
|
| |

|
| |
Fig 2: polygal (with cut-out for illustration) |
| | |
| 2.4 |
Adhesive tape: any type, even low grade will do. |
| | |
| 2.5 |
Rubber bands. |
| | |
| 2.6 |
Scissors or sharp knife, thin tip permanent marker, pencil, cardboard, and ruler. |
 |
|
3. |
Construction |
| 3.1 |
Create a pattern for the fins:
Use a piece of cardboard to make a pattern for the stabilizer fin.
Hold the pattern next to the bottle and make sure it fits the bottle's
contour at the neck as shown in fig. 3. No exact fit is required, just
one contact point is enough.
Any shape that makes sense is ok, but 2 conditions should be met:
-
Leave space for the launcher cable ties and lock tube (thick red line in fig 3)
-
Leave space for hand with launcher (area between green lines in fig 3)
Note: most pictures on this page show old fins that do not meet this condition.
When the result looks ok, draw a straight line on the pattern that is in line with the bottle contour.
|
| |

|
| |
Fig 3: bottle and fin pattern
(see picture)
|
| | |
| 3.2 |
Cut fins:
Place the fin pattern on the Polygal sheet such that the line drawn on the pattern
is aligned with one hole in the Polygal. Hold the pattern in place and mark the
fin on the Polygal with a permanent marker. Cut shape of fin with scissors or knife.
Mark the hole in the Polygal that was aligned with the line on the pattern. Repeat
this to create 3 fins.
|
| |

|
| |
Fig 4: fin
(see picture of fin and pattern)
|
| | |
| 3.3 |
Create stabilizer set (fin and skewer):
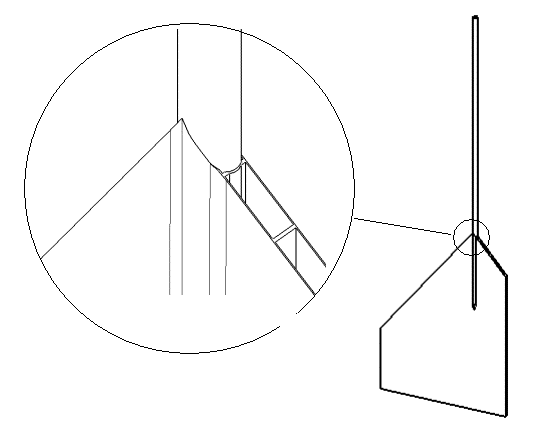
Insert a skewer in the marked hole of the fin from sec 3.2 using the sharp end
starting at the side of the hole in the flight direction. The skewer should be
forced by hand into the fin at least 5 cm (2 inch) so that the friction holds
the two parts firmly together. You will notice that the skewer creates a bulge
in the Polygal.
Repeat two more times to create 3 stabilizer sets.
|
| |

|
| |
Fig 5: stabilizer set (fin and skewer)
(see picture)
|
| | |
| 3.4 |
Positioning the stabilizer sets:
Mark the location on the bottle - three equally spaced marks on the circumference.
Place a few rubber bands on the bottle. Insert the skewers under the rubber bands
at the marked locations. The structure at this point is strong enough so the
rocket can be placed on the fins in vertical position.
Make sure each fin is touching the bottle's neck at least at one point.
|
| | |
| 3.5 |
Connecting the stabilizer sets:
Wrap adhesive tape around the bottle at two locations: next to fin and front of rocket.
This is a good job for two people: one rotating the rocket horizontally while the second
guides the adhesive tape, making sure the tape is following the bottle near the skewer.
At this point the stabilizer set is fixed in the longitudinal direction but can still
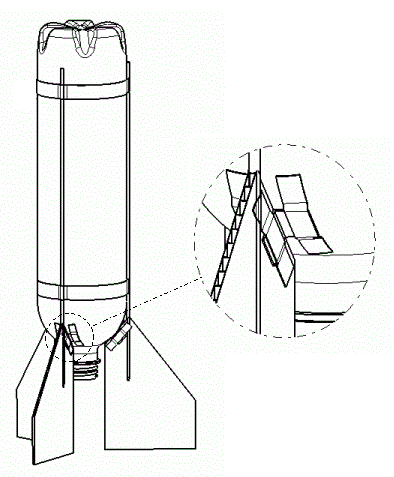
rotate around the skewer. Next, cut 6 pieces from a spare bottle and bend
them to L shapes. Then place 2 L shapes between each fin and the bottle and use adhesive
tape over each leg of the L to connect the fin to the bottle.
|
| |

|
| |
Fig 6: finished rocket with detail of L shape
(see picture)
|
| | |
| |
THIS IS IT !!!
|
| | |
| |
You are ready to launch. If launched "as is" (without parachute), the stabilizer set
will probably need some adjustment after landing since the "Bang" may disconnect
the adhesive tape that was holding the L shapes (but never the tape wrapped
around the bottle). Make sure the fins are attached with L shapes before each launch,
If the fin is not fixed this way it will rotate in flight with considerable decrease
in the rocket's performance.
|
| | |
| 3.6 |
Additional description:
|
| |

|
| |
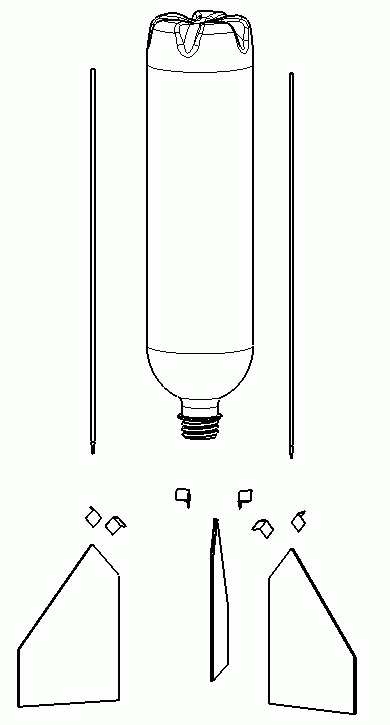
Fig 7: Exploded view (without adhesive tape)
|
| | |
| |
3D view (in new window)
|
 |
|
4. |
Possible improvements |
| 4.1 |
Use adhesive tape to fix a tennis ball at the top of the rocket.
This will help in two ways: first, it provides a softer landing. Second, it contributes
to move the center of gravity forward.
|
| 4.2 |
Connect the stabilizer set with a piece of adhesive tape along the skewer, not
wrapped around the bottle. This is smoother and causes less drag.
|

| |
|
|