|
Home |
|
Rockets
|
|
|
|
Launchers
|
|
|
| Spout |
| Reduced Nozzle diameter (11.8mm) |
|
|
|
|
Launch sequence pics
|
|
|
|
|
| Virtual |
| Computer graphics and animation |
|
|
Stuff
|
|
|
|
Events
|
|
|
|
|
|
| |
Following are launchers I built during the last 5 years, more or less in chronological order.
|
1. |
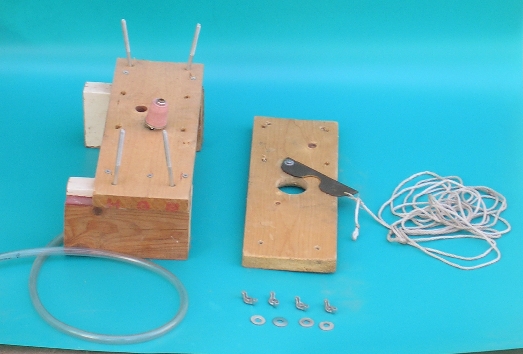
Rubber stopper with side lock (my fist launcher !!!) |
| |
The bottle was inserted through the hole in the upper board on the rubber stopper and the side
lock was moved to grab the bottle's ring. Then the screws were tightened until the board was
pressing the bottle to the stopper. After pressurization pulling the chord released the rocket.
Advantages: It worked, holding high pressure.
Disadvantages: Long and difficult setup. Fins are limited by the upper board. Pulling the chord required a force that tended to tip the structure over, resulting in a pressurized rocket pointing to the person pulling the chord.
Status: retired. |

|
|

|
| Ready for Launch |
|
| View of parts |
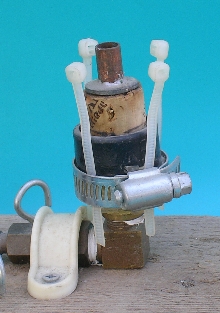
2. |
Rubber stopper with Clark cable tie release |
| |
A Clark cable tie with rubber stopper based on a sanitation tube.
Advantages: it worked, holding high pressure.
Disadvantages: Difficult to build, height of cable ties is critical to seal quality because the conic shape of the rubber.
Status: retired. |
|
|
|

|
| View of parts |
3. |
Garden hose quick release |
| |
Advantages: Small diameter nozzle.
Disadvantages: Lose of the adapter disables the launcher.
Status: semi-retired, replaced by the "Spout" Launcher for small diameter nozzle. |
|
|
|

|
| View of parts |
4. |
Cork Launcher with Clark cable tie release |
| |
Original Idea: Rafi Faibish
Corks are good material for launchers since they do not become slippery with water and provide enough friction to get close to 2 atm (~30 psi) before launch. The body is an L fitting for gas pipes with a 5/8" tube. Drilling a cork is surprisingly easy and can be done by hand with a drill bit, no need for a drill stand. To center the hole insert a nail in the center of the cork prior to drilling. The Clark cable tie release was added later for higher pressure launches. This experimental launcher is the base for all the cork launchers shown on this site.
Advantages: Easy to build.
Disadvantages: Cannot hold high pressure.
Status: retired. |
|
|
|

|
| General view |
|
| Cork close up |
5. |
O-ring with Clark cable tie release |
| |
The body is made of parts originally used for irrigation systems, the green sleeve holding
the o-ring in place is from a tube originally used to lead electrical wires. The right launcher is the prototype and the left is the final design.
Advantages: Easy to build, holds high pressure.
Disadvantages: still looking.
Status: active. |
|
|
|

|
| Final and prototype |
6. |
Split cap |
| |
An O-ring is placed on a plastic tube and a copper tube is going through it. The split cap
is held with the whole device and the rocket is "closed" by the split cap with the O-ring
in place. Since the cap is split it is held by an outer tube that is slid over the split
cap. After pressurization, once the outer tube is removed the split cap falls of and the
rocket is launched.
Advantages: Cool method
Disadvantages: The parts of the split cap fly far and are hard to find.
Status: experimental. |
|
|
|

|
| View of parts |
|
|